Sunday, August 28, 2011

Shapeshifter Shrug - Part 1

I have been dying (no pun intended) to knit this shrug.  It is called the Shapeshifter Shrug from a knit book called Vampire Knits.


I bought this book for myself for Christmas last year and have been wanting to make almost everything in it.  The author states that it was inspired by Twilight but is not limited to Edward and Bella projects.  It goes into the history of vampires, werewolves, witches and all kinds of eerie phenomenon.  It is a great book to have in your library. 

I finally decided on the Shapeshifter Shrug which is a convertible garment that has buttonholes on one edge and buttons on the other to allow you to "shift" it into other forms such as a shrug, shawl, scarf or whatever.
It was originally knit in wool, but I decided to keep it cheaper and a bit less itchy by choosing Wool-Ease from Lion Brand.  It is an acrylic/wool blend; worsted weight in heather forest green.  I had coupons fowr Joann's so this so far has totaled about $12 for 5 balls of yarn (yippee)!

I'm knitting this on size 8 bamboo circular needles.  There are a ton of sts, so circulars are the most comfortable way to knit this garment, in my opinion.  I have to keep track of the pattern row and the cumulative row because I have to place a buttonhole every so often, so I am tracking this with two separate row counters.  High maintenance, for sure!


Another challenge with this is that it has a cabled look to it but they are achieved by yarn overs (yo) and decreases.  My history with yo has been a bit rocky (Aloha Maddie Baby Blanket) so I was being cautious this time by making flash cards of each row so my eyes only see that row.


Don't mind the stars over the cards; there is a copyright on the pattern so I cannot give it out.  I just wanted to illustrate my flashcards and how they are very helpful.

So here is the start of the pattern and a few buttonholes.


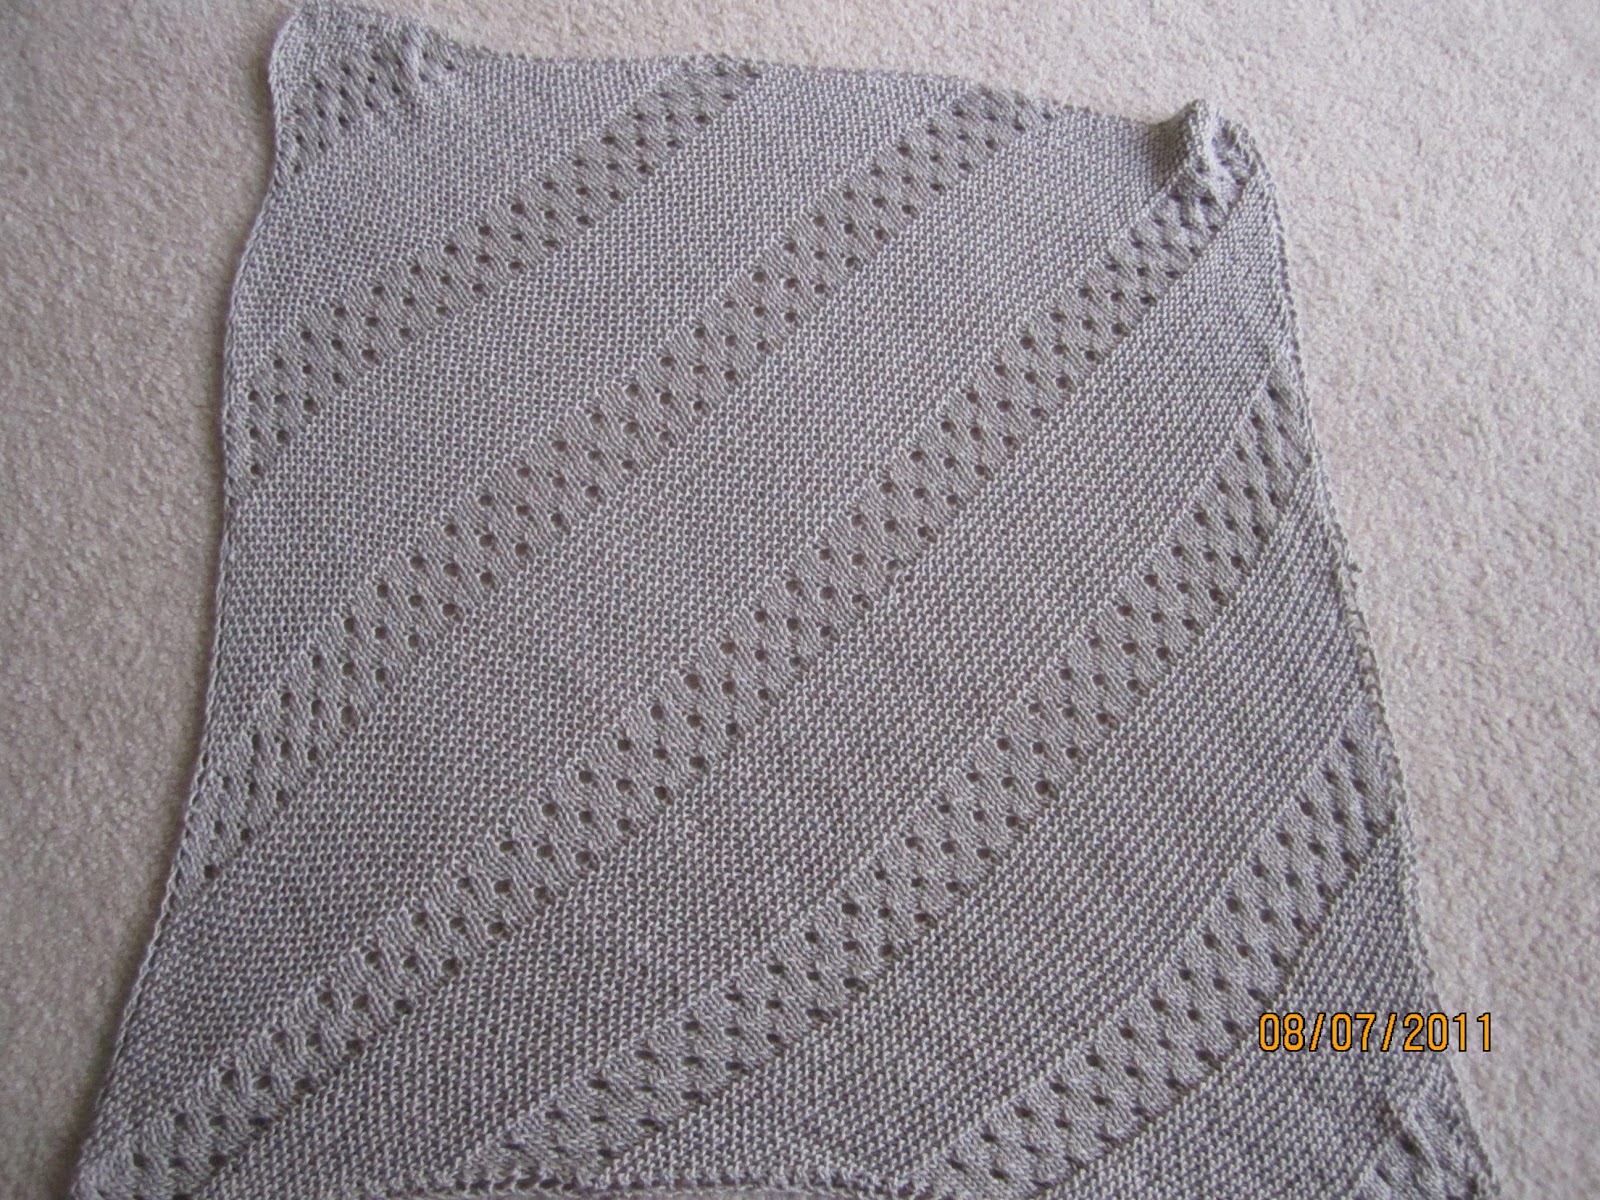
I just love the look of this pattern.  I have to use markers in this pattern so that I only perform the pattern repeat stitch on the stitches that are between the markers and work a garter st at the edges.  The marker set I'm using were made by my friend Crystal as a Christmas present.  They are polymer clay snowmen on jumprings with a post down the center.  How creative, huh?  I love them too.

As of today, I have completed up to the end of the pattern repeat and now I will do just stockinette st for awhile.  Here is another close-up of how this cool pattern has worked up:


Once I block this, the cross-over area will not be puffy or raised but will lay flat.  I am working everyday on this because I'm obsessed with it right now, so I hope to be done with it in a snap.

Stayed tuned!


Saturday, August 20, 2011

Suede Beanie

I started and finished this project in 3 days.  Yes, 3 days!!  Let me start off by saying that I don't consider myself a crocheter and I feel when I start a crochet project, I have to relearn all the stitches again.  Thank you to my sister, Kathy, who had to talk me through the basics (again) so I could start.

My inspiration for this was a conversation about back-to-school shopping.  Vince's youngest daughter is starting high school and she had her shopping list written out with lots of detail.  On the list was accessories, which included a hat.  I asked, "What kind of hat?"  I mean, who knows these days?  She may have wanted a fedora or a ten-gallon.  She wanted a beanie-like hat, but not really a beanie.  I then asked, "A yamaka?"  Her reply was, "Yea kind of."  Okay, I had something to go on.

I went through my knit magazines and found one from a Berroco booklet called #225 - Scarves and More.  The pattern was called Kathe.  It was a crochet pattern and the yarn was Suede by Berroco.  The color I chose was a pink shade they call Annie Oakley (100% nylon) because I already had it in my yarn stash.  Yeah for using up stash yarn! 


So, I start and right away something didn't seem right.  They have you chain 5, connect to make a ring, then do 6 double crochets (dc) in the ring.  Increase in the next round, etc.  I found that the hat was already curling in on the third row.  I did several rounds according to the pattern (and, yes, I even did a gauge swatch) and it was looking like the smallest hat in the word.  I ripped it out and moved up from a G hook to an H hook and redid it.  Still too small.  Hmmmm, what is going on here?

After a day of trial and error I decided that I'm going to alter the pattern to what makes sense to me.  Now, where do I get off altering crochet patterns when I can barely chain, is beyond me, but I was willing to try.  I did the ring again on the H hook and made 9 dc in the ring.  I increased like the pattern said to do for the first 5 rounds where the pattern was pretty basic: ch-1, dc, ch-1 in the spaces.


I'll admit, maybe 9 dc in the ring was too much because this was looking really flat and too loose on my head even though at this stage, I had the required amount of dc, ch-1 spaces as the pattern indicated.  I decided to do a few rounds without increasing.  Still too loose.  Okay, my next round I just did dc in the spaces and left out the ch-1: a little better.  I was feeling some confidence starting to rise up in me at this point.

My 12th round I did dc in the each space four times then skipped a space, then dc four times, etc.  I was hoping this would tighten it up a bit and it did.  Whoo-hoo, my plan is working!

I finished as how the pattern read with 3 rounds of single crochet (sc) in the back loop but moved up one more hook size to an I (it was really tight with the sc rounds on the H hook).  Okay, I'm admitting that I have no clue where the back loop was, but I worked into something in the back around each time.


Ta-da!  I say, not bad for my first, "let's wing it" project.  Crochet is so much faster and a bit more forgiving than knitting it.  I still feel more confident when I knit than crochet, but I do enjoy doing a crochet item every once in awhile.  


I am imagining this is how the daughter will wear it.


She is actually going to high school in another state, so this was her last week in Florida.  I finished in time to give this to her before she left for the airport.  Good luck, G!  I'll see you at Christmas!

Sunday, August 14, 2011

Sweatshirt Bag

I bought this sweatshirt at a yard sale awhile ago.  I bought it with the intention of cutting it up, but was not sure how just yet.  Since I just finished the Aloha Maddie Baby Blanket, I found myself with nothing to do.  :-)

I am figuring out what to do about my Glace Shrug, so not to worry.  I do not think I have enough yarn to complete it, so I am trying a mixed media project with it.  It'll be ready soon, promise!

So, back to the project at hand.  I figured I needed a new project bag [insert hearty laugh here] so I wanted to do that with the material.  I've worked with sweatshirt material before, so a couple of traits of this material are that it won't fray when you cut it and the cut edges will curl.  That can be a good thing or a bad thing.  Knowing these things, I am going to play off them.

First, I cut the sleeves and hood off and trimmed it so it's boxy.


Then I placed the right-sides together and pinned them to sew the side seams.


I started the stitching about a half inch from the top and bottom.  This will help the material curl when washed.


I turned it right-side out and sewed the bottom ribbed edge together.  I then took one of the sleeves and cut it up the seam to "butterfly" it.  I trimmed the seam stitching off so that the material could lay flat.  I cut the sleeve into 2" strips.


I evened out the ends so they were straight with a rotary cutter.  I did not worry that they were not the same length.  I then sewed three strips to each other, end-to-end, twice.  These will be used as the handles.


I then folded each one the long way, wrong-sides together, and sewed each handle strip.


I positioned the handles on the inside of the top edge of the bag and arranged them so that they were long enough to be shoulder straps.  I did some measuring to ensure that there was a bit of a margin at the top edge to allow for the curling.  I sewed them in place with gray thread in a box with an X in the middle.  During this, I was coming dangerously close to running out of thread.


The bobbin had about a few inches on it so I had to wind some more of this onto the bobbin.  I was keeping my fingers crossed during this period!


Hold your breath...yes, I was able to finish with enough thread.  Phew!  (I even attached a few buttons on a pair a pants that had recently fell off with the remaining thread).  Here is an inside view of the bag with all the handles attached.


Once this was done, I was pretty much done with the bag!  I threw it in the wash so that you could see the rolling edge and broken-in look it had.  I could even use this bag as a hand warmer using the kangaroo pouch!


I pulled a ball of yarn out of the closet and gave it a new home.  I think of each project of yarn and a project bag as a hermit crab.  Each set of yarn is like the crab and the bag is it's shell.


Awe, look at how cute this hermit crab is!  The shell - fabulous!

Sunday, August 7, 2011

Aloha Maddie Baby Blanket

I'm so happy to write about my latest finished knitted project.  This is the Aloha Maddie baby blanket.  I started knitting this blanket while on vacation.  The last day I was in Hawaii, we were just relaxing by the water and decided I had enough full-on blazing sun; I chose to start a knitted gift.

I moved under the tree after this pic was taken!

My friend from Mass just had a baby.  She named her Madeline "Maddie" Rae and I wanted to make something special for her.  Maddie's crib colors had gray in it, so I chose to knit a baby blanket in a light gray-silver color.  The yarn I used is called Spa by Naturally Caron in Misty Taupe (75% Acrylic, 25% Bamboo).  Baby blankets need to be machine washable, so I chose an acrylic blend.  The bamboo gives it such a soft silky feel.

A "green" yarn - Bamboo blend

The blanket pattern came from Lion Brand, called "Treasured Heirloom Baby Blanket," but since I started it in Hawaii, I like calling it the Aloha Maddie baby blanket.

The construction of this blanket sounded so easy: knit, purl, and yarn overs.  I used size 8 bamboo circular knitting needles.  I knew that I was going to have lots of stitches on the needles, so choosing circulars is the best way to handle a large number of stitches.  I started at a corner, casting-on two stitches.  From there I increased one stitch at the beginning of each row until I had 148 stitches.  Then I decreased one stitch at the beginning of each row until there were only two left.  Then I casted-off.

Now, doesn't that sound so simple? Well, it was a simple pattern, but I can always find a way to make an easy pattern difficult.  The blanket is essentially garter stitch and knit eyelets made by yarn overs.  First, the garter stitch:

Garter Stitch

A garter stitch is when you knit every row.  It produces the above look.  This is also what it looks like on the back, or "wrong side" of stockinette stitch (knit is the right side and purl is the wrong side).

Then after several rows of garter, you change to stockinette stitch.  That is when you knit one row, then purl the next row, alternating knit and purl rows.

Stockinette stitch with yarn overs (eyelets)

The rows that made the eyelets were the rows that I made the most mistakes.  Once I figured it out the repeat across the row and how to line up the next eyelet so it lines up in between the previous row's eyelets, it became much easier.  I finally figured it out without looking at the pattern when I was half-way through.  Better late than never!

Garter and Stockinette Stitch

Here is the blanket midway done:

Midway - Working on the Diagonal

When the blanket was on it's last garter stitch stripe, I had more than two stitches, so I had to improvise and end it another way than how the pattern was written.  It worked, whatever!

Aloha Maddie Complete!

The blanket stretches, so the pic shows the stripes a bit inconsistent with their width, but it can be stretched to any width.

Big enough to warm my legs!

Some blankets are adult size, and some blankets are preemie size.  This one is in between.  It was enough to cover my legs as a lap blanket.  Perfect, in my opinion.  I hope baby Maddie likes it!

PS
Check out Baby Maddie in Mid-Week Mini - Baby Maddie!