Sunday, February 26, 2012

Fix It: Silk Tissue Tee

I bought this fine, gauzy, long-sleeved tissue tee at Goodwill a month or two ago and put it aside for a rainy day.  Well, it wasn't raining this weekend, but I was at a loss for what to do.  I went through my To-Do pile and saw it and thought, "I forgot I bought this.  This should be an easy fix."


The reason why I put this aside was because the sleeves were too long.  I'm petite and the sleeves are always long on me.  The challenge with these were that the edge (cuff) of the them were slightly rolled, having no hem.  The sleeves matched the bottom edge, so I wanted to keep the roll.  It makes the tee have a feminine look.  

This tee reminded me of the Elizabethan period clothing, with the bell sleeves.  This does not have bell sleeves, but they have a nice drape that looks bell-like.


I surfed the web to see if someone else had already been down this road before and, unfortunately, since this was not a real-knitted item, my search came up short.  One clever way I saw to shorten sleeves was by unstitching the shoulder/arm seam, cutting at the shoulder and then reattach.  Very clever!  But, again, this would not work for me because this tee had raglan sleeves, not a sleeve that was simply sewed in.   This meant I had to come up with something on my own.  

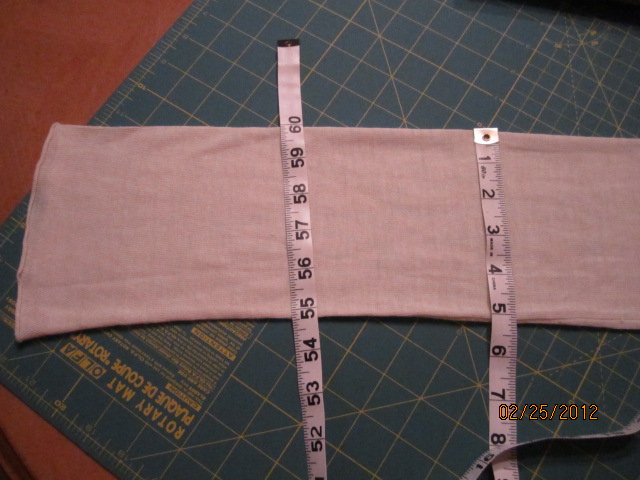
The measurements above show that the sleeve has the same width from the elbow to the cuff, which will make hemming them easier.  My thought on altering the sleeves were to cut a portion from this section out and reattaching the cuff part to the arm.


To do this I figured out how much I needed to shorten them, less the seam allowance, then made pink chalk marks where I wanted to cut out the section.  Measure twice, cut once.  


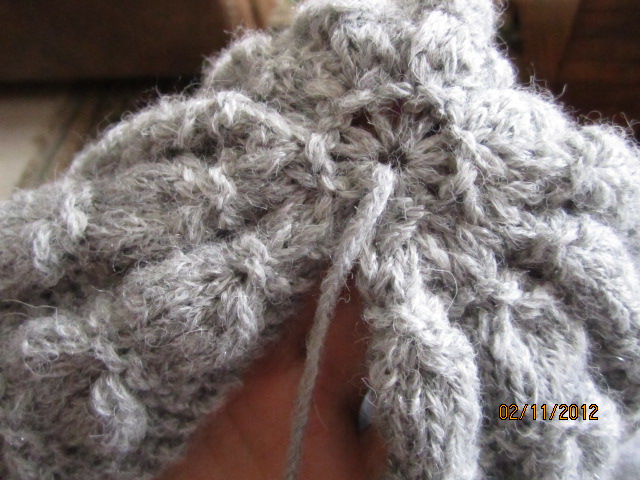
The cut is shown above and I am praying that this idea does not ruin this tee.  I then took the cuff portion, turned it inside out and fitted it over the outside of the cut sleeve edge, matching raw cuts, right-sides together.  Pinned.


I got matching off-white thread, chose a ball-point needle, and sewed a seam.  I then pressed the seam to one side (sort of hard, because the material is silk and you cannot have the iron on high heat, so sometimes ironing silk is a waste of time).


Here it is, done.  The sleeves are the proper length now and the arm seam looks a bit funny, but not too bad.  I figured that it would match with the line seam that is around the empire waist.  The Elizabethan clothes I was talking about earlier, was where I got my inspiration.


Vince did not like it, but I don't think it looks too bad.  It's better than never wearing it, right?  It is very comfortable, so I will make good use of it.

Let's weight in: Was this a nice look, or did I ruin it?  (Use the comments to let me know your opinion).

P.S.
I wore my Tee to work the next day (Monday) and I got 3 compliments from people who do not read the blog and one from one that does and wanted to see the seam close-up.  The summary: Everyone liked it and thought that the seam looked like it belonged there.

Mission Accomplished!
 

Sunday, February 19, 2012

5K Shrug

This weekend I ran my first official 5K in Fishhawk Ranch in Lithia, FL (where I live).  It was called the 15th Annual Fishhawk Ranch Road Race.  There were just under 800 total runners either participating in the 5K or the 10K. 


When we woke up on Saturday morning, it was overcast, in the high 60's and a bit drizzily.  Normally, that would've been considered a dull day in Florida, but for a day that you will be running, it was a perfect day.

On a day like Saturday, you arrive at the race with a few layers of clothing on, like wind pants and/or long sleeve shirt or a fleece, but then you get to running and you definitely don't want to be wearing all those layers.  It's a pain to have to keep running back to your car (esp if the parking is not near where the race starts) or tying a bulky shirt to your waist.

That's where I got the idea of a 5K shrug.  Basically it is a long sleeved t-shirt cut up so you are wearing only the sleeves, like a regular shrug that you wear with tanks or dresses.  This means a lot less bulk when you are running.  Here's what I did:


Take an old long sleeved t-shirt or athletic nylon/quick-dry/whatever shirt you have.  This one came from my I-want-to-donate-but-I-might-wear-it-one-day pile.  Then cut the bottom straight off just below the armpits.


Cut it up the middle.  (Or not, it won't really be a shrug, but it can be your 5K I Love the 80's Half Shirt)


I then matched up the two fronts, wrong-sides together.


I took chalk and drew where I wanted to cut so that it is rounded in the front.


I did the same for the neck area.


Here we are...a 5K shrug.  This t-shirt was a loose one, so you can choose to add a button or a pin to the front to keep it closed, in case it is windy or you might actually want to run with it on.


It's now tied around my waist with very little bulk.  Since it's all cut up, you may even be able to place the shrug somewhere in the race start area or by a bush or something until the race is done.  The likelihood of a cut up t-shirt still being on the ground when you get back is pretty good.  I would advise doing this to a shirt that you won't be sad if someone else thought your idea was fabulous and really did take it (junk pile/Goodwill/yard sale/gift from old boyfriend that you forgot to burn).

Back to the race.  This was a chip-timed race, which is nice, but they still took the guntime as your official time, so I don't really see the point of the chip.  I also timed it with my heart rate monitor watch.


I did a thorough job of stretching out before the race.  Vince and I had been running at least 3 times a week for months now, and we recently added a boot camp style training workout 2 times a week (so awesome, its right after work and work pays for it - how can you say no?).  The boot camp has improved my running measurably.  I'm also sticking to the My Fitness Pal calorie counter and a healthy diet.  That has to be helping too.

My public goal was to run the 5K in under 33 minutes.  That is about an 11 minute mile.  During our practice runs, I would be able to run 2 miles at a 10 min/mile pace, then the last mile it would drop down to 13 minutes.  It just took practice and pushing to get a more steady pace.

My personal, more private goal was to run the 5K in under 30 minutes (less than 10 min/mile pace).  I have not run that distance in that amount of time since running a weekly 5K running series in Mass in 2005.  That's a long time ago!!

I was able to run the 5K in 30:12 (30 minutes and 12 seconds)!  I'm so excited.  My watch time was actually 29:32, but I will just stick with the official guntime of 30:12.  So, I can positively state that I beat my goal.  Whoo-hoo!


A perk of running the race, you get free stuff at the end.  They had hot dogs, bagels, pumpernickel rolls, chic-fil-a breakfast biscuit sandwiches, Gatorade, water, energy bars, granola bars, water bottles, towels, Beef O'Brady's refillable sippy cups and best of all...booze.  They had hard iced tea (Mike's Lite) and Sam Adam's beer.

Even though I did not win a medal for my running efforts (I came in 202nd overall out of 519 runners, 65th out of 285 women and lastly, 9th out of 40 women in my age group of 35-40 yo), I had a great time!

Sunday, February 12, 2012

Viveca Beret

This is my first finished knitted project of the year!  This beret pattern came from Berroco and best of all, it was a free pattern (click here for the pattern).  The pattern name is Viveca and it was knitted with Berroco Flicker in Siegfried, which is a light heathered gray with a thread of silver running through it.

I used about a hank and a half

The stats on this yarn are 87% baby alpaca, 8% acrylic and 5% other fibers and comes in 50g hanks.  It is a dream to work with!  I love it so much that I want my whole wardrobe made out of this stuff.  It is super soft and just a pleasure to touch.  I bought it when I was visiting the family at Christmas time at a yarn shop called The Wool Patch in Middleboro, MA.  The owner was so nice that when I called to ask if they were open on Mondays, she said no but if I could tell her when we were going to come, she would open the shop for my mom, sister and I.  What a lovely lady!

The yarn is a unique weave in that instead of it being wound, it looks braided.  Here is a close-up:

Braided rather than wound - see the silver thread?

The beret is knit with a bubbly repeat pattern.  I knitted a gauge swatch to determine my needle size, like a good little knitter.

Bubbles (what else would you call them?)

It took about a month to knit, I just stalled on the seaming, but it was actually done in January.  I carpool to work with my honey, so on the way home I would break out the beret and knit away.  It was a fairly easy pattern to knit, but I certainly did have my mess-up moments.  Just be sure to count after every odd row to ensure you have the proper stitches (due to the yo's).  It is well worth the time to count the stitches.

Where I stalled out

This beret was knit flat, from the bottom rib to the top.  I used a size 8 bamboo circular needle set.  Then you cut your yarn, leaving a long tail.  Thread the yarn onto a blunt-tip needle and weave it through the live stitches that are left on the needle and pull tight.

Crown of the beret

All that was left was seaming the sides together and viola!  A beret!

Roo & I trying to stay warm

From the back, so you can see the pattern:

Tres chic

I like it.  At first I was thinking that it was too big, but a beret is supposed to be flounced to one side.  The gray color gives it a vintage feel.

I'm going to make this my new FB pic

I don't normally wear hats but I will try and make an effort to wear this.  I worked hard on it, so I will show it off while the weather is still perfect for it.

Passez une bonne semaine!

Sunday, February 5, 2012

Fix It - Crystal's Cinchy Shirt

I have a Guest Blogger today!  My friend Crystal has written one already for me (Glitter Candle) back in 2010 and she is ready to share again.

~~~~~~~~~~~~~~~~~~~~~~~~~~~~~~

I have been inspired by Needles, Hooks & Books, so I though another guest blog was in order.  It was a snowy winter day in New England and all my boys were outside playing.

Blissful Peace Inside for Mommy!

A couple of months ago I was out shopping trying to spruce up my wardrobe a bit.  I found this shirt that I mostly liked but the fit was a little off.  It was on the sale rack for $2! 

Front = Ok

Normally, I would have put it back but I thought of all the advice I read here and figured, "Hey, why not give it a shot?"  The worst that would happen is that I would be out of a couple of bucks.

Back = Hmmm, How To Fix?

I liked that the shirt could be worn with the sleeves down or buttoned up along the arm (shown in above pic).  I decided to add some ribbons to the back to try to pull it in a bit.  I poured through a rat's nest of ribbons in a craft drawer that I've scrapped and saved for such an occasion.

No Rats - Just Ribbons

Let me disclose that I am not the sewing goddess that your usual host it.  In fact, I am a novice at best.  So, my first dilemma was where to attach the ribbons (side seam or pleat).  The second choice was to rip open a bit of seam, feed the ribbon in a sew it closed (the hard way) or just place the ribbon and sew it down so it folds over (the easy way).

Planning With a Little Pink Tomato

My darling husband set me up a lovely space in the basement for my sewing.  I think on this particular day, it must've been about 20 degrees down there.  Is it a wonder I am not too motivated to do more sewing?  But I sucked it up, found some slippers and went to my dungeon.  I felt a little bit like Harry Potter under the stairs.

No One Will Find Me Here

At this point, I realized that I needed some help.  I couldn't see where the ribbons should be placed and although I am a flexible individual, I sure couldn't manage pinning behind my back.  The boys were already in from snow play and once the babies were napping, I dared ask my darling hubby for help.  With absolutely no grumbling at all...ah hem...he agreed to help me.

Pinned & Ready for Business

For some reason, I always end up with messy stitches.  So, I broke out my owner's manual and found all the appropriate settings.  The shirt was fairly thin and the ribbon was very fine.  I did have to rip out my disaster once before getting the tension right, but after that, I just sewed back and forth a bunch of times, making sure to go over the edge of the ribbon a small bit on each side.

Don't Scoff At My Stitches, Please!

As you can see in the above pic, the ends of the ribbon were fraying.  I used the ole' burn-the-edges trick that was previously described in the Lace-up Fingerless Gloves post, and that was pretty much it.  I tied a pretty bow to cinch the back and modeled it for my ever-so-helpful hubby.  Truth be told, he hated the shirt.  Fortunately, I liked it and think that it will look cute with a pair of gray leggings and some gray pom-pom Uggs that I have.

Done!

Admittedly, the front of the shirt was a bit poufy/baggy.  It almost looked like a maternity shirt.  I went online to investigate the brand Lilly Lou, but it did not appear to be maternity.  I read the label a little closer and I noticed that the style number was M1338.  I found the "M" to be a little suspicious, but I will stand by my craft and my decision to like and wear this shirt.

While I was banished to the basement, I attacked my sewing pile: two cashmere sweaters, a tissue t-shirt (my favorite), and a turtleneck.  They all had minor boo-boos and have been sitting in a heap on my closet floor for about a year.  Caught up in a whirlwind of thread and needles, I made the minor repair (all holes in seams) and beefed up my wardrobe a bit more...for free!

Heap of "New" Clothes

~~~~~~~~~~~~~~~~~~~~~~~~~~~~~~

Thanks, Crystal!  I'm always happy to know that my readers are trying some of their own Fit It's.  I would love to see the leggings and Ugg boots together with this shirt.  I've recently bought a few pairs of leggings for weekend wear.  They are so comfy.

Working Alone Tip:  Usually when I am fixing an article of clothing, I have to put it on and take it off a half a dozen times until the placement is just right. I often get pricked with pins and work up a sweat doing this, but I hate having the limited factor of "no one to help me."  But, if your friend/hubby/boyfriend/whatever is willing to assist, then save yourself the contortionist's act and get them pinning and snipping!

What do you have in your closet that could use a good Fix It?  Go on, have fun with it!