 |
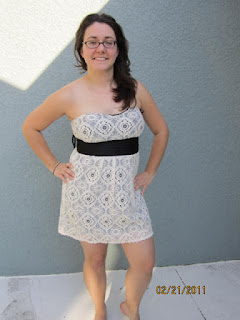
| Lace Dress - Before |
| This fray saved me $3! |
I tucked the fray strands inside the lace and arranged it so it lined-up with the rest of the lace seam. I took a needle and thread and sewed along the lace seam where it was once attached.
| Good, old-fashioned darning! |
I knotted the thread so it was under the lace, to keep it hidden.
| Seamless - Can't even tell! |
Then I bought a length of satin at Jo-Ann's to add my ruffle edge. I measured the circumference of the liner edge and then multiplied it by 3. Creating ruffles takes alot of fabric, so the equation could be anywhere from 2.5 times to 3 times the length of the garment the ruffle will go on. Based on that I had to cut quite a few strips of satin.
| Satin ready for cutting |
I wanted to have the ruffle folded at the bottom edge, rather than hemming the edge. This meant that my cut strips had to be about 6 inches wide, so I could fold it in half. I bought enough fabric, so I could cut plenty in case I made a mistake.
| Cut strips (these are folded here to make cutting easier) |
Once I had my strips cut, I went over to the sewing machine and sewed each strip, end to end. This is a technique I learned in strip quilting. This created a very long strip. Then I ironed the seams open and folded wrong-sides together in half, matching up edges.
| Use low setting on iron and keep going over the fold. |
I then lifted the lace part and started pinning the satin to the hem of the liner. I used my mini measuring tool to create my ruffle evenly all the way around the dress.
| I left the fray, but I would have serged it if I owned one. |
The liner was pretty lightweight, so I pinned the ruffle so it lined-up with the liner hem. The weight of the satin flipped the ruffle so if was turned down. It worked out, that is all that mattered to me. I'm sure there could have been a more proper way to do this, but I couldn't think of it at the time.
Once I made it all the way around, I worked it so the end of the ruffle was tucked into the beginning. I then sewed that hole closed. I then sewed the pinned ruffle. I had my fingers crossed that it would work out to how I envisioned it....
| Viola! Me at the wedding! |
It was perfect weather for the wedding. The ruffle was just as I had hoped it would turn out. It added about 1.5 inches to the length. Still a bit short but I loved it anyway! I also bought my cameo and pearl necklace from Forever 21. It is a great place for accessories.
The newlyweds had a table of various succulent plants as the wedding favors. The table was so beautifully arranged.
| I loved the bell jars! |
The wedding was outside and the reception was in a converted stable. Very well done along with the sangria flowing like water! Let's just say, the sangria was very tasty! Did I ever mention that I love sangria? Bottoms-up!


3 comments:
Cute dress to begin with but I love the extra touch you added to it! Sangria?! Yum!
I really love the bottom, it looks so natural! Good repair and you look great in that dress!
Thank you! I really like this dress, very old-timey feeling.
Post a Comment