Sunday, December 23, 2012

Ben Ice Cream Cozy

Yup, that's right:  I knitted an ice cream cozy.  Wait until you see it!  

Let me start from the beginning.  Last year, I got a Knitting Desk Calendar (2011) and in there was a pattern for ice cream cozies.  They fit a pint of Ben & Jerry's ice cream, hugging the condensation, insulating, protecting your hands from the cold when you eat from the carton.  How awesome is that?!?!

Pic from the Knitting Desk Calendar

I knew I wanted to knit it.  At the time I was dieting and the thought of eating right out of a pint of Ben & Jerry's ice cream was undo-able, so I did not knit one right away (I was not going to use it while on the diet).  So, when I started thinking of who I was going to knit gifts for this Christmas, I thought, "Who can I knit the ice cream cozy for?  Someone must eat Ben & Jerry's ice cream!"  That's when I realized that I do, in fact, have a friend who eats this ice cream.  She even goes online to find what store is selling the exact flavor she is looking for.  This was a no-brainer.

Perfect!

Well, Christmas was sneaking up on me and I had not started it as of the beginning of December.  Nothing like waiting until the last minute.  I was on a roll and then was out with my knitting injury (see the Origami Sweater - Part 2 post).  I still have it and when I think about knitting, my elbow and arm will suddenly hurt.  Ridiculous!

I started it on December 13th, which was a Thursday and was done by Sunday.  So, not too bad.  Here are the details:

 
I used some stash yarn: Bernat Softee Baby (100% Acrylic), in Soft Peach (looks pink in real life) and Premier Yarn Everyday Soft Worsted (100% Acrylic) in Baby Yellow.  I have used the Bernat Softee Baby in a couple projects: I Heart Hats and Vivecita Beret.  The Premier Yarn, I used in my Cookie Swap 2012, Rapunzel braid.

The Softee Baby is a DK weight and the Premier Yarn is a worsted weight.  What does that mean?  That means that the DK is a thinner yarn than the worsted and I had to use 2 strands of the DK to 1 strand of the worsted.  That brought a challenge:  I had only one skein of yarn of each, so I had to ball up the DK yarn (the peach/pink) into 2 balls.

This gave me an excuse to use my ball winder.  I love that thing!


It was kind of a pain to wind it from a skein, but after a tangle or two, I had 2 balls of yarn to work with:


This way I can hold the 2 strands together without a huge mess on my hands by trying to use both ends of the skein (it would not have worked, I tried that way before I balled it up.  Trust me!)

So, this is knitted on double pointed needles (dpn).  The pattern calls for a size 10, but I knit loose, so I went down a needle size to a size 9.  I casted-on and was off.


It's always confusing to me when I cast-on to dpn's.  I always think that I am doing it wrong, but it works out somehow.  So, I have started it, as you see above.


This 2 color knitting is called stranding or simply colorwork.  This is where you carry the unused color behind in the work.  I'll show you in a pic, down below.  I worked in a ribbing pattern, so the cozy can be stretchy.  I worked from the top-down.


Here is a close-up of the rib pattern, where the color changes for the knit and the purl stitch.


This is what the stranding looks like.  This is a pic of the inside of the cozy.  This extra "layer" of yarn behind the stitches helps insulate it, so your hand will not get cold from holding it.


Unfortunately, I completed it and then realized that it was a bit too long and looked like a sock, not a cozy.  I had to rip out about 4 rounds of the colorwork.  Oh well, I fixed it in no time.


That was an awful lot of yarn for 4 rounds.  I put the dpn's back into the live stitches and finished it off again.


Vince and I took one for the team...the Anything-for-the-Christmas-Gifts Team.  We bought a pint of Phish Food (love that one, and it is Gluten Free) and tried the cozy on it.  It fit!!!!  So, we ate the ice cream while watching a DVR'd episode of Dancing with the Stars.  I washed out the carton and gave the gift, with the cozy on the empty Ben & Jerry's pint.  I put a gift card for the local supermarket in it, so she can buy a pint for her to try the cozy out on.  I'm not that cruel, that I would completely tease her with no ice cream!

There is also a Jerry ice cream cozy that I will knit at some point.  I gave her an IOU for that one.  I do not have any more stash yarn that fits the bill for this project, so I will buy some the next time I'm out at Joann's.

What do you think?  Is this a fab gift or what?!?

Sunday, December 16, 2012

Sporty Wristlets

This is a gift that I had on my To-Do list.  It is for a friend's daughter, who I think would look so perfect in!  The pattern came from the 2012 Holiday issue of Knit Simple magazine.  They named them Simple Mitts, which they are, but I'm calling them Sporty Wristlets.


I'm using Beehive Baby Sport from Patons (70% Acrylic/30% Nylon).  It is sport weight, which is often used in baby items.  That is why I thought it would be the perfect yarn to make this pattern with.  Very soft.


I knitted these with size 4 circulars so that I could use the Magic Loop method.  I knitted the main arm, then left an opening for the thumb and finished at the knuckle.  I did two exactly the same.


At this point they are almost done.  I have to actually add a thumb snuggie on each one.


I picked up 18 sts around the thumb opening.  Then I knitted in the round again to make the thumb.  I finished it so it would look like the edge where the knuckles are.


Just need to bind off and weave in the ends.


They are cozy, as you can see, I'm modeling them while I hold my cat.  Very nice!


Another check mark on the Christmas Done List! 

Sunday, December 9, 2012

Coconut Shrimp

I love hot cooked shrimp.  Cold cocktail shrimp, not so much.  Since I started eating gluten-free (GF), lots of batters are on my no-no list.  This means that my shrimp has been either grilled, sauted or baked, but with only some seasoning or marinated in a GF sauce.  That's not a bad thing, but battered shrimp, fried is so good and I was missing it.

Recently, I searched for a Coconut Shrimp recipe that was GF and sort of healthy.  I found one. Googling is a great thing!  I found one that is baked, not fried and I substituted with some GF breading mix and it came out delicious!  I would love to share it with you so here are the details:


This recipe can be found at About.com.  It is under the Thai food category.

Easy Baked Coconut Shrimp
Yields: 18-24 Coconut Shrimps
  • 18-24 medium to large shrimp, butterflied (may leave tails on)
    • I did not butterfly them and left the tails on; they still came out great
  • 1/2 cup shredded coconut (kind used for baking)
  • 2-3 eggs
Coating Mix
  • 1/2 cup breadcrumbs (dried, refined crumbs, such as Panko)
    • Substituted with GF Panko Breadcrumbs.  Can make own by processing GF crackers.
  • 1/2 tsp salt
  • 1 tsp onion powder
  • 1 tsp garlic salt
  • 1/2 tsp cayenne pepper or dried crushed chili
  • 1 tsp sugar
  • pinch white pepper
    • I used regular black pepper, no difference
  1. Preheat oven to 425 degrees F.  Cover a cookie sheet with parchmanet paper or spray with non-stick cooking oil.
  2. Stir the Coating Mixers in a bowl and set aside.
  3. Get 2 more bowls:  the first of these bowls, beat 2 eggs and in the second bowl, place the shredded coconut.  Keep the ingredients out, you may need to prepare more in the bowls as you go.  
    1. I set-up an assembly line of the bowls to make it easier.
  4. Grab a shrimp and dip it in the egg mix, then in the Panko breadcrumbs, coating the shrimp.  Then dip the same shrimp in the egg mixture again and then roll in the coconut.  Place on baking sheet.
  5. Repeat the dipping for each shrimp.  Your fingers will get caked with the breadcrumbs and coconut, but keep going, putting a light coat on each shrimp.
  6. Bake on the middle rack in the oven until they are lightly toasted.  Total time should be about 15 minutes, turning half-way through.
  7. Can be served with Thai sweet chili sauce.

In the above pic, are the bowls set-up and the ingredients still out.  I had to keep adding more to each bowl.


I used frozen shrimp and I did not butterfly them.


I coated each shrimp, which was a pain in the butt, but it was so worth it.


The shrimp, uncooked, ready to go on the backing sheet.  The parchment paper worked like a charm.  No mess to clean-up.  This was an easy recipe, healthier than fried coconut shrimp from your local Chinese or Thai restaurant.

Go ahead and try it and let me know!!

Sunday, December 2, 2012

Origami Sweater - Part 2

I have been knitting like crazy all throughout November, and I'm still not done with my Origami Sweater.  I have been knitting the lace stripe then knitting the seed stitch like a robot.  That seed stitch is enough to drive anyone mad!

I started the Origami Sweater in the middle of October; the first post is here:
Now, I can positively say that I can see the light at the end of the tunnel.  Like I said, I'm still not done, but it's close.  I brought it with me when I visited Mass over Thanksgiving and got a good portion done.

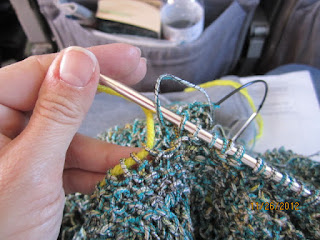
I knitted the rest of the body, then left that on those needles.  I took a second set of longer size 7 circs and did the Magic Loop method to knit the sleeves in the round, rather than using double pointed needles.  My double points were metal and this yarn is like string, so it kept slipping off of them.  I knitted both sleeves and put a contrasting yellow yarn on the live loops to hold them until I was ready to attach them to the body.

Once I was ready with that I would knit a bit from the body, then knit from the yellow holding yarn from the sleeve, knit more body, then attach the second sleeve in the same manner.  It was a bit weird knitting from a piece of yarn, but it worked.


That yellow yarn in the pic is my left hand "needle".  The work on the right handed needle is the body of the sweater.

I got to attach the sleeves while I was on the plane.  I read a bit, then wanted to attach the sleeves before I forgot what I was supposed to do.  Then I went back to reading.


Can you believe that it is starting to look like a real sweater!  Although, it does look a bit shrunken; I'm expecting that once complete, I will stretch it this way and that way to get the stitches settled in and it will fit fine.  Keep your fingers crossed!

One bad thing about all this knitting is that I sort of injured myself.  Yes, a knitting injury, if you will.  My sister calls it epicondylitis, which is pretty much like tennis elbow in my left forearm.  When I knit, I keep my left hand and arm in a bent clenching position for long periods of time holding the left hand needle and that has made my arm very sore.


In the above pic, it is my extensor carpi radialis brevis that hurts!  When my elbow is bent for a period of time, it is very stiff when I extend it straight.  Ugh!  I do running, cross-fit, and the occasional bike ride...I don't get hurt doing any of those activities, no, I get hurt KNITTING!  Like, could it be any more ridiculous?

As a result of that, I have been slowing down on my knitting.  I'm not even done with my holiday gift knitting either.  I may have to forgo those other gifts and start mixing reading and sewing in between my knit projects.

On that note, let me put a warm compress on my arm so I may finish this sweater!

Sunday, November 25, 2012

Whitin Five Road Race

Happy Thanksgiving!

I am still up in Mass visiting my sister for Thanksgiving.  I leave on Monday.  In the meantime, we ran a road race on Thanksgiving.  My sister, Vince and I ran the 24th Annual Whitin Five Mile Road Race in Whitinsville, MA.


It was freezing, literally.  It was between 35-40 degrees out.  I had did a practice 3 mile run the Sunday before Thanksgiving and I got a serious side cramp that was painful.  I walked about a quarter mile home, then when it subsided, I jogged the rest of the way.  In sum: it was a horrible training experience.

Then my sister, Kathy and I ran a 5 mile loop in her neighborhood on Tuesday, which went very well.  I think it was because I did my stretching and deep breathing outside, in the cold, to acclimate my body and lungs.  It must've worked.

So, Thanksgiving day came and we got all suited up in some cold-weather exercise clothing and went out to the race.


My goal was to run the 5 mile race in 45 minutes or less.  Vince did it in just over 41 minutes and Kathy did it in just over 43 minutes.  I did it in just over 46 minutes.  I'm not upset about that, because it was cold and I did get a slight cramp at mile 3, but I'm not making up excuses!  I'm proud of my time.  It is just under a 9 and a half minute mile - That's better than many of my practice jogs at home!


Here is the preliminary time sheet posted after the race.  I came in at 504th place out of over 800 runners.

Once the race was run, we got some water and some coffee and was off to finish the Turkey Day lunch back at home.  It was fun, even though I complained about the cold, it was a great time!

Thank you, Kathy!!!  Love you for making me do these things!!

Sunday, November 18, 2012

Kathy's New Cardigan

During the summer, my sister Kathy came to visit and brought about 5 pullover sweaters that she wanted me to convert to cardigans.  She said she liked what I did for the Unbiased Cardi back in March.  I assume she wanted these for the upcoming fall and winter months (she lives in MA).  I also thought: It's still summer, I have plenty of time to get to them.

Well, here we are, November, and I have not worked on any of them!  Ugh, I always do this.  So, I am currently in MA now visiting the family for Thanksgiving, and I really had to get a move on with at least one of them.  Here is what I did for a v-neck green cabled pullover from Old Navy:


As you can see, she used to roll the sleeves.  I know this because there were dents at the arms, and I also tried it on and we are similar sizes, and it was too long for me.  So, you know I had to take my new skill and shorten the sleeves, like I did in Pink Cashmere


Basically, I snipped one stitch about where I wanted to add onto, and unraveled and detached the cuff of the sleeve.  I then unraveled it and with that very yarn, reknit a cuff.


Last time, I used straight needles to do this and then seamed up the arm again, this time I tried using double points so that I can knit in the round and not have to worry about seaming.  It worked great.


This is how much I shortened the sleeve.  That's a lot, huh?  I did the same to the other sleeve and then seamed up the small hole that remained from opening up the sleeve to unravel.


Alright, here comes the "cardigan" part.  Since there was a centrally placed cable, I simple cut up the middle of the cable.


Before I cut, with a sewing machine I stitched stitches on either side of where I was going to cut, just to hold the stitches in place so that they do not unravel as I'm trying to work with it later.  Then I cut.


So, it was cut all the way up.


I pinned the edges in.  I intended on sewing right down the middle of this cable half.


Next, I went out and bought toggle buttons.  This is a perfect sweater for toggle buttons! 


With the yarn that was left over from unraveling, I made loops.


I cut three strands and braided them.  I made a total of 4 loops.


I stitched the toggle buttons to one side and lined up the cables and figured out where the loops would go.  I poked through the ends of the braided loop and knotted them together on the back side.


I then trimmed the long strands.


Ladies and Gentlemen:  I am done!  Above and below is my sister modeling the new cardigan.


It fit her so well!  The length of the sleeves were just right.  She also just got her hair cut, so it was so sassy to have her new 'do with the new cardi.


I love it and she did, too!  She told me later that she wanted to ask me about all the sweaters that she left with me.  I'm sure glad that I was able to deliver at least one to her.  Although, not sure how long this one can keep her at bay from wanting the other ones.

Last thing, since I am on vacation in MA, freezing my butt off in 32-40 degree weather (FL is still in the 70's), I'm not sure if next week's blog will get written.  Just saying....

Sunday, November 11, 2012

Origami Sweater - Part 1

In my fog of knitting a few [hundred] Christmas gifts, I decided to start a project for myself.  Nothing like putting pressure on myself.  Meaning, I'm not done with my Christmas knitting yet, but I am throwing a sweater in the queue for myself...that I started already!

My local yarn shop (LYS), Brandon Yarn Boutique, was having a sale, so it was a perfect time to shop.  My intention was for myself, I won't fool anyone.  I picked a few projects that I had on my mind and went down there.  Luckily, only one panned out.

I am knitting the Buzios pullover from Berroco.  It was a free pattern from their website and it is knit with Origami (48% Acrylic, 19% Nylon, 17% Linen, 16% Cotton) in a green and blue blend called Turtle Bay.

Pic from Berroco website

As usual, I went down a needle size than what was recommended so that I could achieve the correct gauge.  So, I am using a size 7 circulars.  This sweater is knit in the round from the bottom up.


Here is the yarn.  It is actually not really yarn, but has beautiful colors.  It is several different types of string held together then wrapped with a black thread to bind it.  It's like working with a thin cord.  I don't see this sweater being all that warm, but since it is lacy and open, that was never it's intention!

I casted on and I was off!


The stitches in this sweater are a lace stitch and seed stitch.  There will be stripes of seed stitch alternating with the lace stitch.  I was joking with a fellow knitter and we were saying how seed stitch takes a lot of time.  I told her that this is half seed stitch and I said that this was a project doomed to be a UFO (unfinished object) before it even starts.  I was only joking because this yarn was pricey and it was not going to sit in the closet, unknit!

I'm actually chugging right along on it.  The seed stitch stripes are great for knitting while watching TV or chatting.  The lace stitch stripes, I need to pay attention and count the stitches after each row.  Lace stitching is made up of a lot of yarn overs (yo) and decreases, so you can miss one and not realize it until a row or two later.  Fixing lace is not fun.


I snugged a long pillow through the sweater so that you could see my progress.  From the bottom up, I knitted the seed stitch for 1", then there is the lace stripe, 2" seed stitch stripe, and another lace stripe, then a seed stitch stripe.


The lace stripe: A close-up.  To date, I have knitted a bunch more, I just have not taken any more pictures, but it is pretty much the same: alternating the seed and lace.  Since I am knitting in the round, there will be no seaming.  Once it's done, it's done.

But, since I'm still finishing up some Christmas knitting, this sweater I will work on in the background.  I have only a few more items to knit for gifts, but I'm dragging my feet on them.  One involves stranding, which is like using the yarn wrapping technique that you use for fair isle knitting (multi colors).  I do not have much practice with multiple colors.  We shall see.

Stay tuned for more fun stuff in the pipeline.

Related Links: