Showing posts with label magazine. Show all posts

Sunday, December 16, 2012

Sporty Wristlets

This is a gift that I had on my To-Do list.  It is for a friend's daughter, who I think would look so perfect in!  The pattern came from the 2012 Holiday issue of Knit Simple magazine.  They named them Simple Mitts, which they are, but I'm calling them Sporty Wristlets.


I'm using Beehive Baby Sport from Patons (70% Acrylic/30% Nylon).  It is sport weight, which is often used in baby items.  That is why I thought it would be the perfect yarn to make this pattern with.  Very soft.


I knitted these with size 4 circulars so that I could use the Magic Loop method.  I knitted the main arm, then left an opening for the thumb and finished at the knuckle.  I did two exactly the same.


At this point they are almost done.  I have to actually add a thumb snuggie on each one.


I picked up 18 sts around the thumb opening.  Then I knitted in the round again to make the thumb.  I finished it so it would look like the edge where the knuckles are.


Just need to bind off and weave in the ends.


They are cozy, as you can see, I'm modeling them while I hold my cat.  Very nice!


Another check mark on the Christmas Done List! 

Sunday, June 3, 2012

Cotton Wrap

I'm doing what we knitters call "stash-busting" with this weeks project.  Stash-busting is taking yarn that you already own and making something with it.  It could be yarn that was bought but never used or it may be leftover yarn from a completed project.


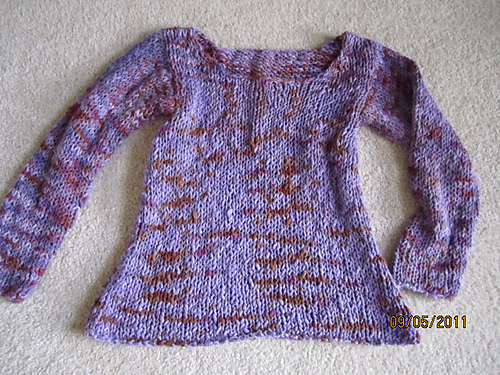
In this case, it was leftover yarn.  I made a sweater with it back in 2007 and had a lot leftover.  I always buy too much.  The sweater had it's issues, but it came out nice enough that I do wear it.


This yarn is a hand-dyed cotton that I bought when I visited Mass one winter season.  It is a cotton yarn that when it was spun, it was done in a way that makes the strand thick in some places and thin in others; very cool.

I chose to knit a small shawl that I am calling a wrap.  It came from the Holiday 2011 issue of Knit Simple.  This is not the suggested yarn, so I had to wing it a bit.  The original pattern called for a silk yarn that had beads and sequins attached to it. That sounds very pretty, but not within my budget for this week.


The wrap is knitted by casting on 3 sts and increasing at the beginning of each row to create a triangle.  I used a size 13 circular needle to accommodate the large number of sts it will have when finished.


The yarn is a purple/brown/pink variegated yarn, which you can see a bit better in the above pic.  This worked up pretty quick because it was just knit and purl back and forth.


Since the original pattern with the beaded and sequined yarn was a fancy idea, I knew I had to put a bit of pizazz into this one.  She's a bit of a plain Jane.  What I decided to do was to make fringe.


I cut strands about 12" long, held two together and placed it at every end-of-row hole.  It came out very chic, in my opinion.  My new summer cotton wrap:


Stash-busting was fun.  You can stash-bust too, by seeing what supplies you have on-hand (which could be fabric, beads, ribbon or anything that is leftover) and make something nice for yourself.  Go ahead - Stash-bust!

Sunday, May 22, 2011

Glace Shrug - Part 1

My knitting has taken a backseat in the last month or two and now I am ready to pick-up my needles again.  Here is a UFO (Unfinished Object) that I had pulled out of my organization session back in Craftolution Update - Organize post in March.  Originally, it was to be a spaghetti strap tank top knitted out of Glace from Berroco.  It is a 100% rayon ribbon.  It is also discontinued, so I cannot purchase this yarn any longer.

Rescued UFO

I was knitting the green colored tank in the booklet you see in the picture above.  The pattern is called Daniela.  I loved it.  Now, the history behind this tank top, and why this post is called Shrug and not Tank, is that I attempted this pattern two times over the course of the years.  It is not that it is a difficult pattern, but just a myriad of mistakes I encountered along the way. 

My first attempt, I was fairly new to knitting and wanted to knit a "real" project that I would wear.  It started fine, I did my gauge swatch, and was almost done with the front half and I fumbled when I was shaping the arm and top.  I was supposed to be shaping the arms and dealing with the neck at the same time.  I read the pattern as if you do them at separate times.  So, I put it down until I could figure out how to undo what I did and get back on track.  Meanwhile, I really needed the size needles that where on this project for something else.  I ended up taking all the stitches off and just leaving them thinking that I will rip out and fix the top.  That never happened.  I just ripped it all out and started new.

My second attempt I started and knitted about 4" and put it down.  I was bored with it.  I then recently picked it up and thought about finishing it.  I took stock of the yarn I had and thought that I needed about 7 or 8 balls for this tank and I only had about 5 or 6.  Something was missing.  I did not want to continue with this pattern if I didn't have enough yarn.  That would be the ultimate worst feeling of getting towards the end and realizing that you don't have enough yarn, while the yarn has been discontinued.  So, I went searching for another project.

I chose a pattern from knit.1 magazine (which I think has been discontinued too, what's going on around here?) from Summer of 2007 called "Moss Stitch Bolero."

New project

I like how it ties in the front, rather than just having sleeves and open front.  The only thing is, is that I may not have enough yarn to do the sleeves.  So my hopes of a shrug may be a sleeveless shrug.  Can I still call it a shrug if it has no sleeves?  Well, I'm going to anyway!  The shrug/bolero has a crocheted edging, a nice touch.

For me to do this project, I have to unravel the tank top again.  As you may see in the first photo, the yarn balls look a bit tangled.  Well, they are very much tangled!!  I had just thrown them together in the bag.  Yikes, what a mess.

Takes 5 to Tangle

Only one ball is attached to the tank top, but yet 5 balls of yarn are tangled.  Here is a close-up of the rat's nest that I must untangle before I can start my shrug.

Maybe just a Mole Nest, not too bad

Once they were separate balls of yarn again, I now had to unravel the knitted part.  When it is unraveling, it stays kinky for some time.  There is no one way to get out the kinks.  Some natural fibers stay kinked until you wet it and wrap it in a ball until dry.  Since this is a rayon yarn, I did not know what to expect.

Kinky Kinky!

I did not wet it but tightly wound it back into a ball.  Since the others had been wound since my last attempt, I was going to let this ball sit and I will use the others to start with. 

The main stitch in this pattern is the moss stitch or seed stitch.  It is k1p1 across the row, then on the next row it is p1k1.  You repeat knitting the purl sts an purling the knit sts to make the pattern.  It is easy, but it is time consuming because you are pausing in between each st to reposition the yarn either to the front or to the back.  It creates this pebble look, where it is not all knit nor all purl.  It is a nice texture to look at.  Below is a close-up of the seed st.

Seeding along

My plan with this is to knit the back, then the two side front panels.  Then I will see how much I have left to do the sleeves.  I may just make this sleeveless and crochet the edging on the arm holes and have a sort of shrug-vest that ties in the front.  I could also make cap sleeves, so there is something there, but that would mean that I would have to make-up something as the sleeve.  I'm not good at that in the knitting world.  This would be going out of my comfort zone, but maybe that is what I need.

Current status

This is what I have worked up so far.  This is the back and I have started the arm hole shaping (the part at the top that tapers inward).  It is looking good and I'm proud that I'm actually rescuing a project from the dooms of the deep dark basket in the closet.  So far I have used only 2 balls of yarn, by my calculation, I may not have enough to do even cap sleeves.  I will crochet the edging along the neck and bottom and see what is left over.

Stay tuned for Part 2, which hopefully will be before I go on vacation in late June.  I would like to bring this with me. 

Does anyone out there recently completed a UFO??  If not, save yourself a few bucks and finish it.  It will keep your money in your pocket a little while longer than if you went out and bought materials for a new project.

Good luck (and wish me some too)!

Monday, December 13, 2010

Crazy Cables

Once you get the hang of knitting you should try and challenge yourself with something that looks hard but is quite easy (assuming you have the knit and purl stitch down pat).  If you are ready for something new, try knitting cables.  They look very impressive when they are done, but, when the pattern is followed, it can be done painlessly.

My very first cable attempt was done on scrap yarn that I knitted up a swatch piece.  Sorry to say, I no longer have that little piece of cable, but I have moved on since then.  My first project was an Irish cabled sweater.  Yes, let's go for gold, I don't want to settle for bronze.  I jumped from a swatch piece to an Irish cabled sweater.  I never admitted to being crazy, but I have high hopes!  So, in my search for the perfect pattern, I asked my Aunt Eileen.  She is the person who taught me how to knit.  She is my great aunt that is like a grandmother to me.  She lent me (let see, over 10 years ago) a Irish knit instruction booklet.  This booklet has a copyright date of 1967!

The pics inside are even more classic!

The Bernat company is still around and going strong; their website offers a blog and free patterns.  The Bernat Book of Irish Knits had the perfect pattern: a classic pullover.  The yarn I chose (sorry Bernat) was Paton's Classic Wool.  It is 100% merino wool in the classic cream color Aran.  I bought it from Smiley's Yarns which can be found on the web.  They literally have yarn for $1!  I don't think this yarn was a buck a skein but it was wicked cheap. 

This sweater was orginally knit for my boyfriend (who became my husband, then my ex).  There is folklore that if you knit your spouse or partner a sweater, then the relationship will sour.  I knew this going into this project, but I knitted it anyway!  I mean, who really believes in that old superstition anyway?  The sweater certainly did outlast the relationship, but at least I was smart enough to hold onto the sweater! 

This sweater, I thought, would take me a few months to knit.  I typed out the pattern so I could read it easily and write on the paper.  Well, to make a long story short, it took over a year to knit!  With all that time invested in it, the boyfriend/husband/ex only wore it a handful of times.  During the piecing of the sweater, he had complained that it was going to be too tight, then I knitted side panels to extend it, then he complained that it was too bulky.

See why I kept it!

I had knit the side sections in moss st, then knitted the cables, and then the middle section was done in popcorn st.  This was very time-consuming and I had to pay attention.  So, watching TV while doing a project like this is not recommended.  At this stage, I would have considered myself an Advanced Beginner.  Only a beginner because I did not know how to seam very well.  You can notice the side seams where I added the extra panels.  For my first cable project, I impressed my Aunt and myself! 

Close-up of cables

I wear it on those few chilly days a year as a cover-up/jacket because it is too large for me; I wear it anyway and I love it.

My next cable project came years later and it was a scarf.  The pattern came from Family Circle Easy Knitting (now it is published through Vogue and is called Knit Simple).  I had a ton of extra Paton's Classic Wool (apparently, I overestimated my yarn requirements) and knitting it up with that.

The scarf was cabled along the bottom edge of each side but carried only three cables through the neck/body.  I was hooked from the look of the ends so I gave it a shot.  After the sweater, this was a piece of cake!

Cute, huh?

Oh, yes, and it had a rolled edge.  The original yarn for this pattern was a soft, fluffier mohair or something.  The end cables had almost a halo appearance to them.  I was being frugal, so no halo effect, but I really liked it anyway.  The side cable always rolls in.  I never blocked it, so that may prevent that from occuring.  Blocking is when you wet the garment either with a spray bottle or a steam iron, set it out flat, shape it, and place a towel with heavy items on it to "set-in" the shape.  It is effective method with sweaters, but not sure if it works on scarves. 

Ends are my favorite part!

My latest cable project was a skirt pattern from knit.1.  This is a hipper knitting magazine for the younger knitters.  The teens and early twenties knitters don't want the stuffy patterns of some of the classic knit magazines.  This is a nice choice for them.  I was in my late twenties when I subscribed and I can see that I would not knit half the patterns, but I enjoy looking at what people can create.  The skirt was knit with Lion Brand Fisherman's Wool.  The pattern had cables running diagonal throughout the skirt with a rolled hem/edging.

I see a color theme going on here...

I finished this skirt the Christmas before last, while visiting my sister in MA.  I have to admit, when I was done, I put it on and thought, "No way am I wearing this in public!"  Let's just say it was very form-fitting and I would need some leggings under it to cover myself up!  It did come out nice, I just am not confident enough to wear it as intended.

Waist cables are a nice feature

My beau and I had a holiday housewarming party and I thought, I want to wear that knitted skirt.  Again, I put it on and could not do it.  Then I got an idea, "What if I wore it as a shirt?"  Marisa from New Dress A Day blog does it all the time!  I threaded a grosgrain ribbon through the cabled waist, put a tank top underneath to protect my skin from the itchy wool, threw on a shrug and viola!  I skirt-top!

Last pic of the evening

It was a cute way to finally wear my knitted cable skirt.  I got several compliements, so I thought that I should've done this ages ago!  Along with my top, I also showed off my early Christmas present from my sister.  She sent it to me and told me to open it up and not wait until Christmas.  She surprised me with a cabled blanket!  I have been talking about knitting one myself forever and she must've got sick of hearing me say that because she did it!

So nice!

Isn't is wonderful?!  I have it displayed on the couch, but I actually have it in my bedroom at the end of the bed.  It has been in the 40's and 50's here in FL and this blanket is the perfect weight for that added warmth.  Even though my sister did not blog about it and take pics along the way, I had to feature it in mine. 
Thank you agian, Kathy!!! 
  
Cable close-up!