I made four skirts but I will demonstrate on one shirt to show how I made the others. My first shirt came from an estate sale for $1. I think it was bought in Hawaii because not only did the brand tag say Tailor Hawaii, it was essentially a Hawaiian shirt.
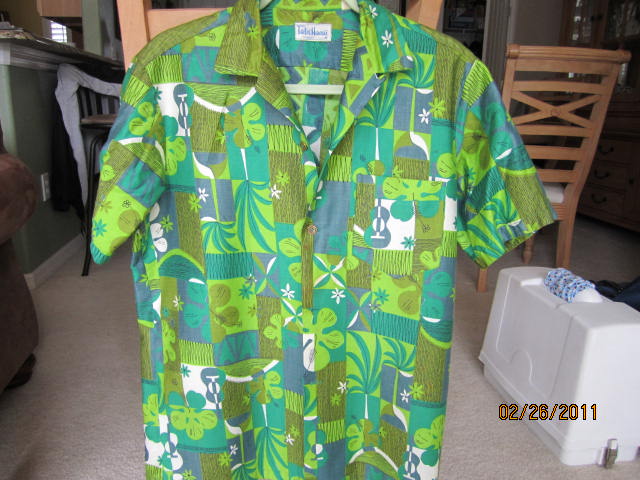 |
| Aloha Mr. Shirt |
This shirt also had some cool buttons:
 |
| I wonder what those symbols mean? |
The first thing I did was iron the shirt, but I didn't worry about the sleeves. Then I unstitched the pocket on the front and set it aside. Then I laid the shirt out on my cutting mat and lined up the bottom hems. I took a rotary cutting ruler (a yard stick or long ruler would work) and used a rotary cutter and cut it from armpit to armpit - straight across.
 |
| A shirt, shoestring and thread is all we will need |
At this point, I no longer need the top part of the shirt for the skirt. I will put it in my scrap bag, because you never know when this will come in handy (I love buttons, so I take off all of the buttons and keep them in a jar). Now, I am only working with the bottom portion of the shirt. I am now calling this the skirt. The top button on the skirt was removed and I also removed the buttons that are often found on the inside towards the bottom.
I pinned the bottom skirt front closed and sewed down the front along the button panel. At the last button, I went about an inch further and stopped and stitched across to meet the stitching on the opposite side of the button panel.
I went back to the iron and ironed my drawstring casing by folding in about 1/4" and then about an inch. I pinned it so when I sew, it will sew the 1/4" hem, making a casing. Before I went and sewed, I unpinned the front area and figured out where the drawstrings were going to come out. I made marks so I could make button holes.
 |
| I used chalk to mark my guidelines |
I should mention that on this skirt only, I had to flip it around so the bottom was the top of the skirt. There was something strange about this shirt bottom that made me do it; I can't remember why though!
Anyway, before you sew the casing, you need to make the buttonholes. My sewing machine has a buttonhole guide thing so it was a snap to do. I made two on this skirt, but the other skirts I only made one. One is really all you need.
 |
| Cut the buttonhole open with a seam ripper |
Now that the buttonholes are made and cut, I sewed the casing as I had it pinned before. Once the casing was made I went and sewed the pocket on the front of the skirt.
 |
| I'm right-handed, so I like my pocket on the right-side |
Now, I have this gadget that threads string and such very easily. I got this at a very small store in my hometown called Goldstein's (which is like a 5 & 10 store) and I have no clue what it is called. But, I'm sure Joann's has something similar. I attach my shoestring (really it was a boot string and I got it in a really long length) to this gadget and threaded it through until I reached the second hole and pulled it all the way out, holding onto the first end of the shoestring so it does not get pulled all the way in.
 |
| Shoestring was a-go! |
Once the shoestring is in place then I had to hem the bottom (of this skirt only). The button that I took off earlier I attached it to the bottom button panel where it logically would be on the shirt. It went in the slit area. I then made another buttonhole for that new button. But it is for looks only, I do not intend on buttoning it.
 |
| All done! Now it is Aloha Ms. Skirt! |
That evening we went to a birthday dinner at the Melting Pot, which is a fondue restaurant. I got compliments on my outfit, which I said, "Thank you very much, I made the skirt today from a man's button shirt!" I love the reactions when you say you handmade something.
 |
| The Fondue Runway! |
I also made a few more shirt skirts that I will model:
 |
| Very comfy! |
That one will be a gift and so will these others:
 |
| Yeah, I'm not modeling these but you get the idea! |
On the striped one, I took it in about and inch on each side then made the casing for the drawstring. I would have done the same on the pink one about, but it had these cool side pleats, that I would have lost if I took it in.
 |
| Side Pleat - Cool! |
Again, I got these at a thrift store and/or Goodwill. They each cost under $5, and the shoestring was about $2 for two pairs. I pick the shirts for their pattern and fabric quality. For example, if you pick a white button shirt, your undies will be seen through it, unless that is the look you are going for. I hold my hand under the shirt when shopping. If I see my hand, then it is a no-go.
Have fun and good luck. Let me know how you make out.
No comments:
Post a Comment