Showing posts with label shirt. Show all posts

Sunday, February 19, 2012

5K Shrug

This weekend I ran my first official 5K in Fishhawk Ranch in Lithia, FL (where I live).  It was called the 15th Annual Fishhawk Ranch Road Race.  There were just under 800 total runners either participating in the 5K or the 10K. 


When we woke up on Saturday morning, it was overcast, in the high 60's and a bit drizzily.  Normally, that would've been considered a dull day in Florida, but for a day that you will be running, it was a perfect day.

On a day like Saturday, you arrive at the race with a few layers of clothing on, like wind pants and/or long sleeve shirt or a fleece, but then you get to running and you definitely don't want to be wearing all those layers.  It's a pain to have to keep running back to your car (esp if the parking is not near where the race starts) or tying a bulky shirt to your waist.

That's where I got the idea of a 5K shrug.  Basically it is a long sleeved t-shirt cut up so you are wearing only the sleeves, like a regular shrug that you wear with tanks or dresses.  This means a lot less bulk when you are running.  Here's what I did:


Take an old long sleeved t-shirt or athletic nylon/quick-dry/whatever shirt you have.  This one came from my I-want-to-donate-but-I-might-wear-it-one-day pile.  Then cut the bottom straight off just below the armpits.


Cut it up the middle.  (Or not, it won't really be a shrug, but it can be your 5K I Love the 80's Half Shirt)


I then matched up the two fronts, wrong-sides together.


I took chalk and drew where I wanted to cut so that it is rounded in the front.


I did the same for the neck area.


Here we are...a 5K shrug.  This t-shirt was a loose one, so you can choose to add a button or a pin to the front to keep it closed, in case it is windy or you might actually want to run with it on.


It's now tied around my waist with very little bulk.  Since it's all cut up, you may even be able to place the shrug somewhere in the race start area or by a bush or something until the race is done.  The likelihood of a cut up t-shirt still being on the ground when you get back is pretty good.  I would advise doing this to a shirt that you won't be sad if someone else thought your idea was fabulous and really did take it (junk pile/Goodwill/yard sale/gift from old boyfriend that you forgot to burn).

Back to the race.  This was a chip-timed race, which is nice, but they still took the guntime as your official time, so I don't really see the point of the chip.  I also timed it with my heart rate monitor watch.


I did a thorough job of stretching out before the race.  Vince and I had been running at least 3 times a week for months now, and we recently added a boot camp style training workout 2 times a week (so awesome, its right after work and work pays for it - how can you say no?).  The boot camp has improved my running measurably.  I'm also sticking to the My Fitness Pal calorie counter and a healthy diet.  That has to be helping too.

My public goal was to run the 5K in under 33 minutes.  That is about an 11 minute mile.  During our practice runs, I would be able to run 2 miles at a 10 min/mile pace, then the last mile it would drop down to 13 minutes.  It just took practice and pushing to get a more steady pace.

My personal, more private goal was to run the 5K in under 30 minutes (less than 10 min/mile pace).  I have not run that distance in that amount of time since running a weekly 5K running series in Mass in 2005.  That's a long time ago!!

I was able to run the 5K in 30:12 (30 minutes and 12 seconds)!  I'm so excited.  My watch time was actually 29:32, but I will just stick with the official guntime of 30:12.  So, I can positively state that I beat my goal.  Whoo-hoo!


A perk of running the race, you get free stuff at the end.  They had hot dogs, bagels, pumpernickel rolls, chic-fil-a breakfast biscuit sandwiches, Gatorade, water, energy bars, granola bars, water bottles, towels, Beef O'Brady's refillable sippy cups and best of all...booze.  They had hard iced tea (Mike's Lite) and Sam Adam's beer.

Even though I did not win a medal for my running efforts (I came in 202nd overall out of 519 runners, 65th out of 285 women and lastly, 9th out of 40 women in my age group of 35-40 yo), I had a great time!

Sunday, February 5, 2012

Fix It - Crystal's Cinchy Shirt

I have a Guest Blogger today!  My friend Crystal has written one already for me (Glitter Candle) back in 2010 and she is ready to share again.

~~~~~~~~~~~~~~~~~~~~~~~~~~~~~~

I have been inspired by Needles, Hooks & Books, so I though another guest blog was in order.  It was a snowy winter day in New England and all my boys were outside playing.

Blissful Peace Inside for Mommy!

A couple of months ago I was out shopping trying to spruce up my wardrobe a bit.  I found this shirt that I mostly liked but the fit was a little off.  It was on the sale rack for $2! 

Front = Ok

Normally, I would have put it back but I thought of all the advice I read here and figured, "Hey, why not give it a shot?"  The worst that would happen is that I would be out of a couple of bucks.

Back = Hmmm, How To Fix?

I liked that the shirt could be worn with the sleeves down or buttoned up along the arm (shown in above pic).  I decided to add some ribbons to the back to try to pull it in a bit.  I poured through a rat's nest of ribbons in a craft drawer that I've scrapped and saved for such an occasion.

No Rats - Just Ribbons

Let me disclose that I am not the sewing goddess that your usual host it.  In fact, I am a novice at best.  So, my first dilemma was where to attach the ribbons (side seam or pleat).  The second choice was to rip open a bit of seam, feed the ribbon in a sew it closed (the hard way) or just place the ribbon and sew it down so it folds over (the easy way).

Planning With a Little Pink Tomato

My darling husband set me up a lovely space in the basement for my sewing.  I think on this particular day, it must've been about 20 degrees down there.  Is it a wonder I am not too motivated to do more sewing?  But I sucked it up, found some slippers and went to my dungeon.  I felt a little bit like Harry Potter under the stairs.

No One Will Find Me Here

At this point, I realized that I needed some help.  I couldn't see where the ribbons should be placed and although I am a flexible individual, I sure couldn't manage pinning behind my back.  The boys were already in from snow play and once the babies were napping, I dared ask my darling hubby for help.  With absolutely no grumbling at all...ah hem...he agreed to help me.

Pinned & Ready for Business

For some reason, I always end up with messy stitches.  So, I broke out my owner's manual and found all the appropriate settings.  The shirt was fairly thin and the ribbon was very fine.  I did have to rip out my disaster once before getting the tension right, but after that, I just sewed back and forth a bunch of times, making sure to go over the edge of the ribbon a small bit on each side.

Don't Scoff At My Stitches, Please!

As you can see in the above pic, the ends of the ribbon were fraying.  I used the ole' burn-the-edges trick that was previously described in the Lace-up Fingerless Gloves post, and that was pretty much it.  I tied a pretty bow to cinch the back and modeled it for my ever-so-helpful hubby.  Truth be told, he hated the shirt.  Fortunately, I liked it and think that it will look cute with a pair of gray leggings and some gray pom-pom Uggs that I have.

Done!

Admittedly, the front of the shirt was a bit poufy/baggy.  It almost looked like a maternity shirt.  I went online to investigate the brand Lilly Lou, but it did not appear to be maternity.  I read the label a little closer and I noticed that the style number was M1338.  I found the "M" to be a little suspicious, but I will stand by my craft and my decision to like and wear this shirt.

While I was banished to the basement, I attacked my sewing pile: two cashmere sweaters, a tissue t-shirt (my favorite), and a turtleneck.  They all had minor boo-boos and have been sitting in a heap on my closet floor for about a year.  Caught up in a whirlwind of thread and needles, I made the minor repair (all holes in seams) and beefed up my wardrobe a bit more...for free!

Heap of "New" Clothes

~~~~~~~~~~~~~~~~~~~~~~~~~~~~~~

Thanks, Crystal!  I'm always happy to know that my readers are trying some of their own Fit It's.  I would love to see the leggings and Ugg boots together with this shirt.  I've recently bought a few pairs of leggings for weekend wear.  They are so comfy.

Working Alone Tip:  Usually when I am fixing an article of clothing, I have to put it on and take it off a half a dozen times until the placement is just right. I often get pricked with pins and work up a sweat doing this, but I hate having the limited factor of "no one to help me."  But, if your friend/hubby/boyfriend/whatever is willing to assist, then save yourself the contortionist's act and get them pinning and snipping!

What do you have in your closet that could use a good Fix It?  Go on, have fun with it!

Sunday, March 20, 2011

More Shirt Skirts

Another thing I like to make that are so easy is the Shirt Skirt.  I made one last year and it is my bi-weekly rotation of either pjs or hanging around clothes.  I followed the basic steps that I did in an earlier post (Shirt Skirt) but changed it slightly.  Instead of an elastic waist, I used a shoe string and instead of sewing all the way to the bottom of the front, I stopped just under the second to last button to give it a slit in the front.  Keep reading and I will show you....

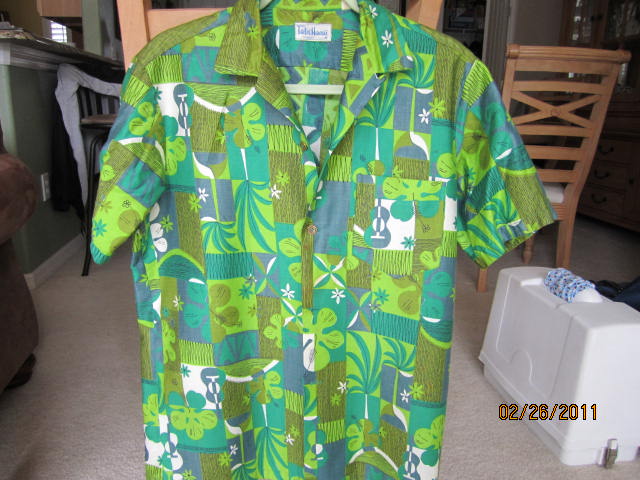
I made four skirts but I will demonstrate on one shirt to show how I made the others.  My first shirt came from an estate sale for $1.  I think it was bought in Hawaii because not only did the brand tag say Tailor Hawaii, it was essentially a Hawaiian shirt.

Aloha Mr. Shirt

This shirt also had some cool buttons:

I wonder what those symbols mean?

The first thing I did was iron the shirt, but I didn't worry about the sleeves.  Then I unstitched the pocket on the front and set it aside.  Then I laid the shirt out on my cutting mat and lined up the bottom hems.  I took a rotary cutting ruler (a yard stick or long ruler would work)  and used a rotary cutter and cut it from armpit to armpit - straight across.

A shirt, shoestring and thread is all we will need

At this point, I no longer need the top part of the shirt for the skirt.  I will put it in my scrap bag, because you never know when this will come in handy (I love buttons, so I take off all of the buttons and keep them in a jar).  Now, I am only working with the bottom portion of the shirt.  I am now calling this the skirt.  The top button on the skirt was removed and I also removed the buttons that are often found on the inside towards the bottom.

I pinned the bottom skirt front closed and sewed down the front along the button panel.  At the last button, I went about an inch further and stopped and stitched across to meet the stitching on the opposite side of the button panel.

I went back to the iron and ironed my drawstring casing by folding in about 1/4" and then about an inch.  I pinned it so when I sew, it will sew the 1/4" hem, making a casing.  Before I went and sewed, I unpinned the front area and figured out where the drawstrings were going to come out.  I made marks so I could make button holes.

I used chalk to mark my guidelines

I should mention that on this skirt only, I had to flip it around so the bottom was the top of the skirt.  There was something strange about this shirt bottom that made me do it; I can't remember why though!

Anyway, before you sew the casing, you need to make the buttonholes.  My sewing machine has a buttonhole guide thing so it was a snap to do.  I made two on this skirt, but the other skirts I only made one.  One is really all you need.

Cut the buttonhole open with a seam ripper

Now that the buttonholes are made and cut, I sewed the casing as I had it pinned before.  Once the casing was made I went and sewed the pocket on the front of the skirt.

I'm right-handed, so I like my pocket on the right-side

Now, I have this gadget that threads string and such very easily.  I got this at a very small store in my hometown called Goldstein's (which is like a 5 & 10 store) and I have no clue what it is called.  But, I'm sure Joann's has something similar.  I attach my shoestring (really it was a boot string and I got it in a really long length) to this gadget and threaded it through until I reached the second hole and pulled it all the way out, holding onto the first end of the shoestring so it does not get pulled all the way in.

Shoestring was a-go!

Once the shoestring is in place then I had to hem the bottom (of this skirt only).  The button that I took off earlier I attached it to the bottom button panel where it logically would be on the shirt.  It went in the slit area.  I then made another buttonhole for that new button.  But it is for looks only, I do not intend on buttoning it.

All done! Now it is Aloha Ms. Skirt!

That evening we went to a birthday dinner at the Melting Pot, which is a fondue restaurant.  I got compliments on my outfit, which I said, "Thank you very much, I made the skirt today from a man's button shirt!"  I love the reactions when you say you handmade something.

The Fondue Runway!

I also made a few more shirt skirts that I will model:

Very comfy!

That one will be a gift and so will these others:

Yeah, I'm not modeling these but you get the idea!

On the striped one, I took it in about and inch on each side then made the casing for the drawstring.  I would have done the same on the pink one about, but it had these cool side pleats, that I would have lost if I took it in.

Side Pleat - Cool!

Again, I got these at a thrift store and/or Goodwill.  They each cost under $5, and the shoestring was about $2 for two pairs.  I pick the shirts for their pattern and fabric quality.  For example, if you pick a white button shirt, your undies will be seen through it, unless that is the look you are going for.  I hold my hand under the shirt when shopping.  If I see my hand, then it is a no-go.

Have fun and good luck.  Let me know how you make out.

Monday, December 13, 2010

Crazy Cables

Once you get the hang of knitting you should try and challenge yourself with something that looks hard but is quite easy (assuming you have the knit and purl stitch down pat).  If you are ready for something new, try knitting cables.  They look very impressive when they are done, but, when the pattern is followed, it can be done painlessly.

My very first cable attempt was done on scrap yarn that I knitted up a swatch piece.  Sorry to say, I no longer have that little piece of cable, but I have moved on since then.  My first project was an Irish cabled sweater.  Yes, let's go for gold, I don't want to settle for bronze.  I jumped from a swatch piece to an Irish cabled sweater.  I never admitted to being crazy, but I have high hopes!  So, in my search for the perfect pattern, I asked my Aunt Eileen.  She is the person who taught me how to knit.  She is my great aunt that is like a grandmother to me.  She lent me (let see, over 10 years ago) a Irish knit instruction booklet.  This booklet has a copyright date of 1967!

The pics inside are even more classic!

The Bernat company is still around and going strong; their website offers a blog and free patterns.  The Bernat Book of Irish Knits had the perfect pattern: a classic pullover.  The yarn I chose (sorry Bernat) was Paton's Classic Wool.  It is 100% merino wool in the classic cream color Aran.  I bought it from Smiley's Yarns which can be found on the web.  They literally have yarn for $1!  I don't think this yarn was a buck a skein but it was wicked cheap. 

This sweater was orginally knit for my boyfriend (who became my husband, then my ex).  There is folklore that if you knit your spouse or partner a sweater, then the relationship will sour.  I knew this going into this project, but I knitted it anyway!  I mean, who really believes in that old superstition anyway?  The sweater certainly did outlast the relationship, but at least I was smart enough to hold onto the sweater! 

This sweater, I thought, would take me a few months to knit.  I typed out the pattern so I could read it easily and write on the paper.  Well, to make a long story short, it took over a year to knit!  With all that time invested in it, the boyfriend/husband/ex only wore it a handful of times.  During the piecing of the sweater, he had complained that it was going to be too tight, then I knitted side panels to extend it, then he complained that it was too bulky.

See why I kept it!

I had knit the side sections in moss st, then knitted the cables, and then the middle section was done in popcorn st.  This was very time-consuming and I had to pay attention.  So, watching TV while doing a project like this is not recommended.  At this stage, I would have considered myself an Advanced Beginner.  Only a beginner because I did not know how to seam very well.  You can notice the side seams where I added the extra panels.  For my first cable project, I impressed my Aunt and myself! 

Close-up of cables

I wear it on those few chilly days a year as a cover-up/jacket because it is too large for me; I wear it anyway and I love it.

My next cable project came years later and it was a scarf.  The pattern came from Family Circle Easy Knitting (now it is published through Vogue and is called Knit Simple).  I had a ton of extra Paton's Classic Wool (apparently, I overestimated my yarn requirements) and knitting it up with that.

The scarf was cabled along the bottom edge of each side but carried only three cables through the neck/body.  I was hooked from the look of the ends so I gave it a shot.  After the sweater, this was a piece of cake!

Cute, huh?

Oh, yes, and it had a rolled edge.  The original yarn for this pattern was a soft, fluffier mohair or something.  The end cables had almost a halo appearance to them.  I was being frugal, so no halo effect, but I really liked it anyway.  The side cable always rolls in.  I never blocked it, so that may prevent that from occuring.  Blocking is when you wet the garment either with a spray bottle or a steam iron, set it out flat, shape it, and place a towel with heavy items on it to "set-in" the shape.  It is effective method with sweaters, but not sure if it works on scarves. 

Ends are my favorite part!

My latest cable project was a skirt pattern from knit.1.  This is a hipper knitting magazine for the younger knitters.  The teens and early twenties knitters don't want the stuffy patterns of some of the classic knit magazines.  This is a nice choice for them.  I was in my late twenties when I subscribed and I can see that I would not knit half the patterns, but I enjoy looking at what people can create.  The skirt was knit with Lion Brand Fisherman's Wool.  The pattern had cables running diagonal throughout the skirt with a rolled hem/edging.

I see a color theme going on here...

I finished this skirt the Christmas before last, while visiting my sister in MA.  I have to admit, when I was done, I put it on and thought, "No way am I wearing this in public!"  Let's just say it was very form-fitting and I would need some leggings under it to cover myself up!  It did come out nice, I just am not confident enough to wear it as intended.

Waist cables are a nice feature

My beau and I had a holiday housewarming party and I thought, I want to wear that knitted skirt.  Again, I put it on and could not do it.  Then I got an idea, "What if I wore it as a shirt?"  Marisa from New Dress A Day blog does it all the time!  I threaded a grosgrain ribbon through the cabled waist, put a tank top underneath to protect my skin from the itchy wool, threw on a shrug and viola!  I skirt-top!

Last pic of the evening

It was a cute way to finally wear my knitted cable skirt.  I got several compliements, so I thought that I should've done this ages ago!  Along with my top, I also showed off my early Christmas present from my sister.  She sent it to me and told me to open it up and not wait until Christmas.  She surprised me with a cabled blanket!  I have been talking about knitting one myself forever and she must've got sick of hearing me say that because she did it!

So nice!

Isn't is wonderful?!  I have it displayed on the couch, but I actually have it in my bedroom at the end of the bed.  It has been in the 40's and 50's here in FL and this blanket is the perfect weight for that added warmth.  Even though my sister did not blog about it and take pics along the way, I had to feature it in mine. 
Thank you agian, Kathy!!! 
  
Cable close-up!


Sunday, October 24, 2010

Matchy Headband

I am going to make full use of the blue and orange plaid button shirt I bought at a yard sale a few weeks back.  If you remember, I made the shirt skirt from it, so the top part of the shirt still has lots of fabric.  What has inspired me was a simple cloth headband I recently bought at Walgreens.  Inspried may not be the proper term...I'm going to shamelessly copy the Walgreens headband.  In the pic below, it is the white and green headband.

Saturday morning project

I made a template from a manila folder of the purchased headband.  I will place this template on a folded section of cloth and cut.  This is done twice to get a top-facing and bottom piece of cloth.  I also took off the rest of the buttons and the label from the shirt.  I love collecting buttons.  I have a jar of buttons on my dresser.

I heart button jars!

The jar was something I got at a thrift store years ago.  It is an old spice jar; I've never seen anything so quaint before.  Then one day I went to an estate sale and there was a whole 20-piece jar set with wall mounted wire shelf of the exact jar I had.  At first I was excited, then, because there was so many, I felt like it lost its charm somehow.  I decided not to buy any and just keep my lone one on my dresser.

Back to finishing the headband.  Once I got the two pieces cut out, I cut a length of elastic about 6" long and pinned it in between the two layers of fabric.

Sewing is so backwards, sometimes!

I stitched along the edge with a ball-point needle on my sewing machine.  I did not want to run the risk of the thread bunching when I got to the elastic.  I'm not sure if it would have, but I did not want to rip out rat nests this morning.  I sewed around the elastic end and 90% of one side.  This is where it got a bit tricky, I  then found the other end of the elastic between the fabric and pinned it to the other end.  The fabric bunched up and I had to keep it smooth so I could sew the end and the other side.

Almost there...

I left a small opening and then turned it right-side out. This left a hole where I did the transformation from scrunchie to headband.  The purchased headband had topstitching around the entire edge; so I chose to do that too.  I am not always a straight sewer, even when I try to line it up with the guidelines on the sewing machine.  The fabrics have a mind of their own and do what they want, even if you are feeding it through straight.  My sewing sistas, I'm sure, would back me up on that fact. 

See ya, hole!

I pressed the fabric so the seams were flat and aligned the fabric folds of the hole so I can close it when I topstitch.  To aid in my mission to sew straight, I used a zipper foot with the needle on the right side (my zipper foot has a plastic piece that you can move from side to side, depending on what side the zipper teeth are on).  This actually worked the way I imagined, so I was happy!  Since this did not take too much time, I cut out another headband out of left-over fabric from my Halloween costume last year, where I was a cowgirl.  The fabric was a faux suede, like microfiber/moleskin, which was supposed to represent my cowhide skirt and vest.


Two new headbands

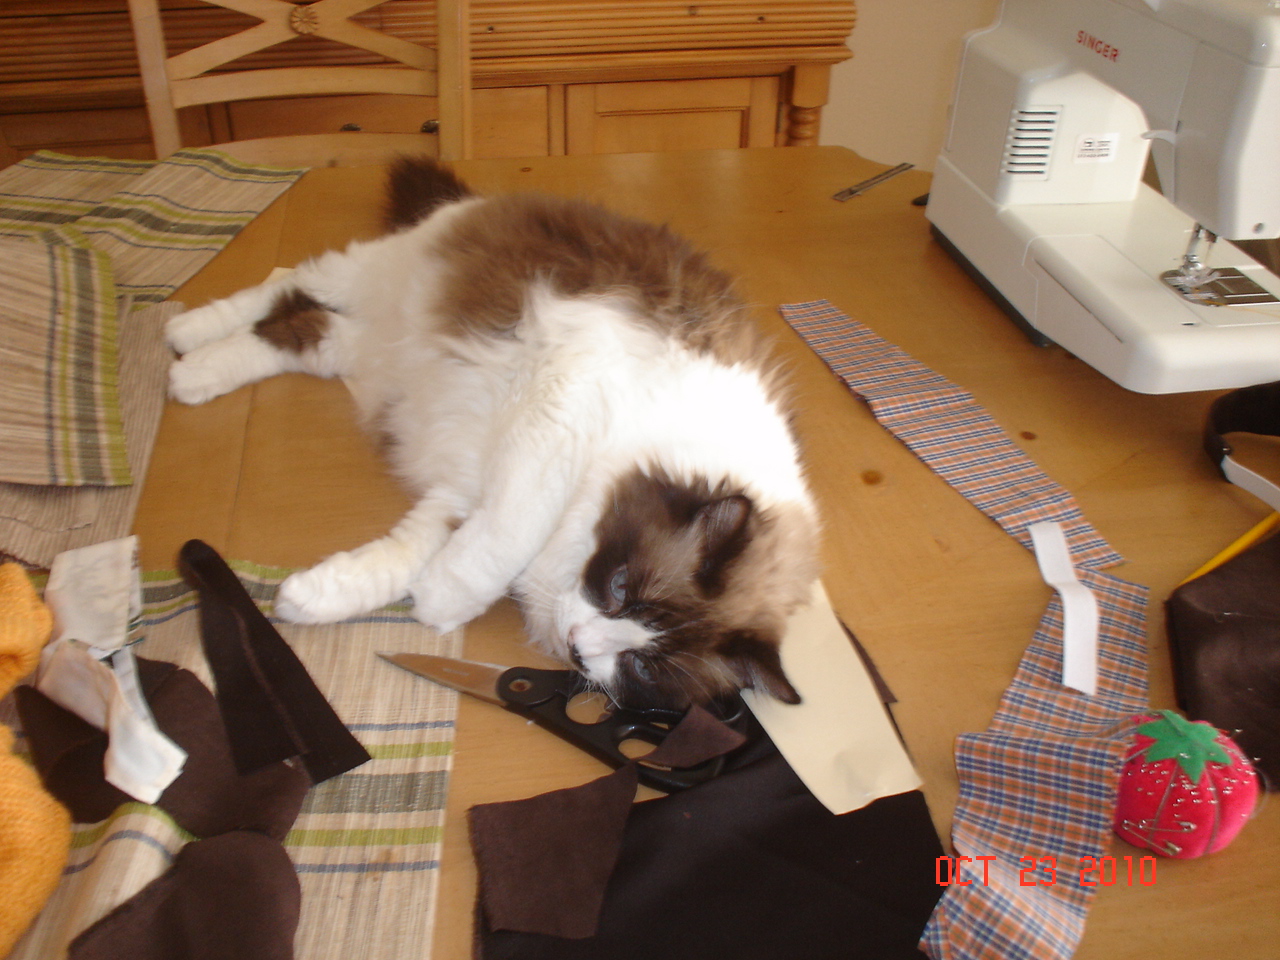
I can't forget that I did have help cutting out the pattern... 

I wouldn't have been able to do it without you, Roo!

When I start a project, it is expected that either Julie or Jasmine will come and get themselves in the middle of it.  My eldest kitty, Julie (aka Roo) helped by laying all over the fabric and pushing it all over the table.  Like I said...typical!