Showing posts with label cables. Show all posts

Sunday, February 9, 2014

Knitting for Charity

It is that time of year where I am sewing and knitting for charity.  The company that I work for participates in the American Cancer Society, Relay For Life event each year.  We start fundraising in October, leading up to the event in April.

The way I have chosen to raise money is to do clothing mending, sewing challenges and knitting coffee cup cozies (or bottle cozies), however you want to use them.

I wrote previously about the coffee cup cozies in these posts:
I have knitted up about 20 or more of them and sold about 15 of them!  I started out knitting them sort of plain, with the self-striping yarns, to keep it simple.  Well, if you know me at all, then you know I can never keep something simple.  I started making cables and making them in sport team colors with horizontal stripes.

If you would like you very own, custom knitted cozy, please email me at moxiebrown25@yahoo.com.  The price of the cozies are $5, but if you are out-of-town, then $6 (to cover the cost of shipping).  You choose your color(s), style & size!

If you would like to donate to a great cause, please go to my Relay Homepage

Tampa Bay Rays
~~~~~
Seattle Seahawks & Denver Broncos
~~~~~
Pink & White Stripes
~~~~~

Zebra for Carcinoid Cancer
~~~~~
Ministripes for Small Cups
~~~~~

Mini Cables in a Solid Color
 
I'm having a great time knitting these up.  They are great on your coffee cup, water bottle or glass bottle!  Let me know what you like!!  Help support a great cause!
 
Thank you to those that have supported me and bought a cozy already! :-)


Sunday, January 12, 2014

Cabled Cardi KAL - Finished!

Happy New Year!
 
I am so relieved to be posting this project as a Finished Project!!  This is my Cabled Cardi Knit-Along with my sister.  We started this project back in March of 2013.  Which isn't a terribly long time when you talk unfinished projects, but I am still feeling a sense of accomplishment.
 
Here are my past posts related to this so that you can catch-up:
I visited my sister in Massachusetts in December for my "Holiday Break" and brought this sweater.  What I still had to do on this was finish the cabling on the body and pick-up and knit along the edge for the ribbing and button holes and knit the sleeves.  Yeah, still a lot!


Here is where I left off.  I really need to knit more than a foot of cables.  The original pattern called for knit stitches every other, so a cable, knit, cable, knit...I did not properly read the pattern and so cabled each one.  Good grief!  I wanted to rip it out, but my sister said that it should be fine.  So, I continued.
 
I then picked up stitches to do ribbing and buttonholes along the inner body edge.  I had a too-short circ needle, but used it anyway.  This really was a challenge because my knitter's elbow was bothering me because of the cumbersome nature of squeezing it all on and holding it.


I know, like what is that picture??  Exactly, but I was able to pick-up the exact number of stitches required to do a k2, p2 ribbing evenly along the edge.  Whoa, go Me!
 
The ribbing is about 12 or so rows, so at row 6 you need to do a button hole.  From trying on my sister's completed sweater, we both agreed that more buttons would be better.  I knit in 4 buttonholes.  I also reduced the hole from a 3 st to a 2 st hole.  The holes will stretch, I know this from past experience.


Once the ribbing was completed, I have 4 buttonholes.  They are not exactly evenly spaced, but good enough.  The top and the second are a bit off, I think, but no one will notice. Shhh!


Next was the sleeves.  The sleeves were left as live stitches so that they just simply go back on the needle and you knit.  I did have to pick-up a few stitches in the armpit.  The pattern instructions were confusing to me, so I did my own thing.  I have picked-up stitches before, ahem, I just did it for the ribbing, so no problem.  I looked at how many stitches I was going to need for my cable repeat in the round.  Once I figured that out, that was the number I needed on my needle.


I decided to make this a short-sleeved cardi, so that it is Florida friendly.  We are talking 100% wool this sweater is made out of.  No joke, it will keep you toasty through cold times, but I don't need that kind of warmth, typically, around here.  Layering is popular in Florida, so short-sleeves is just right.


My sister gave me 4 green buttons (no pun intended - the original pattern name was Mr. Greenjeans). 
 
I don't see us doing many more KALs (Knit-Alongs) because she will knit me in circles, like she did with this one.  But, maybe there will be times where we knit or crochet the same sweater or accessory.  That will be when I showcase our projects together.
 
I was toying with the idea of dying this cardi.  The natural color is really not in my color pallete and maybe something in blue or pink would be nice.  I heard that you can dye in  Kool-Aid.  Hmmm....

Sunday, November 3, 2013

Fetching Fingerless Gloves

I finally started and finished a project in the same month (of the same year)!  Hooray!

I knitted a pair of fingerless gloves for a friend as a birthday gift.  She lives in Mass, so she may actually use these when it gets nippy out.

The project is called Fetching from Cheryl Niamath.  I got the pattern from Knitty.com.  Fetching are fingerless gloves that have a few row of cables around the wrist and on the knuckle.

The yarn I decided to use was Sheep(ish) from Vickie Howell for Caron.  I will have to be honest here:  I really do not like this yarn.  For this purpose, it was not the best yarn choice.  While knitting it kept splitting and there is not much of a twist or wind to it, so it was not the best for cables.  Please forgive my photography, I took most of these at night with the flash on.


The color I chose was Gun Metal(ish), which is a very dark gray.  I will admit they have such great colors to choose from, very vivid and saturated.  I knitted the gloves with a size 6.


I needed double pointed needles (dp), a cable hook (the U looking thing), a marker, darning needle and a row counter. 


While I was casting on, the yarn broke.  Ugh!


For dps, you cast on the required number of stitches, then with the other dps, transfer over several stitches, then with the 3rd dp, again.  You should have split up all the stitches so there are about the same number on each dp.  The first round is the most critical, because you must be careful that you do not have the stitches twisted.  If twisted, you will be knitting a Mobius and you don't want that.


I will then knit the gloves in the round.  Dps are good to use when you have a small number of stitches, but need it in the round.  This will have no seams (yea!) and just a few strands to weave in at the end.


In this pic, I am knitting some cables.  They will be around the wrist and arm.  To cable, you take your cable hook and slip 2 sts onto it.  Hold it in the back or the front (depending on which way it is going to twist) and knit the next sts on the main needle.  Then take the cable hook and knit from that hook.  You now have the start of a cable.  Then you knit in pattern (knit the knits and purl the purls) until the cable row again.  Really, it is easy.


Another feature I want to show you is the thumb.  I was instructed to take waste yarn (a different yarn and color than the yarn you are using) and knit with that as the main yarn for 7 sts, then transfer them back to the left needle and knit them again, but dropping the waste yarn and knit with the main yarn again.


You will have something like this, with the waste yarn showing.  I will carefully unstitch the waste yarn, revealing live stitches.  I will immediately place the live stitches onto two double points.


Slowly unstitch each one and place onto the needle.


I will now knit this little opening in the round to make the thumb.

 
I finished by cabling around the knuckle and loosely bound off with a picot bind-off.  It created little bumps along the edge.  These did not come out as fabulous as I had hoped.  I don't know if I can really blame the yarn entirely, though.  Maybe if I adjusted how much I knit after the cable on the knuckle, or if my hands are too small for these gloves.


They have been sent off to my friend.  Hopefully they will fit her better or look better on her.


I'm sure she will be able to use them on the next blustery New England day.  Enjoy!

Sunday, October 27, 2013

Vampire Knits

I'm giving myself a challenge.  I want to knit my way through the pattern book, Vampire Knits. By no means is this a new book, but I have had it for a few years and have pined over so many of the projects in that book that I HAVE to knit more from it.

 
Vampire Knits by Genevieve Miller was copywritten in 2010, so 3 years ago, this book came out about the time Twilight and all of that was the rage.  It is cleverly written with vampire folklore, quizzes related to dark characters like werewolves and vampires with each project having a very calculated name with a brief summary of why it was chosen.  This is a story, not just a book of patterns and pictures.
 
I have actually already knitted from this book.  My Shapehifter Shrug is from this book.


In that pic, I'm wearing it like Little Red Riding Hood, but it shows how cool the weaved pattern looks.  Here is a pic from the book:
 
 
I am going to do a count down with the ones from the book that I want to make.  The count down will be from the one I love the most down through the book, but it does not mean that I will knit them in that order.  I can't predict what I will be feeling like when it comes time to knit, so I will go with the flow and knit out of order as the mood strikes.
 
Here is my Top 9 (I already knitting one, so it really is a Top 10 list...)
 
Lore Hoodie
 
I have been in love with this project for-ev-ver.  This is what I should have knitting first, but I always talked myself out of it because it was a sweater with a hood that is not very Florida-like, calling for 100% wool.  Well, screw it!  I am going to knit this one with a more Florida-friendly yarn, like a cotton-acrylic or acrylic-wool blend.  My local knit shop has a yarn that I see each and every time I go in there and it screams, "Lore Hoodie!" at me.  I cannot resist much longer!  Help! 
 
Sidhe Shrug
 
This shrug is something that is a bit more practical for Florida.  Just two arms, with all the A/C around here, wearing tank-tops and spaghetti straps makes these shrugs a necessity!
 
The Black Veil
 
This scarf is so pretty!  One of it's features is these picots all the way around the edge.  I have attempted to knit this a few times now, but cannot seem to have the correct gauge/correct weight of yarn.  I do not know why I am not getting gauge, but I will just break down and buy the yarn it calls for and the guessing will be over. 
 
Vampire Diary Protector
 
This is not practical for me, but I love it so!  It makes me want to keep a journal, but I'm not going to fool myself, I won't write in it.  I should make it big enough so that it covers a 3-ring-binder that I place my printed patterns in.  That is much bigger than this book, though.  I will have to see about what it can go on before I take the plunge and cast-on.
 
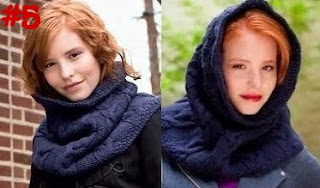
Under the Cover of Midnight Hooded Cowl
 
No, she is not a conjoined twin.  Ha!  This is even more unpractical in Florida than the Lore Hoodie.  I may have to knit this as a gift for a Northener, or I use it when I make my annual trek to Mass to visit my family.  It would beat having a scarf and a hat. I love the cables and how snuggly it looks.  If it was knit with an alpaca blend...I would die for it!  Just Maybe...
 
Pulse Protectors
 
I really like the fingerless gloves better than the throat cover (cowl).  Cables are so striking with yarn that had great stitch definition, that you just want to wear them...even if it doesn't go with your shorts and tank-top.  Alas, most likely this will be a gift.  I cannot really see myself wearing them around here, but one day out of the year.  That won't stop me from knitting them, though!
 
Rampage Fishnet Gloves
 
I attempted this project back when I bought this book.  I ordered the special yarn with elastic in it and everything.  I could not even cast-on!  I think that I was trying to do too many things: A new cast-on, elastic yarn, in the round, and trying Magic Loop.  Too much!!!  I may revisit this again, these are really cool.  They are like evening glove length and then you weave a red ribbon at the end.  Very dramatic.
 
Werewolf Hat
 
This is a felted hat with ears.  How cute is this!?  I clearly will never wear it, but it is so hard to resist the temptation of knitting it!  Maybe I can give it as a gift to a kid, just knit it smaller.  I know there are some Team Jacob's on my Christmas list!
 
Glamour Earrings
 
These are like dripping blood.  I would have to go to the bead store and see what they have, but maybe I could just loosely use this pattern as a guide, because the odds of me finding these beads are very slim.  This looks like a simple project; it calls for DMC thread.  Oh boy, do I have embroidery thread...3 cases of it.
 
That concludes my Top 9 list of pattern projects in the Vampire Knits book.  I can't say that this will be an easy feat or that I will stick to only knitting these projects.  I have magazine subscriptions and I fall in love so easily with every pattern that it will be hard to stay on-track.
 
No way will I knit any of these items quickly.  Quickly and knit do not belong in the same sentence when it is pertaining to me and knitting.  I love the craft, but I'm just not that fast with it.  I wonder how long it will take me to knit all 9 of these projects???  Let the counting begin...


Sunday, June 30, 2013

Kathy's Cardi Conversions

Way back when, like last year, my sister gave me a bunch of sweaters to convert into cardigans.  She saw my post, Unbiased Cardi, and wanted some!  Well...let's just say I have been sitting on them...not making them into cardis.  Ugh, I know, I'm a procrastinator.

When my sister came down, one of the days we finally worked on those sweater conversions.  The first one was a polo-neck style:

Before

We cut this one up the middle, sewed the front band towards the inside and sewed a hem up each side.  Here is Kathy modeling:

After

Next, we took a cabled crew neck:

Before

We cut it up the front and cut the sleeves down a bit.  The sides were hemmed.  Here is her modeling that one too:


So, for the last one, we did something very different.  Well, not so different that we did not cut it up the front, but different enough.  Here is the before:

Before

This one was a cashmere turtleneck.  We cut it up the front, but at a slight angle, cutting right through the turtleneck.

Angle Cutting - In Action

Then, we took some yarn that I used for the Fuzzy Wuzzy hat and scarf set last Christmas and crocheted it on the edge.  Huh?  Yes, we did a mixed media project!!

Just Poke It Through

We took a steel crochet hook and poked it through, grabbed the yarn and pulled it through.  This part Kathy did, I was working on the other cardi conversions.  She did a single crochet around the whole edge, then crocheted double crochets for two rows.  Wait until you see it...pretty neat...

After

We looked through my button jar and found a nice Celtic silver button to cinch it closed.  I'm proud of her!  Here are a few more pics of it:

Close-Up

Ever After

I can say we had a good 'ole crafting time with her sweaters.  They all got a new lease on life when Old Man Winter hits Mass again this year.  Kind of funny to see her wearing a sweater next to a cactus in the month of June.

Let me know if anyone else has done their own "cardi conversions"!

Sunday, June 9, 2013

Cabled Cardi - Part 2

No, I have not forgotten about my KAL with my sister.  The Knit-A-Long is just taking a long time.  It could be that the weather is getting nicer and I don't want to knit with wool anymore.  Actually, that is exactly it.

Kathy is pretty much done with her sweater, as I am the pokey one, am still knitting the body with all of those cables.  Just to refresh everyone on what the Cabled Cardi was, here is a link to Part 1:
Here is also a pic of what it is supposed to look like when we are done:

from knitty.com

Since its cast-on, I have done most of the body.  The raglan sleeves have waste yarn keeping the live stitches for the sleeves holding-tight until I get there.

Top Portion - Front

Looking at these pics, I'm not really liking the color, or the absence of color, much.  Oh boy....

Top Portion - Back

At this point is where I will start the cabled-ribbed part.  It will have no bottom ribbing, that this cabled bottom portion will serve as it.

The cabled was going well, it just takes awhile.  There are a bunch of cables that using a cable hook might take too long.  The quick technique for doing the 4-stitch cable is:
  1. Insert right needle tip into the back loops of 2 stitches on the left needle.
  2. Pop all 4 stitches off the left needle.
  3. Place the loose two stitches back on the left needle and place the 2 stitches that are on the right needle back on the left needle.  They are now in a different order.
  4. Knit, like normal, with the new order of stitches on the needles.
That creates the cable without using a cable hook.  With there being only 4 stitches, it works well.

I have made decent headway on the cabling portion.  But.....there is a minor problem.  Not problem really, but a I just realized I did way more work than I needed too.  Crap!  You'll see:


Here is the cabling.....can you see from the first pic in this post, what is different about it???  Scroll back up and compare the pics.

I did too many cables!  You are supposed to have a ribbing between each cable and I just kept on cabling.  Ugh!  That is way more work than what I was supposed to do.  I do like it, but not what I had in mind.

I only just realized it today, when I looked at the pattern to see how long I am supposed to knit these darn cables to.  I saw the pics and was like, Ah, what is that pic?  Are there different ways you can knit the cables?  Did they give us choices on how we wanted it to look?  Well, the answer is No.  I just did my own thing and did not read the pattern repeat right.

Looks nice, but I'm concerned now that once I put it on, the cables with bunch to the back of me, rather than a nice fan around me.  The cables tend to bunch together, making a ribbing of their own.  The problem with that is that my gauge is now off, with the potential of being too small.  

Well, I'm now putting it back in the bag and will wait it out.  I don't really know what I am going to do with it.  I have a few options:

  1. Continue and hope for the best 
  2. Rip out the cables and start the cable part again
  3. Rip out the whole thing and reknit it in another yarn
  4. Rip out the whole thing and call it a day

Not sure.  Tough choices, since I have spent a ton of time on it already.  I'm having second thoughts of the yarn I chose because it's wool, itchy wool, and can't have it next to my skin.  I'm in Florida, when am I going to wear this?  Only when I'm in Mass, visiting?  I can just wear my sister's sweater that she already knitted.  Hehe.  

I may just rip it out and start it again with another yarn.  A softer yarn.  I'll see what my sister says about it.  I've already placed it back in the bag.  The only bummer is that the project is using my popular size 8 circs.  I like those and tend to use them a lot.  I could have used them on the Weekend Shrug, but used straights instead.

If this happened to you...what would you do?  Let me know!