Showing posts with label ribbing. Show all posts

Sunday, February 9, 2014

Knitting for Charity

It is that time of year where I am sewing and knitting for charity.  The company that I work for participates in the American Cancer Society, Relay For Life event each year.  We start fundraising in October, leading up to the event in April.

The way I have chosen to raise money is to do clothing mending, sewing challenges and knitting coffee cup cozies (or bottle cozies), however you want to use them.

I wrote previously about the coffee cup cozies in these posts:
I have knitted up about 20 or more of them and sold about 15 of them!  I started out knitting them sort of plain, with the self-striping yarns, to keep it simple.  Well, if you know me at all, then you know I can never keep something simple.  I started making cables and making them in sport team colors with horizontal stripes.

If you would like you very own, custom knitted cozy, please email me at moxiebrown25@yahoo.com.  The price of the cozies are $5, but if you are out-of-town, then $6 (to cover the cost of shipping).  You choose your color(s), style & size!

If you would like to donate to a great cause, please go to my Relay Homepage

Tampa Bay Rays
~~~~~
Seattle Seahawks & Denver Broncos
~~~~~
Pink & White Stripes
~~~~~

Zebra for Carcinoid Cancer
~~~~~
Ministripes for Small Cups
~~~~~

Mini Cables in a Solid Color
 
I'm having a great time knitting these up.  They are great on your coffee cup, water bottle or glass bottle!  Let me know what you like!!  Help support a great cause!
 
Thank you to those that have supported me and bought a cozy already! :-)


Sunday, November 3, 2013

Fetching Fingerless Gloves

I finally started and finished a project in the same month (of the same year)!  Hooray!

I knitted a pair of fingerless gloves for a friend as a birthday gift.  She lives in Mass, so she may actually use these when it gets nippy out.

The project is called Fetching from Cheryl Niamath.  I got the pattern from Knitty.com.  Fetching are fingerless gloves that have a few row of cables around the wrist and on the knuckle.

The yarn I decided to use was Sheep(ish) from Vickie Howell for Caron.  I will have to be honest here:  I really do not like this yarn.  For this purpose, it was not the best yarn choice.  While knitting it kept splitting and there is not much of a twist or wind to it, so it was not the best for cables.  Please forgive my photography, I took most of these at night with the flash on.


The color I chose was Gun Metal(ish), which is a very dark gray.  I will admit they have such great colors to choose from, very vivid and saturated.  I knitted the gloves with a size 6.


I needed double pointed needles (dp), a cable hook (the U looking thing), a marker, darning needle and a row counter. 


While I was casting on, the yarn broke.  Ugh!


For dps, you cast on the required number of stitches, then with the other dps, transfer over several stitches, then with the 3rd dp, again.  You should have split up all the stitches so there are about the same number on each dp.  The first round is the most critical, because you must be careful that you do not have the stitches twisted.  If twisted, you will be knitting a Mobius and you don't want that.


I will then knit the gloves in the round.  Dps are good to use when you have a small number of stitches, but need it in the round.  This will have no seams (yea!) and just a few strands to weave in at the end.


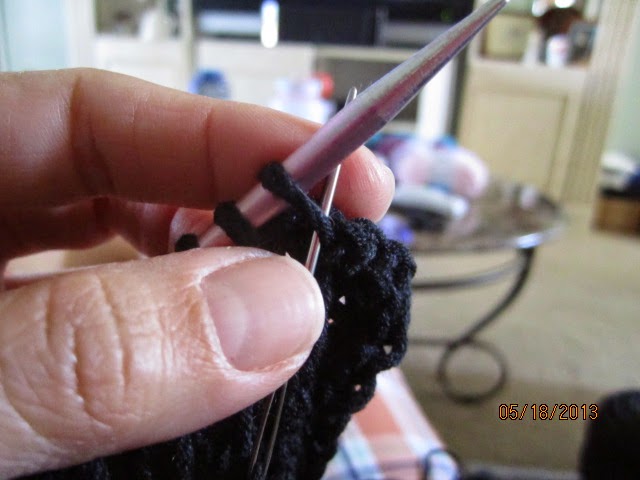
In this pic, I am knitting some cables.  They will be around the wrist and arm.  To cable, you take your cable hook and slip 2 sts onto it.  Hold it in the back or the front (depending on which way it is going to twist) and knit the next sts on the main needle.  Then take the cable hook and knit from that hook.  You now have the start of a cable.  Then you knit in pattern (knit the knits and purl the purls) until the cable row again.  Really, it is easy.


Another feature I want to show you is the thumb.  I was instructed to take waste yarn (a different yarn and color than the yarn you are using) and knit with that as the main yarn for 7 sts, then transfer them back to the left needle and knit them again, but dropping the waste yarn and knit with the main yarn again.


You will have something like this, with the waste yarn showing.  I will carefully unstitch the waste yarn, revealing live stitches.  I will immediately place the live stitches onto two double points.


Slowly unstitch each one and place onto the needle.


I will now knit this little opening in the round to make the thumb.

 
I finished by cabling around the knuckle and loosely bound off with a picot bind-off.  It created little bumps along the edge.  These did not come out as fabulous as I had hoped.  I don't know if I can really blame the yarn entirely, though.  Maybe if I adjusted how much I knit after the cable on the knuckle, or if my hands are too small for these gloves.


They have been sent off to my friend.  Hopefully they will fit her better or look better on her.


I'm sure she will be able to use them on the next blustery New England day.  Enjoy!

Sunday, September 15, 2013

Romance Shell - Part 1

I seem to start summer projects in the summer and winter projects in the winter.  Well, normally that would make sense, but since it takes me forever to finish a project, I really should do the opposite: Knit a winter item in the summer and a summer item in the winter.  That way it will be done in the correct season for wearing it right away.
 
Alas, I have a summer frilly shell that I have started at the end of summer and I won't be able to really wear it until the spring.  Well, in Florida, the seasons are screwy anyway.  Our "winter" is like 1 week of weather where a jacket is nice for the morning, but not really needed on the way home.  But truly, this shell is a summer item to wear.
 
This project is from Tahki Yarns Intermix pattern booklet.  The pattern is called Romance Ruffle Collar Shell.

Romance by Tahki Yarns
 
When I was looking through the booklet I fell in love with almost everything in there!  That is my downfall, is that I like too many patterns and have a hard time choosing only one.
 
This pattern is knit in a novelty yarn called Ripple (100% Mercerized Cotton) that is thick and thin.  Charming at first, then after awhile, not so much.  I chose to do it in the same color as the model.  I typically try hard not to choose the same color, but the other colors in stock at Brandon Yarn Boutique, I had plenty of garments in those colors.  Vince suggested that I pick a color I would not normally have in my wardrobe.  Okaaaaay......

 
I need 5 balls of the Ripple yarn.  Here is a close-up of the thick and thin characteristic:


Knitting a gauge swatch was a bit of a challenge.  I went down one needle size, so I am using a size 6, rather than a 7. 


I'm starting with one of the front pieces, because my size 6 circs are being used for another project, so until those get miraculously get freed up or I buy another set, I can knit the front panels on straights.


The interesting trait about this yarn is that it knits up with a unique texture; it gives a pebbly look.  The basic pattern is a k8, p8 ribbing, so it even makes that basic pattern interesting.
 
To be totally honest, I really do not like knitting with this thick and thin yarn.  Often the thick portion almost gets stuck when you go to do the next stitch.  So if you leave it, then the stitch is tight, if you "let it go" then the stitch is loose.  Not exactly something that I like, when I am trying really hard to keep gauge.
 
Good luck to me!

Sunday, May 19, 2013

Weekend Shrug - Finished

Okay, let's call this the Two-Weekend Shrug!  I did mainly work on this on the weekend days, so it is safe to say that it was a quick knit.  I bought two hanks of Berroco Weekend and I ended up only needing less than 1-1/2 hanks.

My last post, explained the source of the pattern and a bit about why I chose this to knit:
Continuing with the open weave pattern, I need to knit to a length of about 15 inches.


Once I had 15 inches knit, then I knitted the ribbing again, like in the start.  I have essentially knit a rectangle, with ribbing at the top and bottom of the long sides of the rectangle.


There was a special bind-off method that was needed to mimic a cast-on edge, called Elizabeth Zimmermann's sewn bind-off.  Elizabeth Zimmermann was a British-born knitter that revolutionized the modern practice of kntting, so essentially she is the Mother of Knitting.  What she says goes. :-)

So, this is how it is done.  First, when you are ready to bind-off, you cut the yarn really long; put it on a sewing needle.  Thread the yarn from right to left through the first two sts, purlwise.


Second, thread the yarn from left to right into the first st, knitwise.


Third, pop the first st off the needle.


Repeat, threading the needle in this fashion until you have threaded through the last st on the needle.


The bound-off edge looks like the cast-on edge.  Yippee!  Even if it doesn't, who is going to know??


Then I sewed the ribbed edges together for 3-1/4 inches on each side; folded the ribbed edge that will be on my neck and I was DONE

I went by Brandon Yarn Boutique to show off how much I had done (I was at the final ribbing part at the time I stopped by the shop).  There were other people there and enjoyed looking at my project.  I loved hearing their praise and comments.


How neat is this little shrug?  I can't wait to wear it!  This will be my newest favorite article of clothing.


I am vowing to make only practical pieces.  I have several items that I have knit and barely wear because it's too warm out or it only goes with one thing.  That is a good-intention statement, but in my UFO pile there are wool items and long-sleeved pullovers. Sigh.... 

Sunday, May 12, 2013

Weekend Shrug - Part 1

Hooray!  

I'm back to knitting and blogging.  This is a good thing!

My newest project (yeah, yeah, I know I have a few UFO's hanging out there) is called my Weekend Shrug.  It was a free pattern on Ravelry called Ribbed Lace Bolero by Kelly Maher published in her blog: 10 feet high.

Kelly Maher's pic of bolero - Front

Kelly Maher's pic of bolero - Back

Isn't that cute?  I wanted something that I can do in cotton or cotton blend, versatile with my spaghetti strap and sleeveless blouses, and will be a quick-knit.

I went to my local yarn shop (LYS): Brandon Yarn Boutique to find the perfect yarn.  I knew if I went to Joann's or Michael's, I'd end up not liking the yarn I chose or something, so I decided to splurge and do it right.  My time is worth it!

Anyway, I chose Berrocco Weekend (75% Acrylic, 25% Cotton) in Pitch Black.  I am using size 8 and 10.5 knitting needles.


Weekend is a nice acrylic/cotton blend that feels and acts more like cotton than acrylic.  It is not springy like acrylic, but true to form like cotton (aka, no give).  Just what I wanted...something that can get thrown in the wash; carefree.

First you start out by ribbing a k2, p2 on the 8's.  I would use my 8 circs, but they are tied up with my UFO Cabled Cardi KAL.  Oh well, I have so many straights, that is what I used.  It was a little awkward because I used the 14" ones, which gave me arm fatigue holding them up.  I did not realize how spoiled I had gotten with the circs!

Little ribbing

Next you start the lace or open weave on the 10.5's.  These were even more awkward to work with at the 14" length.  How did our foremothers knit all day with these things?!

Kathy, my sister, talked my into buying the 10.5 circs.  Her convincing argument was that you only have to buy them once and you will always have them.  So true...consider me convinced.  I printed out a Michael's coupon and bought them at 40% off.  Yeah me!

Once the open weave portion is done, then you knit the ribbing again, back on the 8's, and connect the corners which meet under the arm and sew.  Right now, I would consider myself only about 25% done.  I have about 6" of the open weave knitted and I need about 18".


I will not let this shrug stay a UFO for long.  I have been wanting a black short-sleeved shrug for awhile and have been too cheap and lazy to go shopping for one.  I figured that I would be crafty and just knit the darn thing myself.

Cheers to a quick knit!


Sunday, March 24, 2013

Cabled Cardi KAL - Part 1

A KAL is short for Knit-Along.  A Knit-Along is when two or more people knit the same thing at the same time and help each other and are generally there for companionship  and support during the project.

These KALs are often done online in large groups or at knit/yarn shops.  My sister and I will be doing our own KAL and I will be blogging our progress.  We will go at my pace, or rather, I will blog our progress as I progress.  I'm a lot slower than she.  My sister's name is Kathy, so I will just be referring to her as Kathy throughout these posts.

Kathy chose a cabled cardigan from knitty.com called Mr Greenjeans.  Here is a pic from knitty:

Picture from knitty.com

It is a one-button cabled cardigan with raglan sleeves.  It is worked from the back of the neck, down, then the sleeves are picked up at the raglan armhole and then the sleeves are knit in the round (no seams) to the cabled cuffs. Then stitches are picked up along the front and neck edge and a ribbing is knit.

Ok, not too bad.  The experience level is "Tangy" per knitty, and that means, intermediate. I never let the experience level stop me from doing a project.  The techniques needed for this cardi are basics of any raglan pullover.  Should be no problem.

The yarn we are using is Lion Brand Fisherman's Wool (100% pure virgin wool).  I am using Natural and Kathy is using Birch Tweed (78% pure virgin wool, 13% acrylic, 9% nylon).

Natural

Birch Tweed

Kathy mentioned to me that she was going to use Fisherman's Wool and I said, "Hey, I have a few skeins of that in Natural already.  I was going to knit you an Irish Cable sweater one time, remember?  I guess your not getting that Irish Cable sweater!"  Yeah, she figured she wasn't getting one, since I've had this yarn since before Ames closed in Raynham, MA (~the year 2000-ish).  Still has the Ames price tag on it: $5.00 on clearance.  What a steal because it is about $12.99 for an 8 oz skein now.
We are using size 8 circulars.  The pattern instructs to change to 7's when you cable.  We are going to stick to 8's because the cables tend to be tighter anyway, so going down a needle size will only scrunch them up further.  

First the cast-on is done and we get an inch or so into it:

Nancy's Start

Nancy's Close-up

Kathy's Start

Kathy's Close-up

So, we are off and running.  Kathy is already way ahead of me.  It was snowing in MA when she was knitting, so she sat and literally knitted all afternoon on one weekend.  I, on the other hand, not so much.

So, check in every once and a while to see how we are doing on the Cabled Cardi KAL!

Related Posts

Sunday, February 17, 2013

Fix It - Miss Me Sweater

I bought this sweater at a thrift store ages ago and just never did anything with it.  I bought it because it is Miss Me brand.  Vane, I know.  I recently looked up sweaters from Miss Me and, of course, they do not have this style anymore but the cheapest sweater on the website was $54.  This sweater at the thrift store was $4.  Yes, $4.

But....there is a catch.  The sleeves were waaaaay too long.  Who has arms this long?


So, you know what I'm going to do?!?!  I'm going to shorten them and reknit the cuff.  Yeeha!  I can't wait!

This is such a cute sweater, albeit a bit itchy, but cute.  Funny how when you look at the construction of a garment, you see how cheaply it was made.  First, this sweater is a mix of wool and acrylic.  Yuck, very itchy.  I will have to wear a long-sleeved T-shirt or blouse under this.  Second, the buttons on the front are the same shell buttons that I bought on eBay when I made the Shapeshifter Shrug.  They were $7 for a big bag of them.  Point proven.

First, I figured out where I wanted the new cuff to end; marked it.  Then unstitched the seam that held the arms together a few inches beyond the place I marked.  Then I found where I marked and made a little snip on a stitch at the very edge.  I carefully pulled that stitch out across the width of the sleeve.


Once the sleeve was detached from the main sweater, I unraveled the detached part of the sleeve and balled it up.  I will use this very yarn to reknit the cuff.


I tried to gauge what knitting needle I was going to use to reknit.  I have at least one of each size in my organizer.


I figured that I needed a 9.  I put the loose stitches from the real sleeve onto this size 9 needle.


I then knitted the ribbing again: k2, p2.


I tried blocking the sleeves in order to align the stitches neat, by wetting the cuffs and placing a towel on it.


In addition to putting heavy weight on it to smoosh them into submission.


But, it did not really work.  I think the reason why it did not work is because it was an acrylic blend.  Damn those acrylic blends.  They ruin everything!


Once I accepted this, I seamed up the arms again with the tails of the yarn that were hanging out still.  I weaved in the rest of the ends.


The seam are in-line with how it looked originally and the cuffs back together.


Not too shabby....


I wore it to work a few weeks back and got tons of compliments.  Thank you Miss Me, but move over for Miss Nancy!