Showing posts with label lace. Show all posts

Sunday, April 13, 2014

Colonnade Jacket

This sweater is going to drive me to drink!  Let me start from the beginning...
 
I love this sweater, the Colonnade Jacket from the Interweave Knits Summer 2013 issue:


I bought yarn for it at the end of November of 2013 and did a gauge swatch and have not did a thing with it until the end of March.
 
The yarn I bought is Berroco Vintage (50% Acrylic, 40% Wool, 10% Nylon) in a blue color called Cerulean, at my LYS Brandon Yarn Boutique.  It is so soft and has a heathered look to it, not completely solid in color.


Love It!!
 
Anyway, as you can see in the picture of the jacket, there is a lace on the entire front edge.  This pattern is written so that you knit side to side, so at the beginning and end of each row, you are knitting the lace pattern, with knit or purl sts in between.
 
This is where the drinking comes into play.
 
I wanted to challenge myself and read the pattern from the chart and not do words or a written out pattern.  Seems like an easy chart:


I mean, I have seen some pretty involved charts, and this one is easy.  WELL, it turns out my brain has not been wired to read charts.  I tried, really tried to get the hang of this.  I just could not successfully complete a pattern repeat through to the 10th row to save my life.  I would goof-up on something at some point.
 
I attempted this pattern on a gauge swatch, of course.  I'm crazy, but not that crazy to jump in on the project before getting the sts down pat on a practice swatch.


I grabbed leftover acrylic from my stash to practice.  The orange string is my lifeline.  Yes, a chart and a lifeline.  Two new techniques to me in this one project.  The object of the lifeline is that you have the string in your project at a point where you know that it is error free.  Like you are good up to that point and you mark where this point is.  You continue to knit and if you do make an error that you cannot fix, you can rip out your work down to the lifeline.  The lifeline has secured your row and you slip your needle in the stitches that the lifeline is holding.  Viola!  You do not have to rip the whole thing out and you just resume knitting from where you marked.
 
The use of the lifeline is critical in lace knitting.  There are yarn-overs (yo) and slip, slip knit (ssp) all over the place, where you would never be able to recreate that if you dropped a yo somewhere or whatever the error may be.
 
Once you get to a point, you insert a new lifeline and continue knitting.  I use two, so that when I am ready to place the 3rd one, I remove the bottom-most lifeline and use that same string again.  You remove it by simply pulling it out.
 
In the above picture with my practice swatch, just above the bottom repeat, there is an error.  A big boo-boo.  I had ripped out the whole thing multiple times and since I had not put the lifeline in at the start, I had to cast-on again and again and again.  Like I said, I was chart reading and really trying.
 
When I made that boo-boo, I just started back at row 1 and continued with my first lifeline.  It worked!  I had to rip back a few times to the lifeline in my practice swatch.  Well, at least that is what it is there for.
 
I continued with my practice swatch for a few more repeats and then bound off.  I wanted to graduate to my actual yarn that I will be knitting with and with the size needle I determined I would use.  Not bad, I have removed the lifelines, which I was gaining confidence on:


I can do this!!  Ok, so I cast-on for the project, ahem, 180 sts.  Jeepers, I hope we are good-to-go!!
 
I place my lifeline at Row 1, my first knitted row.  Good thing, because I messed up and ripped out... a few times at various rows.  I was getting a bit fed up with this.  So, I reverted back to the way I like to knit: with flashcards.
 
I write out each row on an index card in words or abbreviations.  I have one card where I mark what row I am on and where I have placed the lifeline.  This way, I am only looking at the very row I am knitting, not distracted by symbols or viewing the entire chart and losing my place and translating in my head what to do next.


Let me tell you, this has worked out SO much better!  I no longer feel the need to get drunk after knitting or requiring blood pressure medication.  I am using the lifeline as I go and I feel much better about the project now.


I'm not that very far along, but at least I actually want to keep working on it, rather than ditching it and looking for another project to knit with my boutique yarn.

Sunday, June 23, 2013

Indecision City

I bought this beautiful yarn for a project way back last summer, in July 2012.


It is Alpaca Silk (50% Alpaca / 50% Silk) from Blue Sky Alpacas.  It is sport weight and it is in a rich purple color.  I bought 3 hanks of it from a woman on Ravelry for $24, including shipping.  That is a fantastic deal, because online, one hank goes for about $14.  It's like getting one free!  Love it.

My original project idea was from a book called French Girl Knits by Kristeen Griffin-Grimes:

Interweave Press

This book has beautiful French-inspired knitted garments, with seamless construction.  The project I was going to choose to do was called Delphine, a lacy tank top:

Delphine, Interweave Press

Once I copied the pattern and started to do my research on needles and gauge, I discovered that I needed 7 different sets of needles: 2, 3, 4 circs in two separate lengths and then another circ in yet another length.  Ahh, oh crap.  I don't want to be doing all of that!  Yes, gorgeous tank, not so fun knitting experience.  Ugh!

I was bummed when I came to terms with it in my head.  I then poured over my knitting pattern library (with the help of Ravelry: I have it all in their database, where I can search the patterns without actually thumbing through all of my magazines).  My next choice was another lacy top that will use about the same amount of yarn.

It is from Debbie Bliss's Magazine, Spring 2011.

Debbie Bliss, 2011

I chose Cropped Lace Top, pattern #13 (lucky 13, I hope).


Cropped Lace Top - On Right

The sweater is the one on the right.  The construction is knit in 2 pieces from bottom up.  Seam together. Uses one set and size of needle.  Sounds good to me.

I am using size 5 circular, knit flat, not in the round.  I actually started this one and when I got to about 2 inches knit, I was half through one ball...I only have 3.


I put waste yarn through the loops and took it off the needle.  I had 13 scallops (pattern repeats) which measured over 24 inches across.  I need it to be only 20 inches...Drat!  I did not do a meaningful gauge swatch.  I knitted one to make sure I got the pattern repeat down, then casted-on.  My bad.

I even went to the beach with it when my sister came to visit:

Siesta Key Beach, FL

So, I did what anyone would have: I ripped it all out.  Ugh.  Yup, back to the drawing board.  I continued my pattern search and came up with a cute shawl that can be draped into a wrap, shawl or scarf.  It is called Summer Flies shawl.

A fellow knitter on Ravelry, esqknits let me use her finished pic to show what it would look like when it's finished:

Summertime Blues by esqknits

How beautiful; I think that looks very stunning, especially in that aqua blue.  I'm still sticking with the purple, so I can only hope that it is as eye-catching as her Summertime Blues shawl.

Third times a charm??

Sunday, May 12, 2013

Weekend Shrug - Part 1

Hooray!  

I'm back to knitting and blogging.  This is a good thing!

My newest project (yeah, yeah, I know I have a few UFO's hanging out there) is called my Weekend Shrug.  It was a free pattern on Ravelry called Ribbed Lace Bolero by Kelly Maher published in her blog: 10 feet high.

Kelly Maher's pic of bolero - Front

Kelly Maher's pic of bolero - Back

Isn't that cute?  I wanted something that I can do in cotton or cotton blend, versatile with my spaghetti strap and sleeveless blouses, and will be a quick-knit.

I went to my local yarn shop (LYS): Brandon Yarn Boutique to find the perfect yarn.  I knew if I went to Joann's or Michael's, I'd end up not liking the yarn I chose or something, so I decided to splurge and do it right.  My time is worth it!

Anyway, I chose Berrocco Weekend (75% Acrylic, 25% Cotton) in Pitch Black.  I am using size 8 and 10.5 knitting needles.


Weekend is a nice acrylic/cotton blend that feels and acts more like cotton than acrylic.  It is not springy like acrylic, but true to form like cotton (aka, no give).  Just what I wanted...something that can get thrown in the wash; carefree.

First you start out by ribbing a k2, p2 on the 8's.  I would use my 8 circs, but they are tied up with my UFO Cabled Cardi KAL.  Oh well, I have so many straights, that is what I used.  It was a little awkward because I used the 14" ones, which gave me arm fatigue holding them up.  I did not realize how spoiled I had gotten with the circs!

Little ribbing

Next you start the lace or open weave on the 10.5's.  These were even more awkward to work with at the 14" length.  How did our foremothers knit all day with these things?!

Kathy, my sister, talked my into buying the 10.5 circs.  Her convincing argument was that you only have to buy them once and you will always have them.  So true...consider me convinced.  I printed out a Michael's coupon and bought them at 40% off.  Yeah me!

Once the open weave portion is done, then you knit the ribbing again, back on the 8's, and connect the corners which meet under the arm and sew.  Right now, I would consider myself only about 25% done.  I have about 6" of the open weave knitted and I need about 18".


I will not let this shrug stay a UFO for long.  I have been wanting a black short-sleeved shrug for awhile and have been too cheap and lazy to go shopping for one.  I figured that I would be crafty and just knit the darn thing myself.

Cheers to a quick knit!


Sunday, January 6, 2013

Origami Sweater Finale - Part 3

Happy New Year!!

I have been working on this sweater since October and I was working steady on it for a good month and then my elbow/arm started to hurt from knitting nonstop that I slowed way down.  Here are my past two posts related to this sweater:
Just a quick overview:  This sweater pattern is from Berroco called Buzios.  I don't know who comes up with these names at Berroco, but typical is not an adjective I would use.  I enjoy that about them, though.  I knitted this with Berroco Origami.


During my weekends knitting, my cat Julie would occasionally nap on my project.  I would get up to get something or do a chore and I would often come back to that pic above.  Too cute!  She's literally face down in the yarn!  Here is another one:


I did have two resolves before the end of the year, 2012, and that was 1) To finish a book that I had been reading since Thanksgiving (have you noticed that I have not been posting about books lately??) and 2) to finish this sweater.  Well, I am happy to report that there are checks in each of those boxes!!


I was definitely going down to the wire with that second resolve!  The microwave clock read 9:59pm on New Year's Eve.  Phew, with two hours to spare!  That was finishing, binding off and weaving in ends.  I used a total of 6-1/2 hanks of Origami.  I had to run down to the Brandon Yarn Boutique to buy that 7th hank on Monday.  Unreal!


A few things about this sweater...The neck is way too big.  I needed to decrease more stitches.  Since I am not going to unravel it, I made a braided string with the extra yarn and laced the V up a bit.


I also replaced the tank underneath with a short-sleeved shirt, so that there is fabric for the sweater to "grab" onto.


I am very pleased with the final product that this sweater became to be.  This can be worn with jeans, leggings or even pajama pants!  I'm actually wearing pj/yoga pants in the above pic, so this can be worn with pretty much everything.

I'm loving it and I hope that you enjoyed my Origami Sweater journey. 

Have a great 2013!

Sunday, December 2, 2012

Origami Sweater - Part 2

I have been knitting like crazy all throughout November, and I'm still not done with my Origami Sweater.  I have been knitting the lace stripe then knitting the seed stitch like a robot.  That seed stitch is enough to drive anyone mad!

I started the Origami Sweater in the middle of October; the first post is here:
Now, I can positively say that I can see the light at the end of the tunnel.  Like I said, I'm still not done, but it's close.  I brought it with me when I visited Mass over Thanksgiving and got a good portion done.

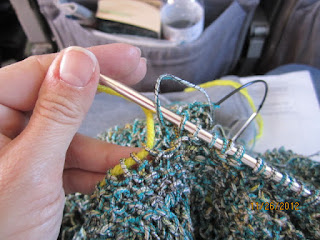
I knitted the rest of the body, then left that on those needles.  I took a second set of longer size 7 circs and did the Magic Loop method to knit the sleeves in the round, rather than using double pointed needles.  My double points were metal and this yarn is like string, so it kept slipping off of them.  I knitted both sleeves and put a contrasting yellow yarn on the live loops to hold them until I was ready to attach them to the body.

Once I was ready with that I would knit a bit from the body, then knit from the yellow holding yarn from the sleeve, knit more body, then attach the second sleeve in the same manner.  It was a bit weird knitting from a piece of yarn, but it worked.


That yellow yarn in the pic is my left hand "needle".  The work on the right handed needle is the body of the sweater.

I got to attach the sleeves while I was on the plane.  I read a bit, then wanted to attach the sleeves before I forgot what I was supposed to do.  Then I went back to reading.


Can you believe that it is starting to look like a real sweater!  Although, it does look a bit shrunken; I'm expecting that once complete, I will stretch it this way and that way to get the stitches settled in and it will fit fine.  Keep your fingers crossed!

One bad thing about all this knitting is that I sort of injured myself.  Yes, a knitting injury, if you will.  My sister calls it epicondylitis, which is pretty much like tennis elbow in my left forearm.  When I knit, I keep my left hand and arm in a bent clenching position for long periods of time holding the left hand needle and that has made my arm very sore.


In the above pic, it is my extensor carpi radialis brevis that hurts!  When my elbow is bent for a period of time, it is very stiff when I extend it straight.  Ugh!  I do running, cross-fit, and the occasional bike ride...I don't get hurt doing any of those activities, no, I get hurt KNITTING!  Like, could it be any more ridiculous?

As a result of that, I have been slowing down on my knitting.  I'm not even done with my holiday gift knitting either.  I may have to forgo those other gifts and start mixing reading and sewing in between my knit projects.

On that note, let me put a warm compress on my arm so I may finish this sweater!

Sunday, November 11, 2012

Origami Sweater - Part 1

In my fog of knitting a few [hundred] Christmas gifts, I decided to start a project for myself.  Nothing like putting pressure on myself.  Meaning, I'm not done with my Christmas knitting yet, but I am throwing a sweater in the queue for myself...that I started already!

My local yarn shop (LYS), Brandon Yarn Boutique, was having a sale, so it was a perfect time to shop.  My intention was for myself, I won't fool anyone.  I picked a few projects that I had on my mind and went down there.  Luckily, only one panned out.

I am knitting the Buzios pullover from Berroco.  It was a free pattern from their website and it is knit with Origami (48% Acrylic, 19% Nylon, 17% Linen, 16% Cotton) in a green and blue blend called Turtle Bay.

Pic from Berroco website

As usual, I went down a needle size than what was recommended so that I could achieve the correct gauge.  So, I am using a size 7 circulars.  This sweater is knit in the round from the bottom up.


Here is the yarn.  It is actually not really yarn, but has beautiful colors.  It is several different types of string held together then wrapped with a black thread to bind it.  It's like working with a thin cord.  I don't see this sweater being all that warm, but since it is lacy and open, that was never it's intention!

I casted on and I was off!


The stitches in this sweater are a lace stitch and seed stitch.  There will be stripes of seed stitch alternating with the lace stitch.  I was joking with a fellow knitter and we were saying how seed stitch takes a lot of time.  I told her that this is half seed stitch and I said that this was a project doomed to be a UFO (unfinished object) before it even starts.  I was only joking because this yarn was pricey and it was not going to sit in the closet, unknit!

I'm actually chugging right along on it.  The seed stitch stripes are great for knitting while watching TV or chatting.  The lace stitch stripes, I need to pay attention and count the stitches after each row.  Lace stitching is made up of a lot of yarn overs (yo) and decreases, so you can miss one and not realize it until a row or two later.  Fixing lace is not fun.


I snugged a long pillow through the sweater so that you could see my progress.  From the bottom up, I knitted the seed stitch for 1", then there is the lace stripe, 2" seed stitch stripe, and another lace stripe, then a seed stitch stripe.


The lace stripe: A close-up.  To date, I have knitted a bunch more, I just have not taken any more pictures, but it is pretty much the same: alternating the seed and lace.  Since I am knitting in the round, there will be no seaming.  Once it's done, it's done.

But, since I'm still finishing up some Christmas knitting, this sweater I will work on in the background.  I have only a few more items to knit for gifts, but I'm dragging my feet on them.  One involves stranding, which is like using the yarn wrapping technique that you use for fair isle knitting (multi colors).  I do not have much practice with multiple colors.  We shall see.

Stay tuned for more fun stuff in the pipeline.

Related Links:

Monday, August 27, 2012

Yarn Stash

I had a long weekend this weekend, thanks to Hurricane Isaac.  Tampa Bay was expecting tons of rain and heavy winds, but the Hurricane went further west than the original forecast models predicted.  My employer had cancelled work for Monday.  Last time we got a lot of rain, my work was like an island, where the parking areas were completed flooded, even the road in.

So, I decided to work on a project that I have been meaning to do for some time now.  The online knit and crochet database & fiber community, Ravelry, allows you to enter in your patterns, yarn, needles & projects.  I had previously entered in my patterns, magazines & books.  This weekend I entered in all of my stash yarn.


Here is a bin of my oldest yarn.  I have had some of this yarn for years, that I even moved from Mass with it.  I swear I will use it one day.  There are some unfinished objects (UFOs) in there that I have full intention to rip out and make better use of the yarn.  Someday...


Here is a picnic basket full of one skein or half skeins of yarn.  This mostly houses the leftover yarn from my completed projects.  It also has my metal straight needle collection.  My cat, Roo, is dying to jump in that basket.


Here is a small basket of yarn from projects that I have recently completed and don't have room in the bin or the picnic basket.

I need to start stash busting.  Some ideas I have are to make scrap scarves, striping with different textures of yarns.  I did a bit of that for the Trio Scarf and the Quintet Scarf. I have other patterns that would look nice with multi textures and colors.  I also want to make a scrappy throw blanket where I would knit different blocks of different patterns and sew them together.  It would be so kitschy; I would love it.

I have a few knitted Christmas gifts to get through (I'm limiting it to just a few) and then I may just start on some scrappy scarves and throws! 
 

Tuesday, May 22, 2012

Seafoam Lace Scarf - The Finish

Whoo-hoo!  I love finishing a project.  This scarf came out so nice, that I took time out from blogging on the weekend to finish it.  This is the third installment of the Seafoam Lace Scarf (Part 1 and Part 2 - click there, they have all the project details) and it will be the last.

I had finished the main body of the scarf for Part 2 and just had to crochet around the edges.  I say "only" but crochet is not my strong suit.

Crochet around the rosy

So, above, is my first round of single crochet (sc).  I went around once and then when I got to the short end, I crocheted the lace edging.  The lace edging is made up primarily of chains, connected to the edge by a sc.

SC close-up

As you can see, the main body was knitted with mohair (so soft) and the edging is crocheted with a hemp blend that feels like cotton.  I love the hemp yarn and really want to make a real garment with it.  (I already have a pattern picked out - alas, I have to buy a full book for the pattern though).

Lace edging - It's a chain thang

When the first short edge got it's lace edge crocheted on, then I did another sc down the length of one side of the scarf that brought me to the other short end.  I then crocheted the same lace edge on that.  Once the second edge was complete, I crocheted sc down the other long end and tied off once I got back to the first lace edge.

How romantic!

There it is - Complete!  The lace edging was a nice challenge for me, where it was not super hard, but I had to think a bit.  I will admit that Vince's mom had to show me what to do, I was counting the sc all wrong.

Very feminine, indeed

The instruction would state to do something in the first sc and then skip one sc and blah, blah.  Well, I was not thinking with my crochet hat on, so I was counting the stitches in the chain as a sc!  I had loops all over the place!  Vince's mom set me straight.

The scarf debut

I wore the scarf to work today, with the knot off to the side.  It was so nice: light and airy.

Scarf in action

I always buy too much yarn for projects.  I still have a full ball and a quarter of the mohair and about half of the hemp.  This project did not even take up one full ball of either.  I like having extra, but I feel like I must go forth in the world and make something else with it right away.  I could knit another scarf, but I hate repeating a project.

I am searching Ravelry and my current library of knit and crochet patterns for something to do with them.  These were my special luxury yarn buys from Christmas.  The project(s) I choose for these must be worthy.  I already have a few ideas....

Sunday, May 13, 2012

Headbands-A-Plenty

Happy Mother's Day!

I was surfing the web of my favorite websites and blogs for some inspiration and I found some on P.S.-I Made This.  Today's project idea came from the braided headband all the way down the bottom of the page.

It is making headbands with covered elastic hair ties, scraps of fabric and odds and ends.  I not only braided some headbands but also made some from a bag of old neck ties I bought at a yard sale for a buck.

My odds and ends

Here is my collection of odds and ends: it includes neck ties, ribbon, yarn, lace and strips of fabric.  Yes, there is some feather boa in there, but it ended up being a bit too elaborate for a headband this time around.  I know, I'm no fun!

Good ol' Goody

First, I did the neck tie headbands first.  I used the skinny portion of the tie and cut a length that fit my head.

Making use of ugly neck ties

I knew these ties would come in handy!  I sewed one end around the elastic and pinned the other end to the elastic so I could fit it to my head perfectly.  I have a small head, so many elastic headbands slip off because they are too big.

Half done already

Once I got it where it fit the best, I sewed that end down.  Viola!  I'm done!

Ugly ties = chic headband

I made a few neck tie headbands, because they took no time to whip up.  I then made a few braided ones.  For the first one, I took a strip of denim, a green and white polka dot ribbon and a strip of black lace.  I sewed them around the elastic like I did the ties.

Neon is back!  Really!

That one had a very retro 80's feeling to it.  Very Debbie Gibson.  The second braided one, I took some brown chenille yarn, navy blue nylon cord and baby blue cotton yarn.

Skinny headbands are cool, too

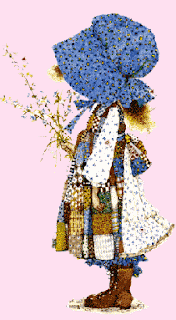
That one is very skinny.  The chenille gives it texture that holds to your hair a bit.  The blue and brown together reminds me of Holly Hobby with her brown field boots and blue bonnet.

Love Holly Hobby! <3

So, all-in-all I made six headbands in the course of about an hour.  This was an easy project and you really don't even need a sewing machine.  You can just needle and thread the neck tie ones and then knot the braided ones.

Busy bee, I was

Show me some blog love and send me some pics or comments to let me know what your thinking!  I would love to see your WIPs or finished projects!