Showing posts with label unfinished project. Show all posts

Sunday, December 8, 2013

WIPs (Work In Progress)

I track my knitting and crochet projects in Ravelry (an online knitting and crochet community).  I have six (6) WIP's: including one (1) that I bought yarn for and have not even casted on for yet and one sewing project that is incomplete.

I figured I would showcase theses projects as to remind myself and my faithful readers what are still outstanding.  Yes, I am calling myself out!

I am going to list them from oldest to newest...here we go (I'm going to be hiding under a blanket as to no show my face while you read this)...embarrassing!

Dec 2009, Celtic Knot Sweater:


This is supposed to be a Celtic Knot Sweater from Interweave Knits Winter 2007.  Yeah...I was so psyched to buy this, only to never even knit up a gauge swatch.  This is what the project should look like when complete...


I love it even today...someday I will start this project.  Next:

March 2013, Scrappy Quilt:


My Scrappy Quilt!  Each weekend I think that I will work on it, but I don't.  I have to sew on my borders, sew the backing and then pin the three layers with the batting in the middle and quilt the top.  I have a friend that has a quilting machine that I will arrange a visit when I am at that stage.  Ugh...the winter would be a great time to finish this quilt.

March 2013, Cabled Cardi KAL:


I am still deciding whether to unravel or keep knitting.  This was not knitted according to the pattern, where I knitted a cable at each interval, but there should be a patch of knitting between each cable.  My sister thinks it will be fine if I continue as I have been knitting.  I suppose so...I am going to visit in Dec, but I doubt I will be done with this by then.  But on the other hand, visiting Mass will be the only occasion in which I will wear it.  Whatever...
 
 
June 2013, Indecision City (aks Plum Lovin')
 
 
This is supposed to be a shawl.  I have not even blogged much about it.  I'm not in love with it, so I may rip it out at some point and choose another project for this yarn.
 
 
This yarn is my alpaca and silk blend.  I want a worthy pattern for this yarn.  I think I have convinced myself that I will rip it out and start a different pattern with it.  Alas...
 
July 2013, Palm Scrap Afghan
 
 
This is supposed to be a WIP, but I have gone past these 4 motifs.  I need worsted weight yarn for this and ideally machine washable.  I have some wool, but I cannot wash it, and other weights of yarn.  I could still use them, I just have not gotten there yet. 
 
August 2013, Romance Shell
 
 
I have paused on this project because the yarn is not nice to work with.  But I should work on this at the beginning of the year, to ensure it will be wearable by spring.  This will be perfect for spring.
 
I am still doing some Christmas knitting, where those projects will not be revealed until after Christmas, as to not spoil it for anyone, so those are not counted here.
 
I write this over Thanksgiving weekend and cannot resist the urge to go to Brandon Yarn Boutique and buy yarn for my next project.  Buying yarn really is a habit and it is hard not to do it.  I clearly do not need any more yarn or projects, clearly....but I love new projects and new yarn and using my ball winder and cataloging the yarn in Ravelry.  I need to knock off my Vampire Knits patterns...I think my purchase will include yarn for the Lore Hoodie! 
 
 
Ooh I can't wait!!!


Sunday, August 25, 2013

Bata Blanket #2

Yes, I am making the Marble Baby Throw from Lion Brand Yarn again.  This time for Vince's sister, who is having a boy.  I have made it twice now, they are listed below:
 
I named these blankets for the language of the recipients.  Bebe for my girlfriend who has Spanish spoken in her house and Bata for my Filipino boyfriend, whose these blankets went/will go to his Filipino friend and sister.  Bebe and Bata mean baby.

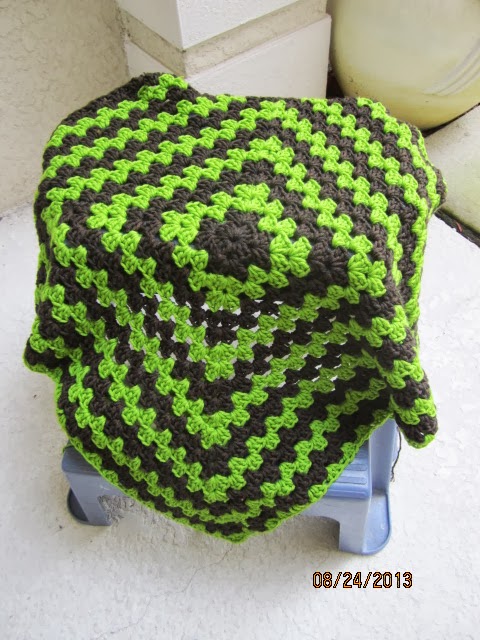
I am using the same yarn I used for the Bata Blanket: Berroco Comfort (50% Cotton, 50% Acrylic).  The colors I chose this time are Seedling (green) and Coffeeberry Heather (dark brown).


I checked out her gift registry and she had lime green and dark brown bedding as her color theme.  So, I did my best, even though Seedling is a bit darker than the lime green of the bedding.

I am crocheting, mainly at night, while TV watching.  But during the week, it is hard to have more than 30 minutes to work on it, so I have been reading.  I am crocheting the bulk of it on the weekends.  I have to finish by the beginning of September, for she is due September 12. Plenty of time.

Famous last words....


It is more than half complete.  This blanket takes a total of 4 skeins of yarn.  Since it is only 2 colors, 2 skeins each of Comfort color.  I am on my second set of skeins = more than half done.


In search of some natural lighting and background, I may have chosen poorly because the bushes are almost camouflaging the blanket!  You get the idea and this picture accurately portrays the colors of the yarn.


Think of this pattern as one big Granny Square.  I love how it is so easy. 
 
I have a feeling that this will not be the last Marbled Baby throw I crochet this year.  There is always someone having a baby and off the top of my head I can think of two women I know that I could crochet this for.  So much for knitting for myself...better warm up the crochet hook.

Sunday, June 9, 2013

Cabled Cardi - Part 2

No, I have not forgotten about my KAL with my sister.  The Knit-A-Long is just taking a long time.  It could be that the weather is getting nicer and I don't want to knit with wool anymore.  Actually, that is exactly it.

Kathy is pretty much done with her sweater, as I am the pokey one, am still knitting the body with all of those cables.  Just to refresh everyone on what the Cabled Cardi was, here is a link to Part 1:
Here is also a pic of what it is supposed to look like when we are done:

from knitty.com

Since its cast-on, I have done most of the body.  The raglan sleeves have waste yarn keeping the live stitches for the sleeves holding-tight until I get there.

Top Portion - Front

Looking at these pics, I'm not really liking the color, or the absence of color, much.  Oh boy....

Top Portion - Back

At this point is where I will start the cabled-ribbed part.  It will have no bottom ribbing, that this cabled bottom portion will serve as it.

The cabled was going well, it just takes awhile.  There are a bunch of cables that using a cable hook might take too long.  The quick technique for doing the 4-stitch cable is:
  1. Insert right needle tip into the back loops of 2 stitches on the left needle.
  2. Pop all 4 stitches off the left needle.
  3. Place the loose two stitches back on the left needle and place the 2 stitches that are on the right needle back on the left needle.  They are now in a different order.
  4. Knit, like normal, with the new order of stitches on the needles.
That creates the cable without using a cable hook.  With there being only 4 stitches, it works well.

I have made decent headway on the cabling portion.  But.....there is a minor problem.  Not problem really, but a I just realized I did way more work than I needed too.  Crap!  You'll see:


Here is the cabling.....can you see from the first pic in this post, what is different about it???  Scroll back up and compare the pics.

I did too many cables!  You are supposed to have a ribbing between each cable and I just kept on cabling.  Ugh!  That is way more work than what I was supposed to do.  I do like it, but not what I had in mind.

I only just realized it today, when I looked at the pattern to see how long I am supposed to knit these darn cables to.  I saw the pics and was like, Ah, what is that pic?  Are there different ways you can knit the cables?  Did they give us choices on how we wanted it to look?  Well, the answer is No.  I just did my own thing and did not read the pattern repeat right.

Looks nice, but I'm concerned now that once I put it on, the cables with bunch to the back of me, rather than a nice fan around me.  The cables tend to bunch together, making a ribbing of their own.  The problem with that is that my gauge is now off, with the potential of being too small.  

Well, I'm now putting it back in the bag and will wait it out.  I don't really know what I am going to do with it.  I have a few options:

  1. Continue and hope for the best 
  2. Rip out the cables and start the cable part again
  3. Rip out the whole thing and reknit it in another yarn
  4. Rip out the whole thing and call it a day

Not sure.  Tough choices, since I have spent a ton of time on it already.  I'm having second thoughts of the yarn I chose because it's wool, itchy wool, and can't have it next to my skin.  I'm in Florida, when am I going to wear this?  Only when I'm in Mass, visiting?  I can just wear my sister's sweater that she already knitted.  Hehe.  

I may just rip it out and start it again with another yarn.  A softer yarn.  I'll see what my sister says about it.  I've already placed it back in the bag.  The only bummer is that the project is using my popular size 8 circs.  I like those and tend to use them a lot.  I could have used them on the Weekend Shrug, but used straights instead.

If this happened to you...what would you do?  Let me know!

Sunday, June 2, 2013

Sewing Room - Part 2

I wrote a tester at the end of the Bata Blanket post about the progress of the sewing room.  I am ready to reveal what we are doing:

Making shelves along the one wall that is indented and having a computer work station built-in

Whoo-hoo!  I know you guys are probably, like, Big deal, shelves?  Anyone can do shelves.

Although this may be true, these will be my shelves, made especially for me by Vince and myself, made for my sewing room.  I can really, seriously get organized and take my crafting serious.


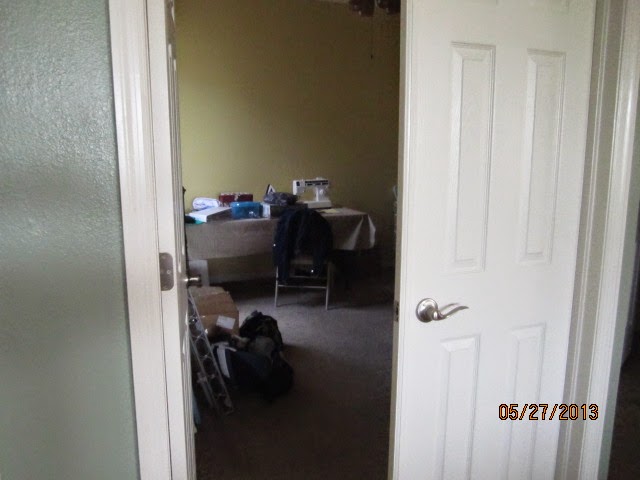
This is how the sewing room has been.  An eyesore with junk everywhere, having one door closed so I don't have to look at it.  In the pic, it is not very inviting.  The cats hang out there and that is about it.  Sad.


That is a pic of the left side of the room when you walk in.


That is a pic of the right side of the room when you walk in.


This is the wall where the shelves will go and computer station.  It is like a nook.

Ok, you can say it: What a mess!  The bookcase is the only thing in this room that is organized and I did not even take a pic of it.  Later.

The Plan:  There will 4, 8 foot long shelves that are a depth of 15 inches each.  Then the computer station will be a 24 inch deep shelf, running in parellel to the other shelves that will be above it.  There will be a 4 foot  long shelf under the computer station that will hold the printer and paper shredder.

Everything will fill in around these shelves.  I will get rid of the current computer cabinet, that you see above.

To start, Vince bought wood and had it cut.  We got it home and he trimmed it so it would fit in the nook.


My job was to sand using the belt sander.  Cool!


Vince rounded the edges with a separate piece of sandpaper.


He used the compound miter saw to trim up and make the ledge where the planks will be sitting on.  He cut 2 x 2's at 45 degree angles so they will fit into each other.


Next was staining the wood.  I chose a Cherry color.  Very nice!!!


I did one coat on the bottom of the plank and 2 coats on the tops of the planks.  Man, that is manual labor!!


A finished plank.  What a handsome plank!  Ok, I am going to stretch this project out a bit more.  Next time you will see it actually in the room!!

Monday, May 27, 2013

Bata Blanket - Part 1

Happy Memorial Day!

Bata, in the Filipino language, means Baby.  I have decided to crochet a baby blanket and give it to Vince's best friend who just had a baby girl in February and call it my Bata Blanket.  It is a pattern that I have crocheted in the past, so I will not be reinventing the wheel on this one.

The pattern is the Marbled Baby Throw from the huge selection at Lion Brand Yarns.  I had crocheted this for my friend's baby last summer, the CB Bebe Throw.  Here is a photo from that project:

Oliver's Blankie

I hear from Crissta and Oliver loves the blanket and sleeps with it every night!  I love it!!!

So, since it was a hit with one baby, let's go for two!  Vince's friend lives out in California and just had his second child.  Way back in 2010, I crocheted the same baby blanket pattern, like, 4 times.  His son got one of them.

Mateo's Blankie

Ok, let's get down to the details of this blanket.  I am using Berroco Comfort (50% Nylon, 50% Acrylic), worsted weight.  I am using two different purples (Raspberry Coulis & Grape Fizz), a teal blue (Dutch Teal) and a pink (Ballet Pink) bought at the Brandon Yarn Boutique.  I am using a size I hook. 

The Ballet Pink and Grape Fizz are light colors and the Rasperry and Dutch Teal are darker, more saturated.  The mix of them together area great! 

Berroco Comfort

The pattern is your basic granny square.  Just one big square that you change colors after two rounds.  I started this blanket last Sat, May 19.

The START!!

The above pic is what the start looks like, with all of the colors being used once.  From the middle, the colors are Dutch Teal, Raspberry Coulis, Grape Fizz and then Ballet Pink.  Once the pattern is established, you don't even need to lug around the pattern anymore and the colors start to come together.

Love this color combo!

I chose these colors over the Comfort Baby colors because the saturated colors give it such a pop, that I'm sure the bata will enjoy it as a toddler, too.

Vince and I have a plan that is being worked on for the sewing room!  I'm so excited to be moving forward with something in that room.  Once I had unpacked everything, it looked just as worse as when the stuff was in boxes!  Preview: I helped cut wood on a compound miter saw, I sanded with a belt sander and I am an expert on wood stain.......

Sunday, May 12, 2013

Weekend Shrug - Part 1

Hooray!  

I'm back to knitting and blogging.  This is a good thing!

My newest project (yeah, yeah, I know I have a few UFO's hanging out there) is called my Weekend Shrug.  It was a free pattern on Ravelry called Ribbed Lace Bolero by Kelly Maher published in her blog: 10 feet high.

Kelly Maher's pic of bolero - Front

Kelly Maher's pic of bolero - Back

Isn't that cute?  I wanted something that I can do in cotton or cotton blend, versatile with my spaghetti strap and sleeveless blouses, and will be a quick-knit.

I went to my local yarn shop (LYS): Brandon Yarn Boutique to find the perfect yarn.  I knew if I went to Joann's or Michael's, I'd end up not liking the yarn I chose or something, so I decided to splurge and do it right.  My time is worth it!

Anyway, I chose Berrocco Weekend (75% Acrylic, 25% Cotton) in Pitch Black.  I am using size 8 and 10.5 knitting needles.


Weekend is a nice acrylic/cotton blend that feels and acts more like cotton than acrylic.  It is not springy like acrylic, but true to form like cotton (aka, no give).  Just what I wanted...something that can get thrown in the wash; carefree.

First you start out by ribbing a k2, p2 on the 8's.  I would use my 8 circs, but they are tied up with my UFO Cabled Cardi KAL.  Oh well, I have so many straights, that is what I used.  It was a little awkward because I used the 14" ones, which gave me arm fatigue holding them up.  I did not realize how spoiled I had gotten with the circs!

Little ribbing

Next you start the lace or open weave on the 10.5's.  These were even more awkward to work with at the 14" length.  How did our foremothers knit all day with these things?!

Kathy, my sister, talked my into buying the 10.5 circs.  Her convincing argument was that you only have to buy them once and you will always have them.  So true...consider me convinced.  I printed out a Michael's coupon and bought them at 40% off.  Yeah me!

Once the open weave portion is done, then you knit the ribbing again, back on the 8's, and connect the corners which meet under the arm and sew.  Right now, I would consider myself only about 25% done.  I have about 6" of the open weave knitted and I need about 18".


I will not let this shrug stay a UFO for long.  I have been wanting a black short-sleeved shrug for awhile and have been too cheap and lazy to go shopping for one.  I figured that I would be crafty and just knit the darn thing myself.

Cheers to a quick knit!


Sunday, December 2, 2012

Origami Sweater - Part 2

I have been knitting like crazy all throughout November, and I'm still not done with my Origami Sweater.  I have been knitting the lace stripe then knitting the seed stitch like a robot.  That seed stitch is enough to drive anyone mad!

I started the Origami Sweater in the middle of October; the first post is here:
Now, I can positively say that I can see the light at the end of the tunnel.  Like I said, I'm still not done, but it's close.  I brought it with me when I visited Mass over Thanksgiving and got a good portion done.

I knitted the rest of the body, then left that on those needles.  I took a second set of longer size 7 circs and did the Magic Loop method to knit the sleeves in the round, rather than using double pointed needles.  My double points were metal and this yarn is like string, so it kept slipping off of them.  I knitted both sleeves and put a contrasting yellow yarn on the live loops to hold them until I was ready to attach them to the body.

Once I was ready with that I would knit a bit from the body, then knit from the yellow holding yarn from the sleeve, knit more body, then attach the second sleeve in the same manner.  It was a bit weird knitting from a piece of yarn, but it worked.


That yellow yarn in the pic is my left hand "needle".  The work on the right handed needle is the body of the sweater.

I got to attach the sleeves while I was on the plane.  I read a bit, then wanted to attach the sleeves before I forgot what I was supposed to do.  Then I went back to reading.


Can you believe that it is starting to look like a real sweater!  Although, it does look a bit shrunken; I'm expecting that once complete, I will stretch it this way and that way to get the stitches settled in and it will fit fine.  Keep your fingers crossed!

One bad thing about all this knitting is that I sort of injured myself.  Yes, a knitting injury, if you will.  My sister calls it epicondylitis, which is pretty much like tennis elbow in my left forearm.  When I knit, I keep my left hand and arm in a bent clenching position for long periods of time holding the left hand needle and that has made my arm very sore.


In the above pic, it is my extensor carpi radialis brevis that hurts!  When my elbow is bent for a period of time, it is very stiff when I extend it straight.  Ugh!  I do running, cross-fit, and the occasional bike ride...I don't get hurt doing any of those activities, no, I get hurt KNITTING!  Like, could it be any more ridiculous?

As a result of that, I have been slowing down on my knitting.  I'm not even done with my holiday gift knitting either.  I may have to forgo those other gifts and start mixing reading and sewing in between my knit projects.

On that note, let me put a warm compress on my arm so I may finish this sweater!

Sunday, November 11, 2012

Origami Sweater - Part 1

In my fog of knitting a few [hundred] Christmas gifts, I decided to start a project for myself.  Nothing like putting pressure on myself.  Meaning, I'm not done with my Christmas knitting yet, but I am throwing a sweater in the queue for myself...that I started already!

My local yarn shop (LYS), Brandon Yarn Boutique, was having a sale, so it was a perfect time to shop.  My intention was for myself, I won't fool anyone.  I picked a few projects that I had on my mind and went down there.  Luckily, only one panned out.

I am knitting the Buzios pullover from Berroco.  It was a free pattern from their website and it is knit with Origami (48% Acrylic, 19% Nylon, 17% Linen, 16% Cotton) in a green and blue blend called Turtle Bay.

Pic from Berroco website

As usual, I went down a needle size than what was recommended so that I could achieve the correct gauge.  So, I am using a size 7 circulars.  This sweater is knit in the round from the bottom up.


Here is the yarn.  It is actually not really yarn, but has beautiful colors.  It is several different types of string held together then wrapped with a black thread to bind it.  It's like working with a thin cord.  I don't see this sweater being all that warm, but since it is lacy and open, that was never it's intention!

I casted on and I was off!


The stitches in this sweater are a lace stitch and seed stitch.  There will be stripes of seed stitch alternating with the lace stitch.  I was joking with a fellow knitter and we were saying how seed stitch takes a lot of time.  I told her that this is half seed stitch and I said that this was a project doomed to be a UFO (unfinished object) before it even starts.  I was only joking because this yarn was pricey and it was not going to sit in the closet, unknit!

I'm actually chugging right along on it.  The seed stitch stripes are great for knitting while watching TV or chatting.  The lace stitch stripes, I need to pay attention and count the stitches after each row.  Lace stitching is made up of a lot of yarn overs (yo) and decreases, so you can miss one and not realize it until a row or two later.  Fixing lace is not fun.


I snugged a long pillow through the sweater so that you could see my progress.  From the bottom up, I knitted the seed stitch for 1", then there is the lace stripe, 2" seed stitch stripe, and another lace stripe, then a seed stitch stripe.


The lace stripe: A close-up.  To date, I have knitted a bunch more, I just have not taken any more pictures, but it is pretty much the same: alternating the seed and lace.  Since I am knitting in the round, there will be no seaming.  Once it's done, it's done.

But, since I'm still finishing up some Christmas knitting, this sweater I will work on in the background.  I have only a few more items to knit for gifts, but I'm dragging my feet on them.  One involves stranding, which is like using the yarn wrapping technique that you use for fair isle knitting (multi colors).  I do not have much practice with multiple colors.  We shall see.

Stay tuned for more fun stuff in the pipeline.

Related Links:

Sunday, August 5, 2012

Star Baby Blanket - Part 1

I have one more baby blanket to make.  This one is quite a bit late, but it'll come.  I wanted to try something new, like always.  I chose a cute star-shaped baby blanket pattern and started it the other evening.  Then I ran into a road block where I was doing something wrong and I can't figure it out.  Again, as usual!

Let me introduce the pattern: It is called "Pipsqueak Star Blanket" from Bernat and it is crochet.

Picture from Bernat's website

Isn't it adorable?  I thought it looked easy and it is marked as a 2 out of 4 skill level. 

I am going to use Loops & Threads Country Loom (100% Acrylic) in a light blue (Ocean Tide) and a brown/blue mix (Landscape), in addition to Bernat Soft Boucle (97% Acrylic, 3% Polyester) in a natural color. 


My issue was with Round 3, in which I am left with a gap before I connect to end the round.  I redid it several times and still a gap.  


I don't get it.  So, above was my first attempt.  I should have 6 points, for one thing and I only had 5 and not enough room for the 6th.  After fooling around with it for a bit, I decided to try it with regular yarn so that I may see all the stitches.  I was thinking that maybe it was the yarn and I could not see the stitches in order to count them correctly.


My next attempt with regular yarn, still yielded a small gap.  I have 6 points this time, at least.  I have put a call in with my sister and she left me a message that the pattern was working out fine for her.  Of course it is!

I will try and try again until I can get it right.  So, enough typing, I need to get hooking!

Related Posts: