Showing posts with label friends. Show all posts

Sunday, March 9, 2014

Cookie Swap 2014

At the end of February, I hosted the Annual Cookie Swap.  This year marks the 11th year of me hosting or attending the Cookie Swap.  Wow!

This year's theme was a Valentine's Day one, where we had the baking challenge of incorporating a candy into our creations.  As always, all the cookies & bars were delish!

Here are some of the gals that were in attendance:


I like to refer to us as the "usual suspects", but in a good way!  There were Chris and her daughter Danielle, Myself in the purple, Sheri, Cathy & Crissta.  Other gals that were there were Vince's mom and his daughter Cris and Gen, a bowling buddy Kelly, Sheri's mom Shirley.  My friends brought their baby & toddler daughters to top it off: Ines, Keira & Vivien.

Let's show the cookies (I mean, isn't that what this was all about anyway?!):

Crissta baked Flourless Triple Chocolate Cookies with a Werther's Twist:

Werther's Originals
 

Cathy baked Heart My Heart Healthy Oatmeal Raisinets Cookies:
 
Raisinets

Chris baked Oatmeal Butterscotch Cookies:

Butterscotch Chips
Cris baked Turtle Cookies:

Caramel Cubes

Gen made Candy Sushi:

Fruit Roll-Up, Swedish Fish, Gummy Sour Worms & Nerds

I made two things, first was Chocolate Cloud Cookies:

Junior Mints

Second was GF Minty Brownies:

Junior Mints
Sheri baked Starbursts Cookies:

Starbursts

Shirley baked Rootbeer Barrel Cookies:

Rootbeer Barrels
Lastly, Kelly baked Conversation Heart Brownie Cookies:

Conversation Hearts

My favorite was Crissta's Triple Chocolate Cookies.  The most creative were Gen's Candy Sushi.  She spent hours working on them, making rolls out of Rice Krispie mix. 


The girls played so well together.  They were a bit hopped up on all the sugar, but, hopefully they fell asleep in the car.  I know I was ready for a nap after the party.

If anyone is interested in the recipe's to these cookies, let me know, I will email them to you.

Any ideas for next year's theme??

Sunday, December 29, 2013

Ice Cream Cozies

For the ladies at work, I wanted to knit them all an ice cream cozy.  I had previously knitted one and gave to my friend and she loved it!  Here is that post:
I have 6 ladies at work and I assume they all love ice cream.  Perfect!  I started out by buying a bunch a different, vibrant colors of yarn at Joann's:

 
I chose Deborah Norville's Everyday Soft Worsted (100% Acrylic).  The colors I went with were, clock-wise from top:
  • Electric Green
  • Aubergine (Purple)
  • Baby Yellow
  • Wild Blue
  • Neon Pink
  • Snow White
Here are the finished cozies:

----
----
----
----
----
 
 
Once I was done knitting those, I decided to make 2 more, one each for Vince's daughters:


When I gave my work friends their cozy, I also had a cooler full of pints of Ben & Jerry's ice cream.  They each got to pick out their flavor.  I will do the same for Vince's daughters.
 
I do still owe the friend I originally knitted one up for at least one more.  She has two daughters, so, I will probably knit up two more.  These make the best gifts!
 
What is your favorite Ben & Jerry's ice cream??  Share your thoughts in the comments!
 
Mine is Chunky Monkey (Phish Food is a close second) :-)


Sunday, December 15, 2013

New England Patriot's Beanie

A friend asked me to make a few hats for her son.  I had made her daughters a few hats in the past years, so they must have gone over well, because she is asking me to make more.  I love knitting for someone who will use it! 
 
Her family is a real sports-loving family, Patriot's, Bruins, Red Sox...all of those and probably more, I just don't know.  I decided to knit her son a New England Patriot's inspired beanie hat.  I looked online and this is one that I found:


I got this!  I went to Joann's and bought 3 skeins of yarn:


A navy blue, gray and dark red.  All of these are Lion Brand Vanna's Choice (100% Acrylic).  Perfect yarn for washing a ton of times and still holding up.
 
I adopted a pattern from one of my magazines for basic beanies and figured out when I would need to change colors.


I started with a k2, p2 ribbing for the brim.  Then just straight stockinette st, then started the decrease for the crown right after the last red stripe.
 
I then topped it off with a navy blue pom-pom.


It's finished!

 
It practically fits my head, so I hope that I did not make it too big!  I will be visiting Mass the weekend that this is posted, so I will be giving it to her then.
 
Stay tuned for more Christmas knitting!

Sunday, July 28, 2013

TreeUmph!

I did say that I was going to start doing some fun activities before the summer is done.  Last weekend, Vince, me and his daughters went to TreeUmph!


TreeUmph! is an Outdoor Zipline Adventure and Obstacle Course.  It is an obstacle course that you do in the trees.  So, first you have a climbing harness on with a contraption for the zipline and two carabiner clips attached to separate lengths of rope (rock climbing rope grade).  You must tether yourself to the safety wires at all times up on the course, but all obstacles can be done with your ability to balance and use your weight wisely.


First, we have us ladies, all geared up and ready to rock and roll!  We all had to go through a practice obstacle course with an instructor so they can show us how to be safe and to trust the ropes and gear attached to us.


Behind me in this course, you can see some of the obstacles.  There were a total of 6 obstacles for adults; they got progressively harder and higher.  The course behind me had a tube that you had to crawl through.


All of the courses were in the trees, you had the ladder to climb up, the landing, the bridge and the zipline.  I have pics of all of these elements.


Alex and I are on a landing, having just completed a bridge.  The bridges are the spans that connect the landings.  Each one is slightly different.


This is a bridge.  This bridge were logs suspended only by ropes hanging from wire ropes.  I am tethered to the safety wire rope above my head.  You accomplish bridges by either holding onto the ropes attached to the logs, the wire rope they are attached to, or the wire rope you are attached to.  There is some upper body strength required for some of the obstacles.  Look how high up I am!!


Vince was the cameraman; he took this picture from the ground.  I am holding onto the wire rope that I am attached to.  There is nothing else to hold onto to.


Like I said, the obstacles got progressively more challenging.  This bridge was a series of ropes hung like a U or jump-rope like and you stepped onto the rope loop only, to get across.  Weeee!!!


 Here is Alex doing a zipline.  We had a special attachment for the ziplines.  This was so much fun!


There was even a Tarzan moment, where you attach yourself to a swinging rope and literally swing and grab onto the rope netting.  Once you are on the net, you climb over to the landing.


Another bridge where you are stepping on the end of the log, where the log will move on you, not to mention that they are suspended by more rope.  Did I mention that rope is very flexible?  This section was the optional section.  It was Course 4 that gave you a choice to continue with Course 4 or start Course 5.  You cannot start Course 5 from the ground.  Right away, Course 5 was monkey bars on ropes...ugh!  Alex and Gen continued with Course 4 and Vince and I did Course 5.  Course 5 took the longest and is the most challenging.  I did complete it, but it was not easy.


This bridge was Course 4, where once you were done with Course 5, Course 4 picks right back up in the trees.  This one had a wire rope to walk on, with rings that you had to go through.  I was very tired, almost exhausted at this point and straddled that damn ring!  There was no fancy moves to get through that!

There was a final zipline that was 650 feet long and starts 60 feet off the ground.  Not everyone make it completely across, ending just shy of the landing.  You would just grab the wire rope and use the hand-over-hand method to reach the landing.  Vince made it and I came up just shy.


After all of that, which was about 4 hours of straight obstacling, we ate lunch at a restaurant called the Linger Lodge.  If you did not know it existed, you never will find it; you will never stumble upon it.  It was located within a housing community, in a trailer park/camp site area.  Yes, we drove through a very nicely established, maturely landscaped community and then heading into a campground-like place with trailers.  First thing, there is the Linger Lodge attached to a bait shop and complete with a laundry facility in the back near the ladies room.  Interesting!

We sat out by the back screened in patio overlooking the Braden River.  There is a side story that the owner got his leg bitten or bitten-off by an alligator.


This is supposedly the alligator that bit the leg.  He is stuffed and on the wall of the restaurant.  Along with others...


Behind the bar they had animals not naturally seen in nature, ha, like the jackolope.


In addition to fish and lots of animal skulls.  Vince tried one of the more exotic items on the menu, alligator chowder.  We all had a bite...it wasn't bad!  It had a cajun flavor.

Our day was filled with lots of excitement.  Unfortunately, TreeUmph! is only located in Bradenton, FL.  But I do believe there are other adventure courses similar to TreeUmph! around the states, somewhere.  I'm excited to know that this is only a 1 hour drive and we can have a half day of some serious climbing!  I will definitely be back!

Sunday, July 14, 2013

Hair Donation

Surprise!  I have always had long hair.  When I was a kid and early teenager, it was really long and hit below my waistline.  Then I decided to trim it back a bit and then I have settled with below shoulder length for a good part of my life.  Once I did get it cut just below my shoulders, maybe brushing the tops, that has been the absolute shortest I have had it since a child when my sister and I would get the same thick bangs, bowl-like hair cut.

My friend Kj and my sister Kathy have both donated their hair to charities and I have been wanting to do that too.  But that means cutting my hair really short or growing it forever to get it long enough where I won't miss the long length.

As you can see from these two pics, my hair was getting pretty long:

January 2013

May 2013

I chose the charity that Kj used which was Pantene Beautiful Lengths.  This charity was started in 2006 and it is Pantene partnered with the American Cancer Society to bring real-hair wigs to women fighting cancer.

I made my appointment and then rescheduled it because I had not made up my mind about the style.  I finally went on July 3 to get the snip!

Here is me preparing for the cut:


The hair must be freshly washed and dried.  So she pinned up my shorter layers that were on the top and blew dried the bottom layer, which was the longest.  She placed it in rubber bands and then cut right above where the top band was.


It may be hard to see the ruler on the left, but I was able to cut off and so therefor donate 11 inches!!!  They only require a minimum of 8 inches!  


Here is the after:


Wow, huh?  I almost don't even recognize myself!  She has styled my hair kind of funny, where it curled under into a big mushroom.  Ugh...not helping!  I was feeling a bit strange as it was, then to have a mushroom on my head!?  In addition to it raining outside, the style took a dive anyway.

After dinner, I went home and flat ironed it so the ends were straighter, since I was looking for a flatter style, not a bushy one.  I like the side-swept bangs.  I parted it on the opposite side than I am used to, so I need to train the hair to stay over on it's own.  Right now it just wants to be in my face.

Overall, I am liking it!  I did tell a few people that I was growing it to donate, but did not really say when I was doing it.  Surprise, surprise!

Sunday, July 7, 2013

T-Shirt Tanks

Happy 4th of July!

I know that the official day of summer already occurred, but the 4th always licks off the summer with a bang!

I have been sitting on this project for a few months.  I promised to work on this for a friend and kept putting it off.  But now, no more excuses!  I have completed this project and think that it was a quick and simple project.

My friend got this idea from Pintrest and I found the source of the project.  It started off as a no sew t-shirt tank project, but I only use fusible webbing for when I'm in a pinch or when a needle is not the most practical way to go.  My machine will make it more durable, so that is what I did.

The project is from the blog Crafter Hours and it is how to make a t-shirt into a tied tank top.

First you take a t-shirt you don't mind cutting up.  But pick one that you would wear to the beach, the pool, hanging around the house or running errands on the weekend.


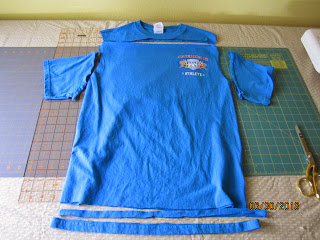
Cut the neck off straight, then the sleeves and a few strips from the bottom.  I threw away the very bottom edge that has the hemming.  Cut 2 more strips from the bottom.

Then seam  the top cut edges where the neck is big enough to form a casing for the tying strips.


Snip the strips so they are long and thin, not a circle.  Then thread the strips, one in the front and one in the back.  Bunch the fabric up a bit and tie on the shoulders with the strips.  Trim away any excess striping material once you have the ties at a good length.


I left two out of the three shirts I did with the cut raw edge at the bottom.  Once that is done, then you are done!!


Another one:


And one more:


This one I also put a casing at the bottom and threaded another strip so that it can cinch on the side.  This t-shirt was a men's XXL, so I had to take it in at the sides.  I had plenty of room at the bottom to do the cinching.


There you go, go forth and cut up all of your husband's t-shirts so that you can have some chic beach shirts and all-round comfy tees.