Showing posts with label easy. Show all posts

Sunday, March 9, 2014

Cookie Swap 2014

At the end of February, I hosted the Annual Cookie Swap.  This year marks the 11th year of me hosting or attending the Cookie Swap.  Wow!

This year's theme was a Valentine's Day one, where we had the baking challenge of incorporating a candy into our creations.  As always, all the cookies & bars were delish!

Here are some of the gals that were in attendance:


I like to refer to us as the "usual suspects", but in a good way!  There were Chris and her daughter Danielle, Myself in the purple, Sheri, Cathy & Crissta.  Other gals that were there were Vince's mom and his daughter Cris and Gen, a bowling buddy Kelly, Sheri's mom Shirley.  My friends brought their baby & toddler daughters to top it off: Ines, Keira & Vivien.

Let's show the cookies (I mean, isn't that what this was all about anyway?!):

Crissta baked Flourless Triple Chocolate Cookies with a Werther's Twist:

Werther's Originals
 

Cathy baked Heart My Heart Healthy Oatmeal Raisinets Cookies:
 
Raisinets

Chris baked Oatmeal Butterscotch Cookies:

Butterscotch Chips
Cris baked Turtle Cookies:

Caramel Cubes

Gen made Candy Sushi:

Fruit Roll-Up, Swedish Fish, Gummy Sour Worms & Nerds

I made two things, first was Chocolate Cloud Cookies:

Junior Mints

Second was GF Minty Brownies:

Junior Mints
Sheri baked Starbursts Cookies:

Starbursts

Shirley baked Rootbeer Barrel Cookies:

Rootbeer Barrels
Lastly, Kelly baked Conversation Heart Brownie Cookies:

Conversation Hearts

My favorite was Crissta's Triple Chocolate Cookies.  The most creative were Gen's Candy Sushi.  She spent hours working on them, making rolls out of Rice Krispie mix. 


The girls played so well together.  They were a bit hopped up on all the sugar, but, hopefully they fell asleep in the car.  I know I was ready for a nap after the party.

If anyone is interested in the recipe's to these cookies, let me know, I will email them to you.

Any ideas for next year's theme??

Sunday, January 19, 2014

Ruby Shoulders

Our work holiday party was this month, January.  My friend gifted me a cute maroon velvet skirt and black sequins tank top.  I want to wear this to the holiday party.  I know that the air conditioning will be on or the night air may be cool.  I wanted to knit up the Sidhe Shrug from Vampire Knits pattern book.  I wrote about my challenge in this post as #2:
My challenge is to knit my way through that book.  I love that book!  Anyway, I went to the yarn shop to get yarn for this project, but giving the fact that I was only just starting the week of Christmas, it was unlikely that I would knit a lacy long-sleeved shrug in a few weeks.

Instead, I bought a unique hank of yarn that is a combo of several different novelty yarns tied end-to end to make this one hank.


This is Alp Dazzle (Mixed Content), hand tied yarn by Feza yarns.  This yarn is made in Turkey.  This is not cheap yarn, but since one skein will make one decent sized shawl, I bought it.  I figured, the outfit was free, my shoes were free (had credit at the store, so no money spent), so, to spend money on this yarn, I felt okay with it.

Vince was a good sport and held the yarn while I balled it up.  The shop owner told me that the ball winder does not do a good job winding this yarn.  I will take her word for it and just ball it.  Even though Vince was not convinced that it could not be wound on the winder. 

I am using size 13 circ needles.  The pattern is simply, cast-on 20 stitches (if you want a triangle point, only cast-on 3 sts.  Knit each row (garter).  At the beginning of each row, increase by 1 (Make 1).  The shawl will grow and grow.  Knit until you run out of yarn.  Simple!


I started it as a rounded edge and I did not like it.  I unraveled it and made it a triangle.  It is very eclectic.  I did this much watching movies with Vince one evening.  I needed an easy project that would work up fast.  


This is the completed shawl.  It self-stripes, you just knit and it does all the work!


 A few samples of how different, but alike each yarn type is.  Comes out very elegant.


Here is me at the holiday party, trying to be a model...I really should not quit my day job...


~~~
 
 
~~~


The shawl was a big hit and it came in handy under the chilly weather we have been having.  Thank you, Crystal, for a super-cute outfit.  That was a big hit, too! 


Sunday, December 22, 2013

Braided Towel Rug


Merry Christmas!
 
For Christmas this year, I wanted to make my sister something.  I had an idea for last year, bought the items to make it and then ran out of time.  This year, I uncovered the items I bought and convinced myself that I had enough time to make it and just do it, no more excuses.

I got this idea from a blog called Sisters of the Wild West, with a project called Braided Towel RugPretty much the project is a braided rug made with towels.  So, I bought 3 different colored towels, a green, a beige and a yellow towel.  I washed them and then cut them into strips.


This sounds easier than it was.  This made a complete mess.  I will soon show you...


Cutting the towels require you to trim off the seamed edges.  Then cut the towel into about 1.5" strips.  Well, let's just say that this project is very forgiving and you can be 1/2" to 1.5" and still be okay with it.


Cut into strips, each towel.  Depending on how big you want this rug, depends on how many strips you will use. 


Each towel yielded about 19 strips.  Because the towels are terry cloth, the loops in the towel get trimmed and make a complete mess.  Utterly miserable!!


This was generated by a shake down of each strip to separate the cutting colors after cutting into strips.   My cutting mat was not too pleased with the after-results either:


I did use a rotary-cutter.  The rotary cutter left behind all of this in the cutting mat.  I had to take my fingernail and scrape the mat.  Not too much fun, but it was a quick task.

 
First, you take one strip of each color and sew them together.  Next, start braiding the three strands.

 
When you come to the end of the strands, you then sew the next strand onto the end of the braided respective color.  You do this for several strips until you have an extremely long braid.  You then start your rug forming.  To form the rug you take the initial sewed strips (the beginning) and start forming a circle in itself:


In order for you to keep everything together, you will need a needle and button thread.  Button thread is thicker and will hold-up to tough wear-and-tear.  So, sew the inner braid to the outer braid of the inner circle. 
 

I made a long braid and then started the rug.  When I got to the end of the braid, I then sewed on more strips and braided.  Continue in this fashion until your rug is the diameter you would like it.

 
I wanted to make a bath mat sized rug.  I only used about a quarter of the rug strips.  It took me about 2 hours to wash and cut the towel strips.  Then another 4 hours to braid and sew the rug in a circle.  No joke, it took awhile.  Plan for this to be a half day to full day project.


I was pleased with the bath mat size, no too shabby!


I almost used a full spool of button thread on just this bath mat.  Buy a few spools, just to be on the safe side. 


Here it is complete.  I like it!!


The cats liked it too.  I left the rug unattended for a few minutes and I come back to them snuggling on it!  I should not be surprised by this. 


Ahhh, the rug feels nice under my bare feet.  I hope that my sister enjoys it too.
 
Merry Christmas!!

Sunday, May 19, 2013

Weekend Shrug - Finished

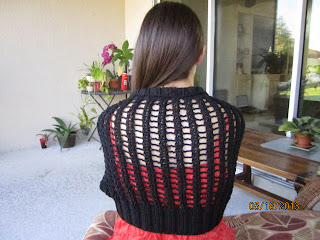
Okay, let's call this the Two-Weekend Shrug!  I did mainly work on this on the weekend days, so it is safe to say that it was a quick knit.  I bought two hanks of Berroco Weekend and I ended up only needing less than 1-1/2 hanks.

My last post, explained the source of the pattern and a bit about why I chose this to knit:
Continuing with the open weave pattern, I need to knit to a length of about 15 inches.


Once I had 15 inches knit, then I knitted the ribbing again, like in the start.  I have essentially knit a rectangle, with ribbing at the top and bottom of the long sides of the rectangle.


There was a special bind-off method that was needed to mimic a cast-on edge, called Elizabeth Zimmermann's sewn bind-off.  Elizabeth Zimmermann was a British-born knitter that revolutionized the modern practice of kntting, so essentially she is the Mother of Knitting.  What she says goes. :-)

So, this is how it is done.  First, when you are ready to bind-off, you cut the yarn really long; put it on a sewing needle.  Thread the yarn from right to left through the first two sts, purlwise.


Second, thread the yarn from left to right into the first st, knitwise.


Third, pop the first st off the needle.


Repeat, threading the needle in this fashion until you have threaded through the last st on the needle.


The bound-off edge looks like the cast-on edge.  Yippee!  Even if it doesn't, who is going to know??


Then I sewed the ribbed edges together for 3-1/4 inches on each side; folded the ribbed edge that will be on my neck and I was DONE

I went by Brandon Yarn Boutique to show off how much I had done (I was at the final ribbing part at the time I stopped by the shop).  There were other people there and enjoyed looking at my project.  I loved hearing their praise and comments.


How neat is this little shrug?  I can't wait to wear it!  This will be my newest favorite article of clothing.


I am vowing to make only practical pieces.  I have several items that I have knit and barely wear because it's too warm out or it only goes with one thing.  That is a good-intention statement, but in my UFO pile there are wool items and long-sleeved pullovers. Sigh.... 

Sunday, March 31, 2013

Scrappy Quilt - Part 2

Happy Easter!

Since my quilt blocks have been done for weeks now, it is time to pick a layout and sew them together.  I first blogged about my Scrappy Quilt here:
Next step you choose a layout.  Since I chose the lap size, I only have three (3) layouts to choose from.  I mean, you can do whatever you want, but to have some pattern, there are 3 ideal layouts for this size quilt.  I will lay them all out for you and then I will tell you which one I am doing.

A neat trick I learned in quilting class, is when you have your blocks laid out and you are trying to figure out which one you like best, you look at it through a peephole.  Yup, a door peephole.  A peephole for a door can be bought at any hardware store for about $5.00.  If you work with colors and palettes, I highly recommend a peephole.  It makes everything look like a kaleidoscope.  Wait and see....


Ok, I'm getting ahead of myself.  The next actual step is to press your blocks on the wrong side to get all of the seams laying flat and pointing outwards.


That is the back of one block.  See how one seam is all crazy on the right?  You will press that down so it is neat as a pin back there.

Next you "square-up".  Squaring up is a crappy job.  Nobody likes doing it.  It is easiest if you have a clear plexi quilting square in the size of your block so you can just zip around it with the rotary cutter.  Alas, I do not have said plexi square.  When I measured my blocks, the numbers were all over the place.  I had real job in store for me.

Not sure how or why the blocks were as much as an inch off one another.  No clue how that happens, unless I cut the strips wrong, and I would have noticed a half inch difference when I was making the blocks.  Whatever, no need harping on what I can't figure out...


So, because of the measurement differences, I now had to pick a size and cut them all to that size.  In the end, no one will notice that the outer strips are a 1/4" thinner than the next one.  I cut them all to 13-1/4".  They should have been about 14".

Now for the fun part...the layouts!  You will now see why I separated the Lights from the Darks.

Layout #1: Fields and Furrows


Kind of chaotic.  Now look at it through the peephole:


Can you see the Light and Dark diagonal stripes?  Cool, huh? 

Layout#2: Timberline


That one makes one Light diagonal line with the other Lights pointing to the center stripe.

Layout# 3: All Sevens


I am noticing on this one that one block is not facing the right direction.  All Dark corners should be pointing down and to the left.  The bottom middle is pointing up and to the right.  Darn!  You get the idea!

All my log cabin quilts have been done in the Fields and Furrows layout.  Can you guess which one I am choosing to do??

If you chose Fields and Furrows, then you would be WRONG!  I'm breaking my rut and choosing Timberline.  Below is all of the blocks sewn together in the correct order.


The book explains how you ensure that your blocks are in the correct orientation when you go to sew them.  I won't explain it here.  All I have to say is pay attention when you do this.  I did make one mistake and had to take the seam ripper to it.  Also, be careful when you rip out these seams, you can poke a hole in the fabric.  Ha, trust me.

Next will be making the borders.  I will save that for some time later in April.  Thanks for stopping by!