Showing posts with label scraps. Show all posts

Sunday, November 17, 2013

More Coffee Cup Cozies

I have knitted a total of 7 coffee cup cozies for the Relay for Life Charity I spoke about in an earlier post:
Here are some of the other finished ones:


I thought this one was going to look a bit dated, 1980's or something, but I really like it.  I has a nice stretch to it.  I held two different strands together.

 
I tried doing a horizontal cable and the cable pattern was too elongated for my liking.  Eh, not so much on this one.  I can definitely can improve this design.


This is my second attempt at cables and I really like it!  This is actually a cable made without a cable needle.  Very clever, I will not reveal the secret stitch just yet.  This is one of my favorites.  Since it is cabled, I can charge a little more for it.


I have made a few of this style already.  This one is cotton self-striping yarn that I had in my stash.  Each one will stripe a bit different.  It has an ombre look to it.  Very chic.

I had a yard sale a few weeks ago and here is me modeling my coffee cup cozie:


I was totally working it!
 
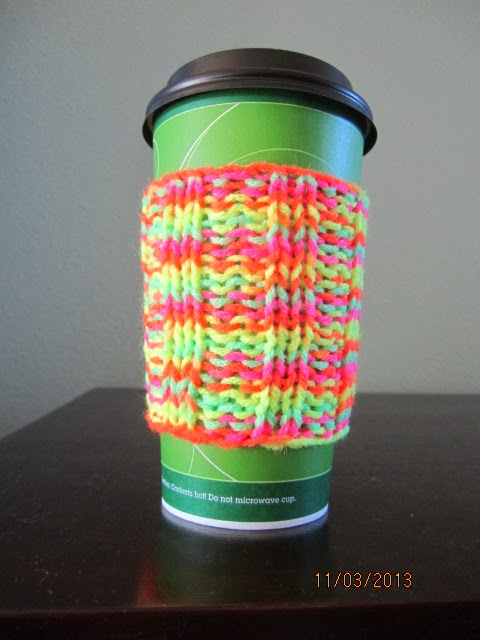
I bought one ball of yarn to knit more with (I will use the rest of the yarn from my stash).  It was Bernat Mosaic in Psychadelic (100% acrylic):
 
 
How cool is that?!  I think they were emulating Noro yarns, which have extremely vivid, saturated colors.  I made one with this and each one will end up looking completely different due so the vast color differences in the skein.
 
 
I made two cozies from the rainbow yarn and here is the other one:


So, they will have completely different colors.  Neat-o!

A fellow Relay for Life crafter let be use some of her Red Heart Super Saver to knit some up.  At first I poo-pooed the Red Heart, but they came out really neat.


This one is also Red Heart.  Excellent elastic memory, I do have to admit.  How fun!:


The last one I have made, then I will see how they sell, is a another cabled one:


I'm taking orders!  Let me know what idea you have for my next Relay for Life craft project!

Sunday, October 20, 2013

Coffee Cup Cozies

At work we are a sponsor of the American Heart Association's charity Relay For Life, Westshore chapter in Tampa, FL.  Last year a group of us created a committee to form Team Xcelience, and we must fundraise leading up to the event, which will be in April of 2014. 
 
One of the fundraising ideas we had was to create the Xcelience Yellow Pages, which employees with a skill or talent can "sell" their skill or expertise for a fee and donate the fee to the charity.  It was a big hit.  I had an "ad" which was Sewing by Nancy  or something like that and I was able to earn over $70 just mending people's pants and repurposing t-shirts and all other sewing-related tasks.  Not too shabby, if you ask me!
 
I will do the same this year and also have a second "ad" with a few coworkers to make crafts to sell.  I wanted to come up with an idea that was easy, fast and cheap.  I came up with Coffee Cup Cozies.  I will knit them in a ribbed pattern.  I plan on making a few and see how well they do, then consider making more.  I have made a few already:


Well, not exactly a coffee cup, it is basically a sleeve that will go on a hot cup of take-out coffee, instead of using the cardboard sleeve they offer you at the cafĂ©.  This is a greener way to drink coffee!
 
I have made a few in a variegated cotton yarn and one in Lion Brand Homespun.  The Homespun is the pink one in the pic.  It was my prototype and came out cute!


I am working on another one now that I am holding two yarns together to give a confetti look.  I'm not sure I am crazy about the colors I chose to go together, sort of 1980's looking, with the neon green-yellow yarn, but I will continue it.  you never know who will like it.


Here are the balls that I am currently using:


I have a TON of yarn that I will use up.  I really do not want buy new yarn, only because I really can't charge too much for them.  Each one takes roughly an hour and I was going to charge either $3 or $5.  How much is too much??  And will anyone even buy them??
 
Right now, I am only doing a k2, p2 ribbing in the round, but I do plan on changing it up.  Stayed tuned.

Sunday, August 18, 2013

Palm Scrap Afghan

I think I have more unfinished projects right now than I have ever had in my life.  I am not even going to count them, I'm embarrassed!  Today I am writing to show off my newest project:

Palm Scrap Afghan
 
This project is an idea from a pullover/tunic project found in a new magazine I bought at my LYS.  The magazine is Interweave Crochet, Summer 2013:
 
Interweave Crochet Summer 2013
 
This issue has tons of cute things!  My gosh, I wish I had more time for crafts!  Anyway, back to my idea.  Thumbing through the magazine, there is a pattern Palm Tunic that I love love.  Here is a pic:
 
Palm Tunic

You crochet each triangle motif separately, but as you do your last set of stitches around the triangle motif, you connect it to the motif you crocheted before it...makes less ends to weave in.
 
I got this idea to do these motifs but make a scrap afghan out of it.  It will be eclectic, no doubt.  I started off with the blue yarn first.  Then added the light purple yarn.
 
 
I mainly started it just to see if I can read a pattern and actually crochet something that looks hard.  Although, it is a bit tight and the center part puckers...I am really liking it.
 
I added a few more a few weeks ago:
 
 
I do need more dark colors.  I am a very pink yarn collector, I have a ton of it, actually.  Which is why I want to use up the scraps so I can buy more yarn and be to justify it with a straight face.
 
My favorite motif is the darker pink one on the left.  It is a cotton/silk blend.  The stitches pop out more with this yarn.  I have a decent amount of this yarn left, but I have to save it to spread it out.  Mix it up a bit.
 
 
It has been awhile since I made a motif, it will be like learning the stitches all over again.  But it takes a good 30-40 min just to crochet one, so I don't know when this will actually get done.  I will just chip away at it as the days go by. 

Sunday, March 31, 2013

Scrappy Quilt - Part 2

Happy Easter!

Since my quilt blocks have been done for weeks now, it is time to pick a layout and sew them together.  I first blogged about my Scrappy Quilt here:
Next step you choose a layout.  Since I chose the lap size, I only have three (3) layouts to choose from.  I mean, you can do whatever you want, but to have some pattern, there are 3 ideal layouts for this size quilt.  I will lay them all out for you and then I will tell you which one I am doing.

A neat trick I learned in quilting class, is when you have your blocks laid out and you are trying to figure out which one you like best, you look at it through a peephole.  Yup, a door peephole.  A peephole for a door can be bought at any hardware store for about $5.00.  If you work with colors and palettes, I highly recommend a peephole.  It makes everything look like a kaleidoscope.  Wait and see....


Ok, I'm getting ahead of myself.  The next actual step is to press your blocks on the wrong side to get all of the seams laying flat and pointing outwards.


That is the back of one block.  See how one seam is all crazy on the right?  You will press that down so it is neat as a pin back there.

Next you "square-up".  Squaring up is a crappy job.  Nobody likes doing it.  It is easiest if you have a clear plexi quilting square in the size of your block so you can just zip around it with the rotary cutter.  Alas, I do not have said plexi square.  When I measured my blocks, the numbers were all over the place.  I had real job in store for me.

Not sure how or why the blocks were as much as an inch off one another.  No clue how that happens, unless I cut the strips wrong, and I would have noticed a half inch difference when I was making the blocks.  Whatever, no need harping on what I can't figure out...


So, because of the measurement differences, I now had to pick a size and cut them all to that size.  In the end, no one will notice that the outer strips are a 1/4" thinner than the next one.  I cut them all to 13-1/4".  They should have been about 14".

Now for the fun part...the layouts!  You will now see why I separated the Lights from the Darks.

Layout #1: Fields and Furrows


Kind of chaotic.  Now look at it through the peephole:


Can you see the Light and Dark diagonal stripes?  Cool, huh? 

Layout#2: Timberline


That one makes one Light diagonal line with the other Lights pointing to the center stripe.

Layout# 3: All Sevens


I am noticing on this one that one block is not facing the right direction.  All Dark corners should be pointing down and to the left.  The bottom middle is pointing up and to the right.  Darn!  You get the idea!

All my log cabin quilts have been done in the Fields and Furrows layout.  Can you guess which one I am choosing to do??

If you chose Fields and Furrows, then you would be WRONG!  I'm breaking my rut and choosing Timberline.  Below is all of the blocks sewn together in the correct order.


The book explains how you ensure that your blocks are in the correct orientation when you go to sew them.  I won't explain it here.  All I have to say is pay attention when you do this.  I did make one mistake and had to take the seam ripper to it.  Also, be careful when you rip out these seams, you can poke a hole in the fabric.  Ha, trust me.

Next will be making the borders.  I will save that for some time later in April.  Thanks for stopping by!

Sunday, March 17, 2013

Scrappy Quilt - Part 1

Here is the start of the scrappy quilt.  I bragged about my previous quilts in a recent post: Quilts - Brag Pics.  I got a couple of comments and a bunch of people viewed it.  It was great!  Now this quilt I'm making now takes a little bit from each one of the quilts, sort of like a memory quilt.

I am making another log cabin (they are easy and I don't need to learn anything new) and I follow the fabric needs and instructions in the Quilt in a Day book series.


This really is a great book, as you can tell in my previous Quilt post, I made several and had this book by my side each time.  This time I am choosing to make a Lap quilt size, which should be about 54" x 68".  I will need a total of 12 blocks.


Above is my collection of fabric.  Some are already cut into strips and some are still fabric that are whole pieces.  I tried to separate into light and dark.  The reason why I do this is so that you will see a distinction in the pattern when I put it all together.

I cut a bunch of strips, about 2 or three strips per fabric.


Those above are my "Darks."


Those above are my "Lights."

I chose the same fabric to be my center square.  I thought choosing the same fabric would give the quilt a focal point or points of reference that would give order in a chaotic array of fabric.  Now, I like the thought of scrappy, but I have rules to my scrappy.  They are:

  1. Have to have separation from the Lights and the Darks; I could not let it be completely random
  2. No two strips of the same fabric could be in the same block
  3. No two strips of the same fabric can be next to each other once all together
I guess you could say this is an OCD Scrappy Quilt.

Here is the "Center."  It was one of the main colors in Alex's quilt. 


Once the center is cut into a square, you need another set of squares to be your first addition strip.  I chose two different fabircs, so they don't look that different yet.


Above is adding on the second strip.  You pretty much go around the square adding on either a Light or a Dark strip until your block measures about 14" x 14".


The beauty of strip quilting is that normally you make the blocks all the same so you sew them all at the same rate.  The challenge with this scrappy way is that I wanted each block to be unique, so I was dealing with having to constantly grab new strips rather than the same one.  Might not sound like a big deal, but it was a bit of a hassle.  A labor of love, that's all I can say.


Almost there...


Here is one finished block.  I have finished all 12 blocks.  You will have to stay tuned to see how it progresses.  I will leave you with that one block to fantasize how scrappy the other 11 blocks are.

Toodles!