Showing posts with label cotton. Show all posts

Sunday, February 9, 2014

Knitting for Charity

It is that time of year where I am sewing and knitting for charity.  The company that I work for participates in the American Cancer Society, Relay For Life event each year.  We start fundraising in October, leading up to the event in April.

The way I have chosen to raise money is to do clothing mending, sewing challenges and knitting coffee cup cozies (or bottle cozies), however you want to use them.

I wrote previously about the coffee cup cozies in these posts:
I have knitted up about 20 or more of them and sold about 15 of them!  I started out knitting them sort of plain, with the self-striping yarns, to keep it simple.  Well, if you know me at all, then you know I can never keep something simple.  I started making cables and making them in sport team colors with horizontal stripes.

If you would like you very own, custom knitted cozy, please email me at moxiebrown25@yahoo.com.  The price of the cozies are $5, but if you are out-of-town, then $6 (to cover the cost of shipping).  You choose your color(s), style & size!

If you would like to donate to a great cause, please go to my Relay Homepage

Tampa Bay Rays
~~~~~
Seattle Seahawks & Denver Broncos
~~~~~
Pink & White Stripes
~~~~~

Zebra for Carcinoid Cancer
~~~~~
Ministripes for Small Cups
~~~~~

Mini Cables in a Solid Color
 
I'm having a great time knitting these up.  They are great on your coffee cup, water bottle or glass bottle!  Let me know what you like!!  Help support a great cause!
 
Thank you to those that have supported me and bought a cozy already! :-)


Sunday, December 22, 2013

Braided Towel Rug


Merry Christmas!
 
For Christmas this year, I wanted to make my sister something.  I had an idea for last year, bought the items to make it and then ran out of time.  This year, I uncovered the items I bought and convinced myself that I had enough time to make it and just do it, no more excuses.

I got this idea from a blog called Sisters of the Wild West, with a project called Braided Towel RugPretty much the project is a braided rug made with towels.  So, I bought 3 different colored towels, a green, a beige and a yellow towel.  I washed them and then cut them into strips.


This sounds easier than it was.  This made a complete mess.  I will soon show you...


Cutting the towels require you to trim off the seamed edges.  Then cut the towel into about 1.5" strips.  Well, let's just say that this project is very forgiving and you can be 1/2" to 1.5" and still be okay with it.


Cut into strips, each towel.  Depending on how big you want this rug, depends on how many strips you will use. 


Each towel yielded about 19 strips.  Because the towels are terry cloth, the loops in the towel get trimmed and make a complete mess.  Utterly miserable!!


This was generated by a shake down of each strip to separate the cutting colors after cutting into strips.   My cutting mat was not too pleased with the after-results either:


I did use a rotary-cutter.  The rotary cutter left behind all of this in the cutting mat.  I had to take my fingernail and scrape the mat.  Not too much fun, but it was a quick task.

 
First, you take one strip of each color and sew them together.  Next, start braiding the three strands.

 
When you come to the end of the strands, you then sew the next strand onto the end of the braided respective color.  You do this for several strips until you have an extremely long braid.  You then start your rug forming.  To form the rug you take the initial sewed strips (the beginning) and start forming a circle in itself:


In order for you to keep everything together, you will need a needle and button thread.  Button thread is thicker and will hold-up to tough wear-and-tear.  So, sew the inner braid to the outer braid of the inner circle. 
 

I made a long braid and then started the rug.  When I got to the end of the braid, I then sewed on more strips and braided.  Continue in this fashion until your rug is the diameter you would like it.

 
I wanted to make a bath mat sized rug.  I only used about a quarter of the rug strips.  It took me about 2 hours to wash and cut the towel strips.  Then another 4 hours to braid and sew the rug in a circle.  No joke, it took awhile.  Plan for this to be a half day to full day project.


I was pleased with the bath mat size, no too shabby!


I almost used a full spool of button thread on just this bath mat.  Buy a few spools, just to be on the safe side. 


Here it is complete.  I like it!!


The cats liked it too.  I left the rug unattended for a few minutes and I come back to them snuggling on it!  I should not be surprised by this. 


Ahhh, the rug feels nice under my bare feet.  I hope that my sister enjoys it too.
 
Merry Christmas!!

Sunday, September 15, 2013

Romance Shell - Part 1

I seem to start summer projects in the summer and winter projects in the winter.  Well, normally that would make sense, but since it takes me forever to finish a project, I really should do the opposite: Knit a winter item in the summer and a summer item in the winter.  That way it will be done in the correct season for wearing it right away.
 
Alas, I have a summer frilly shell that I have started at the end of summer and I won't be able to really wear it until the spring.  Well, in Florida, the seasons are screwy anyway.  Our "winter" is like 1 week of weather where a jacket is nice for the morning, but not really needed on the way home.  But truly, this shell is a summer item to wear.
 
This project is from Tahki Yarns Intermix pattern booklet.  The pattern is called Romance Ruffle Collar Shell.

Romance by Tahki Yarns
 
When I was looking through the booklet I fell in love with almost everything in there!  That is my downfall, is that I like too many patterns and have a hard time choosing only one.
 
This pattern is knit in a novelty yarn called Ripple (100% Mercerized Cotton) that is thick and thin.  Charming at first, then after awhile, not so much.  I chose to do it in the same color as the model.  I typically try hard not to choose the same color, but the other colors in stock at Brandon Yarn Boutique, I had plenty of garments in those colors.  Vince suggested that I pick a color I would not normally have in my wardrobe.  Okaaaaay......

 
I need 5 balls of the Ripple yarn.  Here is a close-up of the thick and thin characteristic:


Knitting a gauge swatch was a bit of a challenge.  I went down one needle size, so I am using a size 6, rather than a 7. 


I'm starting with one of the front pieces, because my size 6 circs are being used for another project, so until those get miraculously get freed up or I buy another set, I can knit the front panels on straights.


The interesting trait about this yarn is that it knits up with a unique texture; it gives a pebbly look.  The basic pattern is a k8, p8 ribbing, so it even makes that basic pattern interesting.
 
To be totally honest, I really do not like knitting with this thick and thin yarn.  Often the thick portion almost gets stuck when you go to do the next stitch.  So if you leave it, then the stitch is tight, if you "let it go" then the stitch is loose.  Not exactly something that I like, when I am trying really hard to keep gauge.
 
Good luck to me!

Sunday, August 18, 2013

Palm Scrap Afghan

I think I have more unfinished projects right now than I have ever had in my life.  I am not even going to count them, I'm embarrassed!  Today I am writing to show off my newest project:

Palm Scrap Afghan
 
This project is an idea from a pullover/tunic project found in a new magazine I bought at my LYS.  The magazine is Interweave Crochet, Summer 2013:
 
Interweave Crochet Summer 2013
 
This issue has tons of cute things!  My gosh, I wish I had more time for crafts!  Anyway, back to my idea.  Thumbing through the magazine, there is a pattern Palm Tunic that I love love.  Here is a pic:
 
Palm Tunic

You crochet each triangle motif separately, but as you do your last set of stitches around the triangle motif, you connect it to the motif you crocheted before it...makes less ends to weave in.
 
I got this idea to do these motifs but make a scrap afghan out of it.  It will be eclectic, no doubt.  I started off with the blue yarn first.  Then added the light purple yarn.
 
 
I mainly started it just to see if I can read a pattern and actually crochet something that looks hard.  Although, it is a bit tight and the center part puckers...I am really liking it.
 
I added a few more a few weeks ago:
 
 
I do need more dark colors.  I am a very pink yarn collector, I have a ton of it, actually.  Which is why I want to use up the scraps so I can buy more yarn and be to justify it with a straight face.
 
My favorite motif is the darker pink one on the left.  It is a cotton/silk blend.  The stitches pop out more with this yarn.  I have a decent amount of this yarn left, but I have to save it to spread it out.  Mix it up a bit.
 
 
It has been awhile since I made a motif, it will be like learning the stitches all over again.  But it takes a good 30-40 min just to crochet one, so I don't know when this will actually get done.  I will just chip away at it as the days go by. 

Sunday, July 7, 2013

T-Shirt Tanks

Happy 4th of July!

I know that the official day of summer already occurred, but the 4th always licks off the summer with a bang!

I have been sitting on this project for a few months.  I promised to work on this for a friend and kept putting it off.  But now, no more excuses!  I have completed this project and think that it was a quick and simple project.

My friend got this idea from Pintrest and I found the source of the project.  It started off as a no sew t-shirt tank project, but I only use fusible webbing for when I'm in a pinch or when a needle is not the most practical way to go.  My machine will make it more durable, so that is what I did.

The project is from the blog Crafter Hours and it is how to make a t-shirt into a tied tank top.

First you take a t-shirt you don't mind cutting up.  But pick one that you would wear to the beach, the pool, hanging around the house or running errands on the weekend.


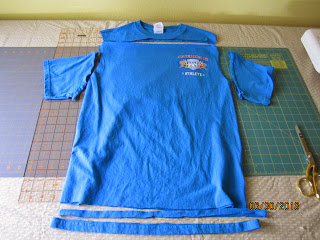
Cut the neck off straight, then the sleeves and a few strips from the bottom.  I threw away the very bottom edge that has the hemming.  Cut 2 more strips from the bottom.

Then seam  the top cut edges where the neck is big enough to form a casing for the tying strips.


Snip the strips so they are long and thin, not a circle.  Then thread the strips, one in the front and one in the back.  Bunch the fabric up a bit and tie on the shoulders with the strips.  Trim away any excess striping material once you have the ties at a good length.


I left two out of the three shirts I did with the cut raw edge at the bottom.  Once that is done, then you are done!!


Another one:


And one more:


This one I also put a casing at the bottom and threaded another strip so that it can cinch on the side.  This t-shirt was a men's XXL, so I had to take it in at the sides.  I had plenty of room at the bottom to do the cinching.


There you go, go forth and cut up all of your husband's t-shirts so that you can have some chic beach shirts and all-round comfy tees.

Sunday, May 12, 2013

Weekend Shrug - Part 1

Hooray!  

I'm back to knitting and blogging.  This is a good thing!

My newest project (yeah, yeah, I know I have a few UFO's hanging out there) is called my Weekend Shrug.  It was a free pattern on Ravelry called Ribbed Lace Bolero by Kelly Maher published in her blog: 10 feet high.

Kelly Maher's pic of bolero - Front

Kelly Maher's pic of bolero - Back

Isn't that cute?  I wanted something that I can do in cotton or cotton blend, versatile with my spaghetti strap and sleeveless blouses, and will be a quick-knit.

I went to my local yarn shop (LYS): Brandon Yarn Boutique to find the perfect yarn.  I knew if I went to Joann's or Michael's, I'd end up not liking the yarn I chose or something, so I decided to splurge and do it right.  My time is worth it!

Anyway, I chose Berrocco Weekend (75% Acrylic, 25% Cotton) in Pitch Black.  I am using size 8 and 10.5 knitting needles.


Weekend is a nice acrylic/cotton blend that feels and acts more like cotton than acrylic.  It is not springy like acrylic, but true to form like cotton (aka, no give).  Just what I wanted...something that can get thrown in the wash; carefree.

First you start out by ribbing a k2, p2 on the 8's.  I would use my 8 circs, but they are tied up with my UFO Cabled Cardi KAL.  Oh well, I have so many straights, that is what I used.  It was a little awkward because I used the 14" ones, which gave me arm fatigue holding them up.  I did not realize how spoiled I had gotten with the circs!

Little ribbing

Next you start the lace or open weave on the 10.5's.  These were even more awkward to work with at the 14" length.  How did our foremothers knit all day with these things?!

Kathy, my sister, talked my into buying the 10.5 circs.  Her convincing argument was that you only have to buy them once and you will always have them.  So true...consider me convinced.  I printed out a Michael's coupon and bought them at 40% off.  Yeah me!

Once the open weave portion is done, then you knit the ribbing again, back on the 8's, and connect the corners which meet under the arm and sew.  Right now, I would consider myself only about 25% done.  I have about 6" of the open weave knitted and I need about 18".


I will not let this shrug stay a UFO for long.  I have been wanting a black short-sleeved shrug for awhile and have been too cheap and lazy to go shopping for one.  I figured that I would be crafty and just knit the darn thing myself.

Cheers to a quick knit!


Sunday, March 31, 2013

Scrappy Quilt - Part 2

Happy Easter!

Since my quilt blocks have been done for weeks now, it is time to pick a layout and sew them together.  I first blogged about my Scrappy Quilt here:
Next step you choose a layout.  Since I chose the lap size, I only have three (3) layouts to choose from.  I mean, you can do whatever you want, but to have some pattern, there are 3 ideal layouts for this size quilt.  I will lay them all out for you and then I will tell you which one I am doing.

A neat trick I learned in quilting class, is when you have your blocks laid out and you are trying to figure out which one you like best, you look at it through a peephole.  Yup, a door peephole.  A peephole for a door can be bought at any hardware store for about $5.00.  If you work with colors and palettes, I highly recommend a peephole.  It makes everything look like a kaleidoscope.  Wait and see....


Ok, I'm getting ahead of myself.  The next actual step is to press your blocks on the wrong side to get all of the seams laying flat and pointing outwards.


That is the back of one block.  See how one seam is all crazy on the right?  You will press that down so it is neat as a pin back there.

Next you "square-up".  Squaring up is a crappy job.  Nobody likes doing it.  It is easiest if you have a clear plexi quilting square in the size of your block so you can just zip around it with the rotary cutter.  Alas, I do not have said plexi square.  When I measured my blocks, the numbers were all over the place.  I had real job in store for me.

Not sure how or why the blocks were as much as an inch off one another.  No clue how that happens, unless I cut the strips wrong, and I would have noticed a half inch difference when I was making the blocks.  Whatever, no need harping on what I can't figure out...


So, because of the measurement differences, I now had to pick a size and cut them all to that size.  In the end, no one will notice that the outer strips are a 1/4" thinner than the next one.  I cut them all to 13-1/4".  They should have been about 14".

Now for the fun part...the layouts!  You will now see why I separated the Lights from the Darks.

Layout #1: Fields and Furrows


Kind of chaotic.  Now look at it through the peephole:


Can you see the Light and Dark diagonal stripes?  Cool, huh? 

Layout#2: Timberline


That one makes one Light diagonal line with the other Lights pointing to the center stripe.

Layout# 3: All Sevens


I am noticing on this one that one block is not facing the right direction.  All Dark corners should be pointing down and to the left.  The bottom middle is pointing up and to the right.  Darn!  You get the idea!

All my log cabin quilts have been done in the Fields and Furrows layout.  Can you guess which one I am choosing to do??

If you chose Fields and Furrows, then you would be WRONG!  I'm breaking my rut and choosing Timberline.  Below is all of the blocks sewn together in the correct order.


The book explains how you ensure that your blocks are in the correct orientation when you go to sew them.  I won't explain it here.  All I have to say is pay attention when you do this.  I did make one mistake and had to take the seam ripper to it.  Also, be careful when you rip out these seams, you can poke a hole in the fabric.  Ha, trust me.

Next will be making the borders.  I will save that for some time later in April.  Thanks for stopping by!