Showing posts with label holiday. Show all posts

Sunday, January 19, 2014

Ruby Shoulders

Our work holiday party was this month, January.  My friend gifted me a cute maroon velvet skirt and black sequins tank top.  I want to wear this to the holiday party.  I know that the air conditioning will be on or the night air may be cool.  I wanted to knit up the Sidhe Shrug from Vampire Knits pattern book.  I wrote about my challenge in this post as #2:
My challenge is to knit my way through that book.  I love that book!  Anyway, I went to the yarn shop to get yarn for this project, but giving the fact that I was only just starting the week of Christmas, it was unlikely that I would knit a lacy long-sleeved shrug in a few weeks.

Instead, I bought a unique hank of yarn that is a combo of several different novelty yarns tied end-to end to make this one hank.


This is Alp Dazzle (Mixed Content), hand tied yarn by Feza yarns.  This yarn is made in Turkey.  This is not cheap yarn, but since one skein will make one decent sized shawl, I bought it.  I figured, the outfit was free, my shoes were free (had credit at the store, so no money spent), so, to spend money on this yarn, I felt okay with it.

Vince was a good sport and held the yarn while I balled it up.  The shop owner told me that the ball winder does not do a good job winding this yarn.  I will take her word for it and just ball it.  Even though Vince was not convinced that it could not be wound on the winder. 

I am using size 13 circ needles.  The pattern is simply, cast-on 20 stitches (if you want a triangle point, only cast-on 3 sts.  Knit each row (garter).  At the beginning of each row, increase by 1 (Make 1).  The shawl will grow and grow.  Knit until you run out of yarn.  Simple!


I started it as a rounded edge and I did not like it.  I unraveled it and made it a triangle.  It is very eclectic.  I did this much watching movies with Vince one evening.  I needed an easy project that would work up fast.  


This is the completed shawl.  It self-stripes, you just knit and it does all the work!


 A few samples of how different, but alike each yarn type is.  Comes out very elegant.


Here is me at the holiday party, trying to be a model...I really should not quit my day job...


~~~
 
 
~~~


The shawl was a big hit and it came in handy under the chilly weather we have been having.  Thank you, Crystal, for a super-cute outfit.  That was a big hit, too! 


Sunday, January 6, 2013

Origami Sweater Finale - Part 3

Happy New Year!!

I have been working on this sweater since October and I was working steady on it for a good month and then my elbow/arm started to hurt from knitting nonstop that I slowed way down.  Here are my past two posts related to this sweater:
Just a quick overview:  This sweater pattern is from Berroco called Buzios.  I don't know who comes up with these names at Berroco, but typical is not an adjective I would use.  I enjoy that about them, though.  I knitted this with Berroco Origami.


During my weekends knitting, my cat Julie would occasionally nap on my project.  I would get up to get something or do a chore and I would often come back to that pic above.  Too cute!  She's literally face down in the yarn!  Here is another one:


I did have two resolves before the end of the year, 2012, and that was 1) To finish a book that I had been reading since Thanksgiving (have you noticed that I have not been posting about books lately??) and 2) to finish this sweater.  Well, I am happy to report that there are checks in each of those boxes!!


I was definitely going down to the wire with that second resolve!  The microwave clock read 9:59pm on New Year's Eve.  Phew, with two hours to spare!  That was finishing, binding off and weaving in ends.  I used a total of 6-1/2 hanks of Origami.  I had to run down to the Brandon Yarn Boutique to buy that 7th hank on Monday.  Unreal!


A few things about this sweater...The neck is way too big.  I needed to decrease more stitches.  Since I am not going to unravel it, I made a braided string with the extra yarn and laced the V up a bit.


I also replaced the tank underneath with a short-sleeved shirt, so that there is fabric for the sweater to "grab" onto.


I am very pleased with the final product that this sweater became to be.  This can be worn with jeans, leggings or even pajama pants!  I'm actually wearing pj/yoga pants in the above pic, so this can be worn with pretty much everything.

I'm loving it and I hope that you enjoyed my Origami Sweater journey. 

Have a great 2013!

Sunday, December 2, 2012

Origami Sweater - Part 2

I have been knitting like crazy all throughout November, and I'm still not done with my Origami Sweater.  I have been knitting the lace stripe then knitting the seed stitch like a robot.  That seed stitch is enough to drive anyone mad!

I started the Origami Sweater in the middle of October; the first post is here:
Now, I can positively say that I can see the light at the end of the tunnel.  Like I said, I'm still not done, but it's close.  I brought it with me when I visited Mass over Thanksgiving and got a good portion done.

I knitted the rest of the body, then left that on those needles.  I took a second set of longer size 7 circs and did the Magic Loop method to knit the sleeves in the round, rather than using double pointed needles.  My double points were metal and this yarn is like string, so it kept slipping off of them.  I knitted both sleeves and put a contrasting yellow yarn on the live loops to hold them until I was ready to attach them to the body.

Once I was ready with that I would knit a bit from the body, then knit from the yellow holding yarn from the sleeve, knit more body, then attach the second sleeve in the same manner.  It was a bit weird knitting from a piece of yarn, but it worked.


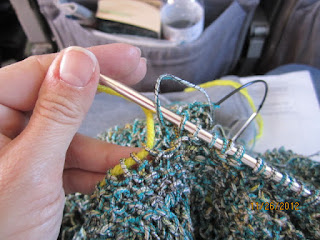
That yellow yarn in the pic is my left hand "needle".  The work on the right handed needle is the body of the sweater.

I got to attach the sleeves while I was on the plane.  I read a bit, then wanted to attach the sleeves before I forgot what I was supposed to do.  Then I went back to reading.


Can you believe that it is starting to look like a real sweater!  Although, it does look a bit shrunken; I'm expecting that once complete, I will stretch it this way and that way to get the stitches settled in and it will fit fine.  Keep your fingers crossed!

One bad thing about all this knitting is that I sort of injured myself.  Yes, a knitting injury, if you will.  My sister calls it epicondylitis, which is pretty much like tennis elbow in my left forearm.  When I knit, I keep my left hand and arm in a bent clenching position for long periods of time holding the left hand needle and that has made my arm very sore.


In the above pic, it is my extensor carpi radialis brevis that hurts!  When my elbow is bent for a period of time, it is very stiff when I extend it straight.  Ugh!  I do running, cross-fit, and the occasional bike ride...I don't get hurt doing any of those activities, no, I get hurt KNITTING!  Like, could it be any more ridiculous?

As a result of that, I have been slowing down on my knitting.  I'm not even done with my holiday gift knitting either.  I may have to forgo those other gifts and start mixing reading and sewing in between my knit projects.

On that note, let me put a warm compress on my arm so I may finish this sweater!

Sunday, October 21, 2012

NY City Cowls

One of my friends is going to NY City to visit her sister and her husband.  I was invited to go, but other financial commitments (ahem, a sick cat) has prevented me from going; this has made me very sad because it was going to be a Sex in the City sort of weekend (minus the sex, hehe).  In other words, a girls weekend in New York City.

When you live in Florida, you tend to get rid of your warm weather clothing a little bit each season.  It comes to a point where you barely own a jacket.  As a "Sorry-I-Can't-Go-But-Thanks-For-Asking-Me" gift, I thought I would knit up a snuggly cowl for her to wear while she is up in NY.

The pattern comes from the Knit Simple Holiday 2011 issue designed by Vickie Howell.  I then chose chunky baby yarn.  Never underestimate the greatness of baby yarn!  I chose Patons Beehive Baby Chunky in a light green called Quicker Clover (70% Acrylic/30% Nylon).


I used size 10 straight knitting needles and about 1.25 balls of yarn.  I knitted several rows of a k2, p2 ribbing to start.


Then I started to cable.  I had never done a cable quite like this and I thought something was wrong at first, but once you do a few, it starts to look very nice.


Here is a close-up of the cabling:


The pattern instructs you to either sew adornments on the folded cowl or make buttonholes and sew buttons on.  I chose the button route.


I chose some nice bling buttons for the NY girl in her.  I situated the cowl and figured out the placement of the buttons and sewed them on.


I buttoned it up and it is complete!


I had to try it on and test drive it for a bit while watching TV.  In the words of TV Guide: I Cheer it!


This should keep her warm as she sees the sights with her sister...Have fun, Cathy!

I thought this came out so nice that knitted up a second one to give to another friend for her birthday.  I chose black bling buttons for her.  Happy Birthday, Kj!


Send me pics of you guys wearing them...I'll post the pics!

Sunday, September 16, 2012

Oliver & Ryan Sprinkles Baby Hats

I had one skein of Premier Yarns Serenity Chunky Sprinkles (75% Acrylic/25% Nylon) in a blue, green and white called Tadpoles.  It is very soft and I bought it last year without really knowing what I was going to do with it.


I now had a reason to use it.  My two close friends both gave birth to boys this year and I can now knit them hats.  Baby clothes are so adorable and faster to knit or crochet up than an adult garment, so it gives a faster done-with-this-project good feeling.

I just used a basic k2, p2 ribbing pattern so it will be stretchy to grow with them.  


I used a size 11 needle, because they weren't kidding when they call this chunky yarn.  Because it is chunky, it worked up even faster.

One hat will be for Ryan, which I topped it off with an i-cord, in a sort of fanciful curly-q fashion.  That will be for Christmas.  I currently have it folded at the bottom edge, but it can be unfolded to fit his growing head over the winter months.


The second hat will be for Oliver, which I topped off with an old-fashioned pom-pom.  I used my cell phone as a guide for making the pom-pom.


Once wrapped I tied a short piece of yarn around the middle and cut the loops at both ends and fluffed it up.


I then took the original yarn that was used to tie the middle and with the crochet hook, threaded those ends through the top of the hat.  I turned the hat inside-out and tied those ends in a knot to secure it the the top of the hat.


I love how the pom-pom is just as big as the hat.  Too darn cute!  I got to meet Oliver last Wednesday and I was able to give him his little Sprinkles hat.

I still need to meet Ryan, who is up in Mass.  I might be coming for a visit over Thanksgiving, so I hope that I will be able to see a few friends and meet Ryan while I'm there.

Sunday, May 27, 2012

Fade Into Summer Shorts

Happy Memorial Day!

Since this weekend is the official weekend that kicks off summer, what better way than to welcome the wearing of white with a bleaching project.  In Florida, we don't really abide by that whole only-wear-white-after-Memorial-Day rule.  This project is easing into the wearing white gradually, by doing a fade-out on a pair of cut-off shorts.  This idea came from P.S. I Made This. (Such a great site, you have to check it out!)


I took my really dark blue Gap pair of Long and Leans (I love my Long and Leans) and chopped the legs off.  I used a pair of shorts where I liked the length and used those as a guide in cutting the Gap jeans.


Once the shorts were cut, Vince and I made a solution of 2 parts water and 1 part bleach in a bucket.  We propped the shorts up in the bucket so only the bottom portion was dipped in the solution.


We let it sit there for awhile.  The original instructions said for 30 minutes at first but that it could take a few dips.  Well, we had it in the bucket for about 5 hours (it was about midnight at this point) and it was bleaching it, but it was not white as snow yet.  Good enough!


Next we took them out and dumped and rinsed the bucket of bleach solution out.  In the same bucket, we made a solution of 2 parts water and 1 part vinegar.  This will stop the bleaching process.  Completely soak the shorts in this solution for about 10 minutes.

Once soaked and completely stinky, the next step is to wash them in the washing machine.  Wash them alone for this first time only.  Then dry them as usual (alone this first time, too).


Guess what, my crafty peeps?  You are done!


Washing them made them a bit whiter, maybe because I was seeing them wet and these are now dry.


I will wear these shorts proud at a Memorial Day BBQ party tomorrow.  Thank you to all the military that had fallen to allow us to be free!  Rest in Peace.

Source: google.com via Nancy on Pinterest