Showing posts with label soft. Show all posts

Sunday, January 13, 2013

Circus Cowl

Back in Oct, 2012, my local yarn shop (LYS), Brandon Yarn Boutique, had a "yarn tasting."  This yarn tasting was all Cascade Yarn yarns. I had only knitted with this brand once before and was eager to try the others.  They had long tables set up and acrylic square plates set up like a place setting.  Each plate had a different yarn ball on it with a pair of knitting needles (crochet hooks were available, as well) .  This way you can knit or crochet a small swatch to test each yarn.  What a great idea!

I bought a few hanks:

Cascade Yarn Luna Paints (Cotton)
Cascade Yarn Eco Duo (Alpaca/Wool)
Cascade Yarn Heritage (Wool/Nylon)

The project I used Cascade Yarn on before was the Pima Pullover where I used Ultra Pima cotton yarn. Very nice cotton, so soft, not stiff at all.

While at the yarn tasting, I won a door prize!  This is what was in my prize bag:

Cherub DK (Nylon/Acrylic)

Cherub DK (Nylon/Acrylic)

The prize bag had those two skeins of yarn and a pattern for a child's hat.  Cool!

My first project from the yarn tasting yarns, I'm calling Circus Cowl.  I used the first pic above's orange/pink hank of yarn.  It is a crazy mix of colors that I could not resist.  The colors remind me of the circus with all the multicolored flags. 

I decided to knit a cowl that has criss-cross stitches.  I found this free pattern on Ravelry called 3-Hour Cowl.  It came from the blog Malcolm and Marcus.  It was a great project to knit while vegging on the couch watching TV.  It took me a bit longer than 3 hours, but I did make it a bit longer than the pattern.


Here it is done:


It's hard to take a picture so you can have a real appreciation for the vivid colors in this yarn.  It really is fantastic how the colors change when they are very different.


Of course, I have to make a babushka out of it:


It is cozy and the fact that it is cotton, makes it non-itch against the skin.


It is summer-like weather out today, so I won't be wearing it for long, but in the "chill" of the morning, sure, why not.  If my morning tea does not wake me up, then the colors certainly will.

I have promised myself that once this project was finished that I would take the rest of January off of knitting, at a minimum.  Well, I finished this last weekend, Jan 4th and this weekend, I was totally missing picking up my needles while we watched TV.  I'm not sure how long this no-knitting is going to last.

Sunday, October 28, 2012

Pink Cashmere

Earlier this month, we had a yard sale.  The whole Fishhawk Ranch community had one.  So you can put your stuff out, sell some of it, and then go around and buy other people's stuff.  Ha.

Anyway, Vince always goes around and I don't.  This time, my friend Cathy came over and we worked the yard sale for several hours, then put Vince in charge for a bit.

We went to one where I bought a pretty pink Anne Klein 100% cashmere sweater for $2.  I later saw that the back of the lower arm had a tiny food stain on it.  No big deal, the sleeves were too long (as usual) so I wanted to try shortening them.  This is going to be called my:

"$2 Experiment"

I read that this is possible, but have not officially tried it myself.  I am going to attempt to unravel the sweater sleeve and pick-up the live stitches on my straight knitting needles and knitting with the unraveled yarn, a new edging.  I tried it on to see how long the sleeves really were.


It was / still is a pretty sweater:


I first measured the sleeve length and figured I would want it about 7" shorter.


I then opened the sleeve at the seam.  I then made a cut a little lower than where I wanted the new edging to be.  I cut one strand along the edging.  I held my breath; I really didn't know what I was doing.  And then to be doing it on a nice cashmere sweater.  I must be nuts!


The one cut allowed be to unhook this end of the strand from each loop by pulling gently at each stitch until I made it across the row.  The bottom of the sleeve has been separated from the rest of the sweater.


In the above pic, I have already started to unwind the lower portion of the sleeve and ball it up.  Yes, that ball of yarn is the bottom portion of the sleeve.  Cool, huh?

That pic also shows the rest of the sleeve, if you look closely, you can see the loops of the live stitches.  These are the loops that I will pick-up on my straight needles.  I chose a size 2 needle, because this was a fine knit sweater, so I estimated the needle size.


The live loops have been picked-up.  This was not as bad as I thought it would be; the stitches stayed open so I could easily insert the tip of the needle through them.  I made sure that the strand that I took out was near the last stitch I picked-up.  I need that to make sure I'm on the correct side. 

I then took that ball of yarn that I wound from the bottom portion of the sweater and did 1 purl row and then 3 rows of k1, p1 ribbing edge.  I then bound off.


I seamed the sleeve back up and it was done!  

It worked!

I was so stoked that I did not ruin the sweater.  I was getting nervous while I was unraveling that first row to separate the sleeve from the sweater.  I repeated this for the other sleeve.


I now have two small balls of cashmere yarn to do with as I please.  How nice!


Here is me modeling how lovely this sweater fits now.


I have another sweater to do this with.  I bought that a while back and now feel the confidence to go ahead an try this technique on it.  Another set of close-ups of the sleeve edging.


I love it!  I'm going to do this to everything now.  A long sleeve will not prevent me from buying a garment now.  Awesome!

Sunday, October 21, 2012

NY City Cowls

One of my friends is going to NY City to visit her sister and her husband.  I was invited to go, but other financial commitments (ahem, a sick cat) has prevented me from going; this has made me very sad because it was going to be a Sex in the City sort of weekend (minus the sex, hehe).  In other words, a girls weekend in New York City.

When you live in Florida, you tend to get rid of your warm weather clothing a little bit each season.  It comes to a point where you barely own a jacket.  As a "Sorry-I-Can't-Go-But-Thanks-For-Asking-Me" gift, I thought I would knit up a snuggly cowl for her to wear while she is up in NY.

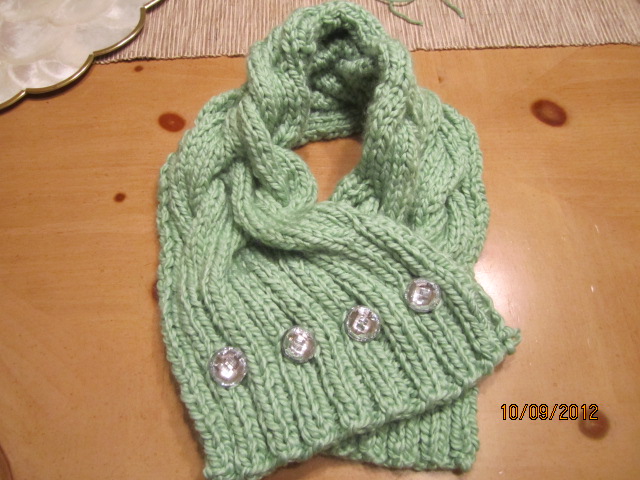
The pattern comes from the Knit Simple Holiday 2011 issue designed by Vickie Howell.  I then chose chunky baby yarn.  Never underestimate the greatness of baby yarn!  I chose Patons Beehive Baby Chunky in a light green called Quicker Clover (70% Acrylic/30% Nylon).


I used size 10 straight knitting needles and about 1.25 balls of yarn.  I knitted several rows of a k2, p2 ribbing to start.


Then I started to cable.  I had never done a cable quite like this and I thought something was wrong at first, but once you do a few, it starts to look very nice.


Here is a close-up of the cabling:


The pattern instructs you to either sew adornments on the folded cowl or make buttonholes and sew buttons on.  I chose the button route.


I chose some nice bling buttons for the NY girl in her.  I situated the cowl and figured out the placement of the buttons and sewed them on.


I buttoned it up and it is complete!


I had to try it on and test drive it for a bit while watching TV.  In the words of TV Guide: I Cheer it!


This should keep her warm as she sees the sights with her sister...Have fun, Cathy!

I thought this came out so nice that knitted up a second one to give to another friend for her birthday.  I chose black bling buttons for her.  Happy Birthday, Kj!


Send me pics of you guys wearing them...I'll post the pics!

Sunday, July 29, 2012

Bebe Throw

I had a baby shower to attend yesterday and so I have been working on crocheting a baby throw.  Crochet goes by much faster than knitting and I was running out of time (shocking, I know) and needed one.  Her husband's family is Puerto Rican, so they are very immersed in the Spanish culture, so they call "baby", "bebe".  That will be the name of my throw.

I chose an easy crochet throw from the Lion Brand collection of patterns and it is pretty much one big granny square.  Here is a pic from their website:


Isn't is sweet?  It is a throw that I believe I can start and finish in time for the shower.  I went to Knit 'N Knibble and browsed their huge selection of yarn and settled on the following:


It is Snuggly by Sirdar and it is a dk weight baby yarn that is 55% Nylon/45% Arcrylic.  I normally do not like using arcrylics because they are often not soft or are prone to pilling.  This acrylic blend yarn is definitely the exception: very soft, does not have that dense, plasticy feeling you can feel when you rub it between your fingers.  It is lightweight and really a pleasure to work up.  I bought 2 of each color and used an I hook.

I chose 3 colors rather than 4, as the pattern suggests.  This is a pattern that you can do any color in any order and not worry about it.  The sex of the baby will be a surprise, so the 3 colors I chose were a buttercup yellow (Daisy), a sage green (Summer Lime) and a light blue.  I thought the blue was another shade of green at the time I purchased it, but when worked up, it is definitely blue. 

I started that very evening with the center square:


I will repeat the color order as you see above.  I will crochet two rounds of each color.  I took this throw in the car with me and crochet to and from work ( I carpool and often am not the driving), so this worked up even faster than I imagined.


I'm almost done in the above picture.  I bought 2 balls of each color and plan on crocheting until I run out of yarn.  I ran out of yellow first, which is supposed to be the color I end on: perfect!

Here are a few of the finished throw:


Now, here is a picture from the baby shower:


She loved it!  She said it was very nostalgic from her own childhood.   That was the only homemade gift at the shower, which had to complete with some pretty nice gifts!  A homemade gift is special in it's own way.

Now, I am off to start another baby blanket for a friend that had her baby already.  Better late than never, I always say.  It will be worth the wait.