Showing posts with label Bernat. Show all posts

Sunday, February 2, 2014

Arm-Knitting

Yup, Arm-Knitting!

I made an arm-knitted infinity scarf for my friend for her birthday.  Vince's daughter showed me a YouTube video of arm-knitting and I was like, "Huh?  I need to try that!"
 
The tutorial I like is this one:  Vicki Howell
 
You need at least 2 skeins of bulky or super bulky yarn.  You can also use multiple strands (about 4) of worsted weight yarn.
 
In my project I used 2 skeins of Vicki Howell's Sheepish Stripes in Punk(ish) and 1 skein of Red Heart Boutique Sashay in Boogie.

Sheepish

Sashay
 
As you can see, I have a purple theme going on here.  I bought the Sheepish yarn but I had the Sashay in my stash.  The Sashay you are supposed to make this ruffle scarf with, but I never got around to it.  This project is perfect for it.
 
Basically, with arm-knitting you are using your arms as the knitting needles.  This creates a very large gauge knitted item.  The concept is the same as knitting, really!  I had to watch the video a few times and practice the cast-on and did a few rows, then I took it out and started "for-real."


I am in the midst of doing it above.  See how large the gauge is?!  It's huge! 


Above is the knit side.  Below is the purl side.


The green you see in there is the Sheepish self-striping yarn.  It has the purple and green in there.  Love it!

Here it is finished.


You can also double it.


And, of course, me wearing it (got to try it out before you give it away!


Very Cozy!!

I'm also knitting these for Relay for Life (in addition to the Coffee Cup Cozies).  I will post more about it in my next post.  Clearly, everyone will want one! :-)

Sunday, December 23, 2012

Ben Ice Cream Cozy

Yup, that's right:  I knitted an ice cream cozy.  Wait until you see it!  

Let me start from the beginning.  Last year, I got a Knitting Desk Calendar (2011) and in there was a pattern for ice cream cozies.  They fit a pint of Ben & Jerry's ice cream, hugging the condensation, insulating, protecting your hands from the cold when you eat from the carton.  How awesome is that?!?!

Pic from the Knitting Desk Calendar

I knew I wanted to knit it.  At the time I was dieting and the thought of eating right out of a pint of Ben & Jerry's ice cream was undo-able, so I did not knit one right away (I was not going to use it while on the diet).  So, when I started thinking of who I was going to knit gifts for this Christmas, I thought, "Who can I knit the ice cream cozy for?  Someone must eat Ben & Jerry's ice cream!"  That's when I realized that I do, in fact, have a friend who eats this ice cream.  She even goes online to find what store is selling the exact flavor she is looking for.  This was a no-brainer.

Perfect!

Well, Christmas was sneaking up on me and I had not started it as of the beginning of December.  Nothing like waiting until the last minute.  I was on a roll and then was out with my knitting injury (see the Origami Sweater - Part 2 post).  I still have it and when I think about knitting, my elbow and arm will suddenly hurt.  Ridiculous!

I started it on December 13th, which was a Thursday and was done by Sunday.  So, not too bad.  Here are the details:

 
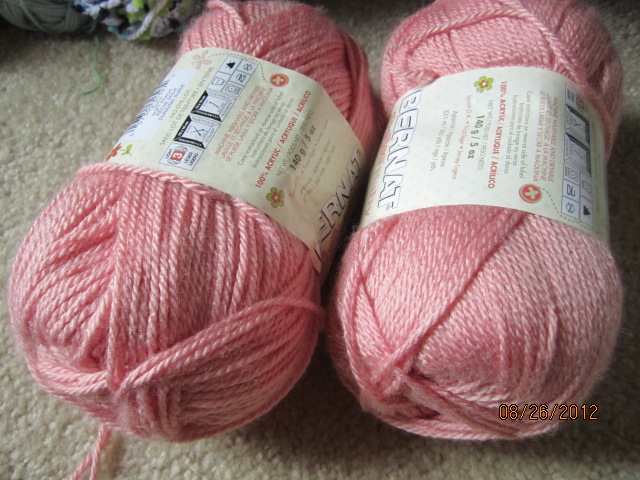
I used some stash yarn: Bernat Softee Baby (100% Acrylic), in Soft Peach (looks pink in real life) and Premier Yarn Everyday Soft Worsted (100% Acrylic) in Baby Yellow.  I have used the Bernat Softee Baby in a couple projects: I Heart Hats and Vivecita Beret.  The Premier Yarn, I used in my Cookie Swap 2012, Rapunzel braid.

The Softee Baby is a DK weight and the Premier Yarn is a worsted weight.  What does that mean?  That means that the DK is a thinner yarn than the worsted and I had to use 2 strands of the DK to 1 strand of the worsted.  That brought a challenge:  I had only one skein of yarn of each, so I had to ball up the DK yarn (the peach/pink) into 2 balls.

This gave me an excuse to use my ball winder.  I love that thing!


It was kind of a pain to wind it from a skein, but after a tangle or two, I had 2 balls of yarn to work with:


This way I can hold the 2 strands together without a huge mess on my hands by trying to use both ends of the skein (it would not have worked, I tried that way before I balled it up.  Trust me!)

So, this is knitted on double pointed needles (dpn).  The pattern calls for a size 10, but I knit loose, so I went down a needle size to a size 9.  I casted-on and was off.


It's always confusing to me when I cast-on to dpn's.  I always think that I am doing it wrong, but it works out somehow.  So, I have started it, as you see above.


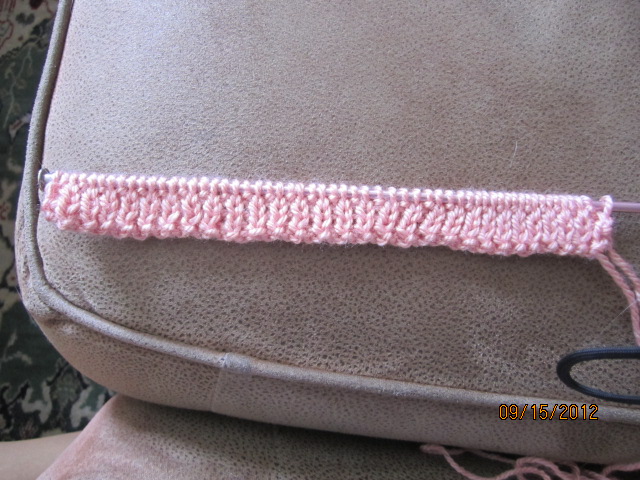
This 2 color knitting is called stranding or simply colorwork.  This is where you carry the unused color behind in the work.  I'll show you in a pic, down below.  I worked in a ribbing pattern, so the cozy can be stretchy.  I worked from the top-down.


Here is a close-up of the rib pattern, where the color changes for the knit and the purl stitch.


This is what the stranding looks like.  This is a pic of the inside of the cozy.  This extra "layer" of yarn behind the stitches helps insulate it, so your hand will not get cold from holding it.


Unfortunately, I completed it and then realized that it was a bit too long and looked like a sock, not a cozy.  I had to rip out about 4 rounds of the colorwork.  Oh well, I fixed it in no time.


That was an awful lot of yarn for 4 rounds.  I put the dpn's back into the live stitches and finished it off again.


Vince and I took one for the team...the Anything-for-the-Christmas-Gifts Team.  We bought a pint of Phish Food (love that one, and it is Gluten Free) and tried the cozy on it.  It fit!!!!  So, we ate the ice cream while watching a DVR'd episode of Dancing with the Stars.  I washed out the carton and gave the gift, with the cozy on the empty Ben & Jerry's pint.  I put a gift card for the local supermarket in it, so she can buy a pint for her to try the cozy out on.  I'm not that cruel, that I would completely tease her with no ice cream!

There is also a Jerry ice cream cozy that I will knit at some point.  I gave her an IOU for that one.  I do not have any more stash yarn that fits the bill for this project, so I will buy some the next time I'm out at Joann's.

What do you think?  Is this a fab gift or what?!?

Sunday, September 23, 2012

Vivecita Beret

I am a knitting fool, with all these knitted gifts getting completed.  Here is another knitted gift that I made with stash yarn.  Vivecita is a small, child-size version of Viveca, from Berroco.  So far I have made a total of 3 berets:
  1. Viveca Beret (for myself back in February)
  2. Viveca Hunter Beret (as a gift earlier this month)
  3. Vivecita (as a gift, today's blog post)
The yarn I used is Bernat Softee Baby, in Soft Peach.  It is 100% acrylic.  I used this yarn (that's why I called it a stashed yarn) for the I Heart Hats that I made last Christmas.


The modifications that I did for this pattern was to only do 6 fan repeats across the row, rather than the 12 for an adult beret and on the height, knit up 3 fans, rather than the 6 for an adult then start the crown shaping.  I also knitted the ribbing at the start edge for about a half inch rather than a full inch.


The ribbing makes it stretchy.  This ribbing is a K1, P1 ribbing.  The back and forth with the yarn string to go from purling to knitting is enough to make you batty.  That is one reason for the half inch modification, mentioned earlier.


That's a close-up of the ribbing.  Since I was knitting a child-size version of my favorite beret, this knitted up in no time.   This only took one weekend to do.  I knitted while watching movies last Sunday.


I really hope that the modifications worked and that it actually will fit the recipient's head.  She is only 2-ish, but still.  I hope it fits!!

Sunday, August 19, 2012

Star Baby Blanket - Part 3

Hooray!  I finally finished the Star Baby Blanket!  This took me about 2 weeks, I think I started on Aug 4, which was a Saturday.

Here is a close-up of a corner:


I did have to go out and buy one more skein of each blue, but I only went around the blanket with one set of two rounds with each.  These skeins will join my bin of stash yarn.  I was trying to stash-bust using yarn I already had, but alas, I'm left with the roughly the same amount.

I will have to make scarves as gifts to stash-bust these skeins.  Anyway, here is the final picture:


It came out very nice.  It's not perfect, but I think that one won't even notice.  If you look real close, a skilled crocheter will pick out the irregularities, but the layperson...doubtful.  I will send this blanket as a gift soon.

I am now at a loss of what to work on next.  I have yarn for projects, but I fell like if I'm going to make a few gifts for Christmas, I should get knitting or crocheting now and put my personal projects aside until Dec/Jan.  Doing that, I then feel some anxiety that I must do the gifts and pick a nice project or the recipient will not like it and think it some ole granny gift.  

I will think it over and you shall see in my coming posts, what I decide to work on next.  Have a great week!

Related Posts:

Sunday, August 5, 2012

Star Baby Blanket - Part 1

I have one more baby blanket to make.  This one is quite a bit late, but it'll come.  I wanted to try something new, like always.  I chose a cute star-shaped baby blanket pattern and started it the other evening.  Then I ran into a road block where I was doing something wrong and I can't figure it out.  Again, as usual!

Let me introduce the pattern: It is called "Pipsqueak Star Blanket" from Bernat and it is crochet.

Picture from Bernat's website

Isn't it adorable?  I thought it looked easy and it is marked as a 2 out of 4 skill level. 

I am going to use Loops & Threads Country Loom (100% Acrylic) in a light blue (Ocean Tide) and a brown/blue mix (Landscape), in addition to Bernat Soft Boucle (97% Acrylic, 3% Polyester) in a natural color. 


My issue was with Round 3, in which I am left with a gap before I connect to end the round.  I redid it several times and still a gap.  


I don't get it.  So, above was my first attempt.  I should have 6 points, for one thing and I only had 5 and not enough room for the 6th.  After fooling around with it for a bit, I decided to try it with regular yarn so that I may see all the stitches.  I was thinking that maybe it was the yarn and I could not see the stitches in order to count them correctly.


My next attempt with regular yarn, still yielded a small gap.  I have 6 points this time, at least.  I have put a call in with my sister and she left me a message that the pattern was working out fine for her.  Of course it is!

I will try and try again until I can get it right.  So, enough typing, I need to get hooking!

Related Posts:

Monday, July 16, 2012

Sleeveless T-Neck - Part 2

As I said before in my previous post about this project, I have been working on this for years.  I hate to admit it, but I'm really not even that interested in this sweater anymore.  It is not all that fashionable and it was sort of a starter garment / practice piece.  

Well, it is FINALLY DONE!  Yippee, raise the flag!


The one on the left is the one I just finished.  Normally you would block these pieces, but given the nature of this yarn, I'm not going to bother.  

The stitches on the tops of both of these pieces are live, meaning that they are loose, ready to go back or stay on a needle, usually to continue the project with a sleeve, neck or edging.  The original pattern called for a turtleneck, but I do not need a turtleneck in my wardrobe.  I am going to vary it but I'm going to be a free spirit and see where it goes.


First, I transferred the stitches to a circular needle because I am going to knit around the neck but not in the round.  I am going to leave an opening / slit on one of the shoulder, so I will be working side-to-side.

I decided to start off by knitting a k3, p2 rib for the neck.  My plan was to knit it long enough so that it will hang down in a sort of cowl neck, but not really.  I am not sure what the proper name of the neck I'm trying to accomplish with my thoughts, we'll just see where this takes me.


I was knitting for awhile and was getting bored with it and wanted it to be finished the day I was working on it.  There is no need for this project to linger on any longer.  Above is my rib fold-down neck.  Not long enough though.

So, I decided, since I am so confident in my crocheting skills since completing my Pima Pullover, that I am going to finish this collar with some crochet.  I bound off with knitting and picked up an I crochet hook and did a dc, ch1, dc thing along the entire edge, then did the same for 4 rows.  


This is how this collar came out!  Not too shabby.  I actually like how this came out.  The shaping of the body of the sweater could be a bit more fitted, but I'm not going to complain too much.


This one shoulder is only connected by a few stitches at the end, but not by the neck.  This is where I intentionally did not connect for the neck.


I can see myself wearing this, maybe at the end of the summer.  The sweater itself it warm, but I have to wear a tank top underneath it so you don't see through it.

I talked about not making myself finish UFOs in my stash in my Craft-no-lutions post at the beginning of the year.  I think because I was sick of moving this project out of the way each time I went into my craft corner, that I decided that it must get done.  Phew, so glad it is over and it came out wearable!

Related Link:

Sunday, June 10, 2012

Sleeveless T-Neck - Part 1

Most crafters (knitters, crocheters, cross stitchers, beaders, seamstresses, etc) have projects that are not complete.  This could come in many categories such as: supplies bought but never started, half done, and almost done but something is preventing you from finishing.  This sweater project fits in the "almost done" category.   It has been in this stage, probably, oh, since 2007.  So, what, 5 years?  Yes, it has been sitting in the dark for 5 years! 

Natural roll at the bottom edge

I'm sure I'm not alone, but not sure who will be admitting this over the internet?  I don't care, no problem, let me start!  I am just happy that I am finally getting to it.

Here are my reasons for delaying it:
  •  Seemed like a nice project, but something better came along, so I put it aside to work on that.
  • I picked it back up in those 5 years, but, again, something better came along, so I put it aside.
  • I picked it up last year and realized, about 6" of knitting ago, I made a very noticeable mistake.
    • That was when I put it back until I had the courage to do what every knitter hates:
Ripping Out! 
 
Nobody likes ripping out hours of work.  But, I'm in a stash-busting mood, so I'm going to figure this problem out.

Let me introduce you to the project first, though.  It is supposed to be a sleeveless t-neck (cute way of saying turtleneck, I guess).  I got this pattern from the Vogue Knitting International,  Holiday 2004 issue.  I think I may make this a cowl neck instead.  That is more in vogue than a turtleneck (and I'm in Florida, so who the heck wears turtlenecks down here, anyway??)

Boucle yarn

It is being knitted with Bernat Soft Boucle (98% Acrylic/2% Polyester).  It was leftover yarn from a baby blanket I knitted a friend.  The word "boucle" comes from the French for curly.  This yarn is spun so it forms loops at various intervals.  I never knew how to pronounce this word so I looked it up:  boo-clay.   Oui cheri,  Now we can speak French!

The "mistake"

Above is what I have done so far.  I'm working on the second side and that is where the mistake lies.  I have circled it in red.  It a about 15 sts or so of purl on a knit side.  One may not be able to notice it, but I knew it was there and would never had worn it if I finished it like that.  I claim that I was knit-sleeping.

I thought of quick fixes: double stitch a thin ribbon around the body at that row so it would hide it or threading a ribbon through it so it would tie into a cute bow on the side.  Eh, in the end, I figured it would just be best to fix the darn thing.  But I am not ripping it out.  I am going to dropstitch to each wrong stitch and pick them back up.


First: Transfer the good stitches to a stitch holder and placed a stopper at the end of the needle.

 
Second: Undo the stopper and pop one stitch off the needle.  Undo that stitch.  I have the crochet hook there so you can see that it is a live stitch.  I am using the hook to help undo each stitch in each row.


Third: Undo that stitch all the way down to the mistake and one stitch further (for good measure).  The hook is where the bad row of stitches are.  Yea, it's pretty far down.  I call the yarn strands that are left behind a "rung", like rungs on a ladder.


Fourth: To make a good knit stitch, you put the hook through the live loop (the one that you just undid down the length of the sweater) from front to back.  Take the next "rung" that is in the row above it and hook it.  Pull it through the live loop from back to front.  You just made/picked-up one good knit stitch.

Fifth:  Re insert the crochet hook in that new live loop and repeat the fourth step all the way back up the ladder.

Sixth: Once all stitches have been fixed, then transfer all the stitches on the holder back onto the needle.


Finally ready to tackle this sweater!  All the mistake stitches have been fixed.  Not sure if this saved any time, but I feel better that I did not undo all my hours of work.  It took hours to fix the stitches this way, but I can say it is now fixed.