Showing posts with label blocking. Show all posts

Sunday, February 17, 2013

Fix It - Miss Me Sweater

I bought this sweater at a thrift store ages ago and just never did anything with it.  I bought it because it is Miss Me brand.  Vane, I know.  I recently looked up sweaters from Miss Me and, of course, they do not have this style anymore but the cheapest sweater on the website was $54.  This sweater at the thrift store was $4.  Yes, $4.

But....there is a catch.  The sleeves were waaaaay too long.  Who has arms this long?


So, you know what I'm going to do?!?!  I'm going to shorten them and reknit the cuff.  Yeeha!  I can't wait!

This is such a cute sweater, albeit a bit itchy, but cute.  Funny how when you look at the construction of a garment, you see how cheaply it was made.  First, this sweater is a mix of wool and acrylic.  Yuck, very itchy.  I will have to wear a long-sleeved T-shirt or blouse under this.  Second, the buttons on the front are the same shell buttons that I bought on eBay when I made the Shapeshifter Shrug.  They were $7 for a big bag of them.  Point proven.

First, I figured out where I wanted the new cuff to end; marked it.  Then unstitched the seam that held the arms together a few inches beyond the place I marked.  Then I found where I marked and made a little snip on a stitch at the very edge.  I carefully pulled that stitch out across the width of the sleeve.


Once the sleeve was detached from the main sweater, I unraveled the detached part of the sleeve and balled it up.  I will use this very yarn to reknit the cuff.


I tried to gauge what knitting needle I was going to use to reknit.  I have at least one of each size in my organizer.


I figured that I needed a 9.  I put the loose stitches from the real sleeve onto this size 9 needle.


I then knitted the ribbing again: k2, p2.


I tried blocking the sleeves in order to align the stitches neat, by wetting the cuffs and placing a towel on it.


In addition to putting heavy weight on it to smoosh them into submission.


But, it did not really work.  I think the reason why it did not work is because it was an acrylic blend.  Damn those acrylic blends.  They ruin everything!


Once I accepted this, I seamed up the arms again with the tails of the yarn that were hanging out still.  I weaved in the rest of the ends.


The seam are in-line with how it looked originally and the cuffs back together.


Not too shabby....


I wore it to work a few weeks back and got tons of compliments.  Thank you Miss Me, but move over for Miss Nancy!

Sunday, September 25, 2011

Shapeshifter Shrug - Part 2

Welcome to Part 2 of the Shapeshifter Shrug.  I am almost done I can almost feel how cozy this will be.  I have completed both parts of the shrug, the left and the right. (In case you missed it, here is Part 1).


The next step is to connect these two halves with a knit stitch called the Kitchener stitch.  There is no way to easily explain how this stitch is done, but I can tell you that the blog The Purl Bee does it with some great instructions.  Basically, you are taking a blunt needle and the same yarn and weaving in the stitches that are on the needle and holder (those are called "live" stitches) to create a stitch that looks like the knit side of your work.  This creates a seamless join.


I had to have the instructions up on the screen the entire time I did this and had the computer cursor on the step I was doing each time.  This took concentration and a quiet house. (Sorry Vince, no TV and no talking!)


Here is the work-in-progress from last week.  Once this was complete I weaved in the loose ends and took a break for about a week.  Ha, the next step I wanted daylight and plenty of time so I waited until the following weekend (this weekend) to block.

Blocking is something that you do at the end of a project to make all the hard work you just put into knitting look fabulous.  This means that all the stitches that puckered and all the curling get smoothed out for a professional look.  I did this step when I knitted the Lace-Up Fingerless Gloves for Christmas last year.


I start out by laying out a towel on the floor.  I measure and arrange (by stretching, if necessary) my shrug to the dimensions that look good to me.  I chose 23" wide.  I took safety pins and stuck them through the edge and into the rug. 

I then used a spray bottle to generously mist the fabric.  I used my fingertips to massage the mist into the fabric and to ensure it is evenly wetted.


I then stretched it to my measurements and pinned all the way around the shrug.


Next, I covered it with a second towel and placed books on top of the entire surface area of the shrug.  I up-ended two TV snack trays and placed those on top of the books along with a box and a bin.  I used whatever would evenly press down on the fabric.  I will come back and check on this in a few days.  It is ready when the fabric is fully dry.


Last week I went button shopping.  I changed the pattern a bit and did not make it as long as the pattern was originally written.  As a result, I did not need as many buttonholes as planned.  Instead of 20 buttonholes, I only needed to make 18.  That being said, I needed 18 buttons.  I thought Joann's would have just what I needed, so I headed there and I discovered two things:
  1. That Joann's did not even have 18 of the same button (unless I bought two bags of the bag-o-buttons and those are plastic and are not going anywhere near the shrug that took me a month to knit).  Yeah, I'm snubbing the bag-o buttons.
  2. That even if Joann's did have that many buttons in a button I liked, it would've cost me a fortune.  That is even taking into account using coupons.  Nice buttons were priced anywhere between $2.99 to $8.99.  Some had only one to a card and some had up to four on a card.  
So, I went looking on the internet and there are several online stores that had some great buttons that you could buy in bulk, but they were still too expensive.  I then got a Eureka! moment and went to eBay.  


I found a lot of 50 flower-shaped white mother-of-pearl shell buttons for a total of $7.05.  That is with shipping.  The only thing is, is that it's coming from Hong Kong and will take 4-6 weeks.  Hey, I don't care, it is still in the 90's here in Florida, I can live a bit longer without the shrug. 

I love eBay!  

Sunday, August 28, 2011

Shapeshifter Shrug - Part 1

I have been dying (no pun intended) to knit this shrug.  It is called the Shapeshifter Shrug from a knit book called Vampire Knits.


I bought this book for myself for Christmas last year and have been wanting to make almost everything in it.  The author states that it was inspired by Twilight but is not limited to Edward and Bella projects.  It goes into the history of vampires, werewolves, witches and all kinds of eerie phenomenon.  It is a great book to have in your library. 

I finally decided on the Shapeshifter Shrug which is a convertible garment that has buttonholes on one edge and buttons on the other to allow you to "shift" it into other forms such as a shrug, shawl, scarf or whatever.
It was originally knit in wool, but I decided to keep it cheaper and a bit less itchy by choosing Wool-Ease from Lion Brand.  It is an acrylic/wool blend; worsted weight in heather forest green.  I had coupons fowr Joann's so this so far has totaled about $12 for 5 balls of yarn (yippee)!

I'm knitting this on size 8 bamboo circular needles.  There are a ton of sts, so circulars are the most comfortable way to knit this garment, in my opinion.  I have to keep track of the pattern row and the cumulative row because I have to place a buttonhole every so often, so I am tracking this with two separate row counters.  High maintenance, for sure!


Another challenge with this is that it has a cabled look to it but they are achieved by yarn overs (yo) and decreases.  My history with yo has been a bit rocky (Aloha Maddie Baby Blanket) so I was being cautious this time by making flash cards of each row so my eyes only see that row.


Don't mind the stars over the cards; there is a copyright on the pattern so I cannot give it out.  I just wanted to illustrate my flashcards and how they are very helpful.

So here is the start of the pattern and a few buttonholes.


I just love the look of this pattern.  I have to use markers in this pattern so that I only perform the pattern repeat stitch on the stitches that are between the markers and work a garter st at the edges.  The marker set I'm using were made by my friend Crystal as a Christmas present.  They are polymer clay snowmen on jumprings with a post down the center.  How creative, huh?  I love them too.

As of today, I have completed up to the end of the pattern repeat and now I will do just stockinette st for awhile.  Here is another close-up of how this cool pattern has worked up:


Once I block this, the cross-over area will not be puffy or raised but will lay flat.  I am working everyday on this because I'm obsessed with it right now, so I hope to be done with it in a snap.

Stayed tuned!


Sunday, January 9, 2011

Lace-up Fingerless Gloves

Let's back-up a bit this week.  In addition to a few scarves, I also made a pair of lace-up fingerless gloves as a Christmas gift this year.  These gloves came from a knit book called AlterKnits by Leigh Radford. 

Very creative knit pattern book

This book I received as a gift one year for my birthday.  I've had the book for about four years and this is the first project I have made from it.  There are a ton of cute and cool items to knit or otherwise create with wool that it is definitely worth checking out. 

The yarn I chose for this project was Encore by Plymouth Yarn (75% Acrylic / 25% Wool) in a peach color. First, they instruct you to knit a gauge swatch.  You know how I feel about gauge swatches, so I sort of make one then just go with the needle size recommended, which was a size 7.  The cool thing about these gloves that make them different than many other gloves, are that they are longer up the arm and lace-up with a ribbon.  Wait until you see how nice they came out.

So, right away I make a mistake.  The pattern starts at the arm and you knit on straight needles for 6" or so.  In the arm part, on each side you do some yarn overs (yo) and create eyelets for the threading of the ribbon.  I missed the first eyelet on one side.  I did not discover this until I was, oh, I don't know.....

Can you read the tape measure?

Let's see, what does the tape measure read?  Yup, five inches along.  Well, I did what any insane knitter would do:  I ripped it out and started over.  I had to!!  I could not lace it up, in good faith, through a random stitch and give it as a gift.
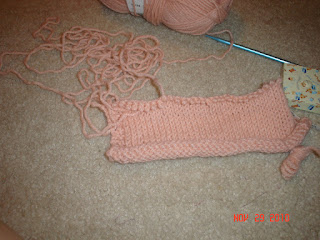
Rip, rip, rip!

By this time, I had the eyelet pattern repeat down pat.  Once I got myself back on my feet and knitted the required inches for the arm, they instruct to transfer to double pointed needles (dp), aka double points, so you can knit in the round (join the two sides together to form a tube).  Double points are knitting needles that are short and have a point on each side and come in sets of four or five.  I have several sets and I hate using them.  You have to evenly distrubute the stitches over three or four needles and use the empty one as the second knitting needle.  I may have lost you but that is okay.  They are confusing and I can't ever hold them right.

But, alas!  There is a cure for the dp blues.  It is called Magic Loop.  You get a pair of circular needles in a length of at least 32" long and you do this thing where you have loops on both sides of your knitted tube.  This technique eliminates the "ladder" effect that alot of knitters get with the dps.  I'm not really going to try to explain, just click on the link above to see a video from YouTube.  It is only three (3) minutes long and it will convert you!!

Me, Magic Looping!!

This part is shaping the hand portion and the thumb.  The below pic shows that the join of the sides is seamless and you cannot tell (no laddering).  Laddering is when the joining stitch is slack and is not uniform with the rest of the stitches, but is consistent going up the side and looks like rungs on a ladder.  I think I am getting too technical, so forget all this!  Just let me show off my seamless stitches and be done with it! :-)

Yeah, Me!

Nothing else disasterous happened while knitting the rest of the gloves.  You work the hand up to the  knuckle, making a spot for the thumb.  Meanwhile, the thumb stitches are placed on a holder to be worked later. 

WIP (Work in Progress)

Once the thumb was knitted and yarn tails weaved in (I had to sew up a hole that formed between the thumb and the hand, so I just used the tail that was from the thumb), I had to model to show the almost complete fruits of my labor.

The rolled-edge is cute, huh?

So, when I got to this point, I just wanted to be done already!  But I wanted to block the gloves so the stitches will lay flat and to tame the eyelets so they will be straight and flat, not curling.  Here are some things you need when you block something:

Take the time to block, you will thank yourself

A flat surface (I used a wooden tv tray), a spray bottle with water, towel, and pins.  In this case, I did not need the pins.  The pins help set the item to a measured size; I did not need to size the gloves.  I wet the gloves on both sides until they were damp, but not soaking wet.  Rub the water into the stitches (this, to me, is like feeling a wet dog...yuck), then position the gloves in a single layer on the towel.  I folded the towel over the gloves, but left the rolled edges hanging out.  I did not want the rolls to be flat.  So I had essentially sandwiched the gloves between two layers of towel.

Towel sandwich

Then I placed some heavy items on top to weight it down.  Then I came back the next morning and took a look.  The gloves were dry and set.  On a side note, yes, that is a Dexter board game!  I just got it for Christmas from a very close friend and I played it on New Year's Eve.  The game is won by collecting your suspect game tokens in a mini black garbage bag and moving your piece around the board until you get to the marina to "dump" the evidence.  Yes, a bit demented, but if you are in love with the show, you would get a kick out of the game concept.

So, here are the final results of my lace-up fingerless gloves:

Now, how do you lace the ribbon?

I am pleased with how they came out.  I did have an interesting time actually lacing up the ribbon.  I wanted the ribbon to actually show but could only think of how a shoe was laced.  I figured it out, eventually. 

In my opinion, this was not a difficult project, considering that they are pretty much a half a glove (no fingers), but it still took me at least two weeks to complete them.  It actually spanned about a month, but I did not work on them each day and I visited MA for 10 days in December, so I finished them up when I got home during Christmas weekend.  I did not give these as a gift until New Year's weekend, so I had a bit of breathing room.

No matter what, it is always hard for me to part with my creations.  I may not have come up with the pattern or the idea, but I take pride in the finished piece, so I end up wishing I made the item for myself!  Selfish, I know, but I did give the gloves away, so it is not too selfish.  (I hope).

Now that you see how I got through a pattern, with a few hiccups.  What hiccups have you encountered in your latest WIP?  Let me know, take pics, send them to my email by clicking the envelope link below.  I would love to show off your pieces!