Showing posts with label cuff. Show all posts

Sunday, November 3, 2013

Fetching Fingerless Gloves

I finally started and finished a project in the same month (of the same year)!  Hooray!

I knitted a pair of fingerless gloves for a friend as a birthday gift.  She lives in Mass, so she may actually use these when it gets nippy out.

The project is called Fetching from Cheryl Niamath.  I got the pattern from Knitty.com.  Fetching are fingerless gloves that have a few row of cables around the wrist and on the knuckle.

The yarn I decided to use was Sheep(ish) from Vickie Howell for Caron.  I will have to be honest here:  I really do not like this yarn.  For this purpose, it was not the best yarn choice.  While knitting it kept splitting and there is not much of a twist or wind to it, so it was not the best for cables.  Please forgive my photography, I took most of these at night with the flash on.


The color I chose was Gun Metal(ish), which is a very dark gray.  I will admit they have such great colors to choose from, very vivid and saturated.  I knitted the gloves with a size 6.


I needed double pointed needles (dp), a cable hook (the U looking thing), a marker, darning needle and a row counter. 


While I was casting on, the yarn broke.  Ugh!


For dps, you cast on the required number of stitches, then with the other dps, transfer over several stitches, then with the 3rd dp, again.  You should have split up all the stitches so there are about the same number on each dp.  The first round is the most critical, because you must be careful that you do not have the stitches twisted.  If twisted, you will be knitting a Mobius and you don't want that.


I will then knit the gloves in the round.  Dps are good to use when you have a small number of stitches, but need it in the round.  This will have no seams (yea!) and just a few strands to weave in at the end.


In this pic, I am knitting some cables.  They will be around the wrist and arm.  To cable, you take your cable hook and slip 2 sts onto it.  Hold it in the back or the front (depending on which way it is going to twist) and knit the next sts on the main needle.  Then take the cable hook and knit from that hook.  You now have the start of a cable.  Then you knit in pattern (knit the knits and purl the purls) until the cable row again.  Really, it is easy.


Another feature I want to show you is the thumb.  I was instructed to take waste yarn (a different yarn and color than the yarn you are using) and knit with that as the main yarn for 7 sts, then transfer them back to the left needle and knit them again, but dropping the waste yarn and knit with the main yarn again.


You will have something like this, with the waste yarn showing.  I will carefully unstitch the waste yarn, revealing live stitches.  I will immediately place the live stitches onto two double points.


Slowly unstitch each one and place onto the needle.


I will now knit this little opening in the round to make the thumb.

 
I finished by cabling around the knuckle and loosely bound off with a picot bind-off.  It created little bumps along the edge.  These did not come out as fabulous as I had hoped.  I don't know if I can really blame the yarn entirely, though.  Maybe if I adjusted how much I knit after the cable on the knuckle, or if my hands are too small for these gloves.


They have been sent off to my friend.  Hopefully they will fit her better or look better on her.


I'm sure she will be able to use them on the next blustery New England day.  Enjoy!

Sunday, February 17, 2013

Fix It - Miss Me Sweater

I bought this sweater at a thrift store ages ago and just never did anything with it.  I bought it because it is Miss Me brand.  Vane, I know.  I recently looked up sweaters from Miss Me and, of course, they do not have this style anymore but the cheapest sweater on the website was $54.  This sweater at the thrift store was $4.  Yes, $4.

But....there is a catch.  The sleeves were waaaaay too long.  Who has arms this long?


So, you know what I'm going to do?!?!  I'm going to shorten them and reknit the cuff.  Yeeha!  I can't wait!

This is such a cute sweater, albeit a bit itchy, but cute.  Funny how when you look at the construction of a garment, you see how cheaply it was made.  First, this sweater is a mix of wool and acrylic.  Yuck, very itchy.  I will have to wear a long-sleeved T-shirt or blouse under this.  Second, the buttons on the front are the same shell buttons that I bought on eBay when I made the Shapeshifter Shrug.  They were $7 for a big bag of them.  Point proven.

First, I figured out where I wanted the new cuff to end; marked it.  Then unstitched the seam that held the arms together a few inches beyond the place I marked.  Then I found where I marked and made a little snip on a stitch at the very edge.  I carefully pulled that stitch out across the width of the sleeve.


Once the sleeve was detached from the main sweater, I unraveled the detached part of the sleeve and balled it up.  I will use this very yarn to reknit the cuff.


I tried to gauge what knitting needle I was going to use to reknit.  I have at least one of each size in my organizer.


I figured that I needed a 9.  I put the loose stitches from the real sleeve onto this size 9 needle.


I then knitted the ribbing again: k2, p2.


I tried blocking the sleeves in order to align the stitches neat, by wetting the cuffs and placing a towel on it.


In addition to putting heavy weight on it to smoosh them into submission.


But, it did not really work.  I think the reason why it did not work is because it was an acrylic blend.  Damn those acrylic blends.  They ruin everything!


Once I accepted this, I seamed up the arms again with the tails of the yarn that were hanging out still.  I weaved in the rest of the ends.


The seam are in-line with how it looked originally and the cuffs back together.


Not too shabby....


I wore it to work a few weeks back and got tons of compliments.  Thank you Miss Me, but move over for Miss Nancy!

Sunday, June 24, 2012

Pima Pullover - Part 2

I'm still working on the Pima Pullover from last week.  I could not have gotten this far without my sister Kathy's help.  She has explained every stitch to me and showed me how to connect the front and arms and, most importantly, where I'm inserting hook at the end of each row.  I find that the most confusing part, not the stitches or the pattern repeats, but how to finish and start the rows/rounds.

Last Morning with Kathy

We got as far as the shoulders, connecting to make the v-neck, finish one sleeve and start the second.  Kathy finished one sleeve for me so I would: A. know what to do on the rib part and B. cover some ground so I would not have so much to do.

I was hoping that this sweater would be completed by the time she left and I was really sweating doing it on my own.  I finally had a chance to re-start the sweater only today.  I was able to make some good headway:  I finished the second sleeve.

Half a Sweater

I tried it on to to make sure that it was still on-track for fitting well.

Yeah, it's fitting!

Awesome!  It is fitting and my second sleeve looks like the first sleeve that Kathy crocheted.  Seriously, I was worried that my sleeve would be looser or tighter and it would be ridiculous.  I'm giddy with excitement!

No time for celebration just yet, I need to keep crocheting my little heart out!  See you next week!

Related Links:

Sunday, March 11, 2012

Unbiased Cardi

I've read that you can convert a sweater into a cardigan with some bias tape.  So, on one of my trips to Goodwill, I bought this cute Aeropostale, cabled, lime green sweater, with the intention of converting it.


I figured this would be a cute one because it was a bit snug on me.  I took the scissors, bias tape and chose a pink button to sew to the top to match the pink embroidered butterfly on the front.


I cut up the middle and got my biased tape prepared (ironed it).  I pinned the bias tape to the raw edge of the sweater.


I started sewing the bias tape to the sweater edge.  I only got a few inches in and I already was seeing crooked sewing and even the biased tape was off the sweater.  Not good.  I hate bias tape.  I never liked it.  I had a project once where I was sewing bias tape around the entire perimeter of this baby bathrobe.  Ugh!  I couldn't do it; I had to have my friend Kj finish it.

This project is not coming out any better (and I don't have Kj near me to finish this for me)!  I just cut off a little more of the sweater to cut off the bad bias sew job.


I then decided to chuck the bias tape and just fold over the raw edge and sew.


This came out much better.  Next was the arms.  They were so long and monkey-like.  I figured I would shorten them, similar to what I did for the Silk Tissue Tee a few weeks ago.


I cut a section out from the arms, keeping the wrist cuff portion.  I used the same technique where I reattached the cuff to the arm.  This was about where the elbow was.


It does not lay smooth like it was seamless, but when I have it on, it is at my elbow, so the crook of my elbow bunches it up; you can't tell something is amiss.


Yeah, I took this pic on Saturday morning, please excuse my bed-head.  Anyway, here it is, my unbiased cardi.  It is a cute little thing to just throw on when you're feeling a bit chilled.  I did not use the pink button because this is way snugger than I remembered.  It would not have looked nice with the button.  I can't close this cardi any more than you see in the pic.

That's fine by me...I like it for the arms and a splash of color.  I feel good about rescuing something from Goodwill or a yard sale and putting my own pizazz into it.

Sunday, February 26, 2012

Fix It: Silk Tissue Tee

I bought this fine, gauzy, long-sleeved tissue tee at Goodwill a month or two ago and put it aside for a rainy day.  Well, it wasn't raining this weekend, but I was at a loss for what to do.  I went through my To-Do pile and saw it and thought, "I forgot I bought this.  This should be an easy fix."


The reason why I put this aside was because the sleeves were too long.  I'm petite and the sleeves are always long on me.  The challenge with these were that the edge (cuff) of the them were slightly rolled, having no hem.  The sleeves matched the bottom edge, so I wanted to keep the roll.  It makes the tee have a feminine look.  

This tee reminded me of the Elizabethan period clothing, with the bell sleeves.  This does not have bell sleeves, but they have a nice drape that looks bell-like.


I surfed the web to see if someone else had already been down this road before and, unfortunately, since this was not a real-knitted item, my search came up short.  One clever way I saw to shorten sleeves was by unstitching the shoulder/arm seam, cutting at the shoulder and then reattach.  Very clever!  But, again, this would not work for me because this tee had raglan sleeves, not a sleeve that was simply sewed in.   This meant I had to come up with something on my own.  

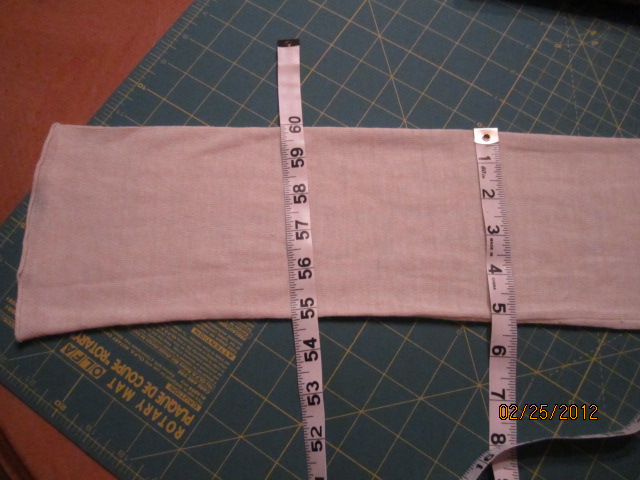
The measurements above show that the sleeve has the same width from the elbow to the cuff, which will make hemming them easier.  My thought on altering the sleeves were to cut a portion from this section out and reattaching the cuff part to the arm.


To do this I figured out how much I needed to shorten them, less the seam allowance, then made pink chalk marks where I wanted to cut out the section.  Measure twice, cut once.  


The cut is shown above and I am praying that this idea does not ruin this tee.  I then took the cuff portion, turned it inside out and fitted it over the outside of the cut sleeve edge, matching raw cuts, right-sides together.  Pinned.


I got matching off-white thread, chose a ball-point needle, and sewed a seam.  I then pressed the seam to one side (sort of hard, because the material is silk and you cannot have the iron on high heat, so sometimes ironing silk is a waste of time).


Here it is, done.  The sleeves are the proper length now and the arm seam looks a bit funny, but not too bad.  I figured that it would match with the line seam that is around the empire waist.  The Elizabethan clothes I was talking about earlier, was where I got my inspiration.


Vince did not like it, but I don't think it looks too bad.  It's better than never wearing it, right?  It is very comfortable, so I will make good use of it.

Let's weight in: Was this a nice look, or did I ruin it?  (Use the comments to let me know your opinion).

P.S.
I wore my Tee to work the next day (Monday) and I got 3 compliments from people who do not read the blog and one from one that does and wanted to see the seam close-up.  The summary: Everyone liked it and thought that the seam looked like it belonged there.

Mission Accomplished!
 

Sunday, January 8, 2012

Razzy Socks

When I went to visit my family in Mass just before Christmas my sister showed me how to knit socks.  I brought a skein of my own up there, but failed to take a pic of it before starting (I know, what kind of blogger am I?).

First we had to separate the skein into two equal weighted balls (50g each).  This yarn is called "self-striping" because the colors in the skein vary, but different from variegated, in that as you knit around the sock, stripes appear as if you purposely knit them there.  Really neat.
Then we took the ends of the balls and matched up the colors.  This took a few yards to get the colors striping at the same rate; we snipped off the extra yarn.  

My sister showed me the techniques she uses from the book Socks from the Toe Up by Wendy Johnson.


She showed me the "Judy's Magic Cast On" and I was off and knitting!


I am still knitting them, but I am close to being done.  See how they are striped?  That is the yarn doing all of the work.  Near the toe, it started knitting up a peach and black checker-like appearance.  It reminds me of one of my cats, Jasmine (aka Razzy); she is a Bengal cat.  Her hair shafts are striped with orange and black.


I will model what I have so far:


I am now finishing it up with a k2p2 rib.  Now I must stop blogging and start knitting!

UPDATE:  Click here to see them complete.

Sunday, August 14, 2011

Sweatshirt Bag

I bought this sweatshirt at a yard sale awhile ago.  I bought it with the intention of cutting it up, but was not sure how just yet.  Since I just finished the Aloha Maddie Baby Blanket, I found myself with nothing to do.  :-)

I am figuring out what to do about my Glace Shrug, so not to worry.  I do not think I have enough yarn to complete it, so I am trying a mixed media project with it.  It'll be ready soon, promise!

So, back to the project at hand.  I figured I needed a new project bag [insert hearty laugh here] so I wanted to do that with the material.  I've worked with sweatshirt material before, so a couple of traits of this material are that it won't fray when you cut it and the cut edges will curl.  That can be a good thing or a bad thing.  Knowing these things, I am going to play off them.

First, I cut the sleeves and hood off and trimmed it so it's boxy.


Then I placed the right-sides together and pinned them to sew the side seams.


I started the stitching about a half inch from the top and bottom.  This will help the material curl when washed.


I turned it right-side out and sewed the bottom ribbed edge together.  I then took one of the sleeves and cut it up the seam to "butterfly" it.  I trimmed the seam stitching off so that the material could lay flat.  I cut the sleeve into 2" strips.


I evened out the ends so they were straight with a rotary cutter.  I did not worry that they were not the same length.  I then sewed three strips to each other, end-to-end, twice.  These will be used as the handles.


I then folded each one the long way, wrong-sides together, and sewed each handle strip.


I positioned the handles on the inside of the top edge of the bag and arranged them so that they were long enough to be shoulder straps.  I did some measuring to ensure that there was a bit of a margin at the top edge to allow for the curling.  I sewed them in place with gray thread in a box with an X in the middle.  During this, I was coming dangerously close to running out of thread.


The bobbin had about a few inches on it so I had to wind some more of this onto the bobbin.  I was keeping my fingers crossed during this period!


Hold your breath...yes, I was able to finish with enough thread.  Phew!  (I even attached a few buttons on a pair a pants that had recently fell off with the remaining thread).  Here is an inside view of the bag with all the handles attached.


Once this was done, I was pretty much done with the bag!  I threw it in the wash so that you could see the rolling edge and broken-in look it had.  I could even use this bag as a hand warmer using the kangaroo pouch!


I pulled a ball of yarn out of the closet and gave it a new home.  I think of each project of yarn and a project bag as a hermit crab.  Each set of yarn is like the crab and the bag is it's shell.


Awe, look at how cute this hermit crab is!  The shell - fabulous!