Showing posts with label rivet. Show all posts

Sunday, May 15, 2011

Lucky Star Key Chain

This project was done in a couple of hours, for that is all the time I had allotted.  Since I have been doing all of the Sweater Purses, they have created a lot of scraps that I have been collecting in a bag.  So this project is a scrap project.

Here are the items I will use to make my key chain:

Scrap-a-plooza!

I had printed out a star shape on paper and cut it out, then had denim, pink and gray sweater scraps.  I used washable marker to trace the star on each scrap.

I'm not above tracing, no freehand for me! 

I can't draw to save my life, so I had to trace if I wanted my shape to even resemble a star.  Plus, a star is an easy shape to cut, no rounded edges or fine detail.  Once traced, I then cut them all out.  There are two of each because I will be making this double-sided.

Fourth of July scraps

I cut them all out the same size and then determined what order I would stack these in.  I really liked how the denim looked on top when I did Sweater Purse 3.0, so I decided, Pink, Cream, Denim.  I took my paper star and drew lines about a quarter inch in with a ruler (yeah, I can't even draw a straight line without help) and trimmed it.  Then I retraced the cream stars and trimmed and repeated again another quarter inch in and trimmed the denim stars.


Second round of tracing
 
I totally have Lucky Star from Madonna in my head right now.  I heard she refuses to play her old stuff at concerts, is this true?  I've never been to one of her concerts, but I had heard a rumor that she would charge the venue extra for her to play songs like Material Girl and Lucky Star.  I love those songs!
Anyway, back to the trimming.  I trimmed out all the stars so there are a total of six (6) stars.  I then stacked them to ensure that was what I wanted.
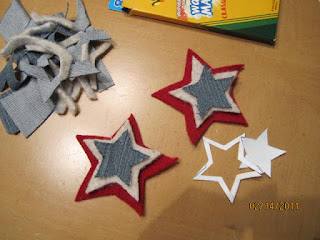
Star stacked action

I thought it made sense to sew from top to bottom, so I sewed the denim to the cream then the cream to the pink.  I did the sets separate.  While I was sewing and thinking that there must be a better way to do this (they were not staying straight for me and so the stars came out a bit skewed), I snacked on one of my favorite snacks: Toffifay.

Yummmmm

Toffifay is described as a caramel cup with a whole hazelnut dropped into, then a chocolate hazelnut filling covers the hazelnut and then it is topped with a drop of chocolate.  I love these!  Vince's mother eats these and I had never heard of them until she got me addicted to them.  I can find them at Walgreen's and Joann's (strangely enough).  Joann's sells them in a package of four, while Walgreen's sells them in a package of 15 (often at a buy one, get one free).  Try them!!!

Again, I digress!  The stars are finally sewn together.  Like I mentioned above, they are not aligned as I had imagined and are a bit off.

How do you read unaligned stars??

I did not like that so much pink was showing; it also made these really large.  I trimmed the pink to the cream star.

Much better!

Now that the stars are stacked and trimmed I then put them back-to-back and took needle and thread and hand stitched them together with a whip stitch.

The Stars Unite!

Once the stitching was done, it was time to make this a key chain.  In my kit of rivets, it contained some colored ones, rather than just silver or gold.  Luckily, there was a red one.  Vince did the honors of punching the hole and affixing the red rivet into the star.

Riveting Star

Once the rivet was attached, then I took a key chain and attached it to it.

A star is born!

This was a quick project, but I think that if I were to do it again, I would do it differently.  I think by cutting out all of the pieces ahead of time, that left me with little to hold onto while I was sewing them together.  I would try cutting out the smaller one first, then sewing that onto the next one, for me it was the cream.  Then cutting the cream out based on the lines of the denim.  Do the same for the cream on the pink. 

When I gave this as a gift, she said, "How did you know I love stars?"  Funny, they were an easy shape. :-)

If anyone tries something like this, let me know what worked for you.  Thanks!

Sunday, February 6, 2011

Laptop Bag

This project had been on my mind for awhile; for I had this pair of jeans that I loved, but sadly, a hole had worn itself on the inner thigh.  I had worn them, even with the hole there, but I knelt down the other day and I heard the "rrrrrip" of the threadbare fabric; I knew their time had come.  But I had these jeans since forever and wanted to repurpose them somehow.

I've been to craft shows where little girl's pants are transformed into cute purses and seen denim purses selling in stores.  I went online to take a closer peek at these said items and came across a video on YouTube on making a laptop case out of a pair of old jeans.  The unknown chic who made this sped up the video so it was only about a two minute tutorial on how this is done, but it is really all you need.

But, you know me, I'll drag it on a bit longer than two minutes.

My poor favorite jeans!

First I took my jeans (see the worn spot), and cut the legs off just below the crotch.  This depth was adjusted later, but I did not want to cut it too short to begin with. 


Then, with the seam ripper, I opened up the front to the bottom of the zipper flap.  If anyone says that Gap jean are crap, then try taking the seams out and get back to me.  The inner seam had three layers of stitching.  Three layers!  It took longer than I though because this was baffling to me.  After I unstitched the plethera of stitches, I had all these little thread bits every where I cut the stitches (on both sides of the jean fabric and on the table).  There is this little trick I learned in a quilting class to get those little bits out of there in a jiffy.  So, I took a lint roller and slowly rolled it over where I cut the seam stitches.  Each one of the bits stuck to the lint roller in a crazy straight line.  Amazing!  Alternately, I ran out of lint roller tape and had to use packing tape.  That worked well too, you use it like you are waxing (put on, press where the threads are and rip)!

Flap over and stitch

Once, I had all of the threads out, I arranged the front so that one side flapped over the other (like in above pic) and sewed to the end.  Coats and Clark makes a denim thread that is orange and is a bit thicker than your average thread.  I used this to sew the flap down.  I only did one pass with the sewing machine, but a second, double row would have matched the way the rest of the stitching was done. 

Next, I then figured out how deep I needed the "bag" to be.  Then turned it inside-out and drew a line across the bottom so to make it straight, then I cut along the line and sewed it shut.

Measure from the waist to determine your line

The below pic shows that I also sewed and trimmed the corners off, but this is not necessary. 

You know, what this could be...

I turned the bag right side-out and ironed it.  The waist was crinkled from the store during the stonewashing, so they were always crinkled.  I ironed the heck out of it with a touch of starch so it would stay uncrinkled.  A little starch goes a long way.

Almost there!

If you watched the video link, you will see that the chic made holes in the waist and cut the side seams off of the legs.  She used the side seams as the handles to the bag.  In my opinion, this will not do for me.  I did cut them out, but I did not like the way it was going to look.  I imagine that you could tie them to the belt loops or thread them through the belt loops as you would a belt, but my legs are short and I would have to sew them end to end to make something long enough to do these ideas.  I was not in the mood for that.

Instead, I chose to insert rivets or grommets in the wasit area.  Just poking a hole was not enough of a finish for me.  I marked where I was going to place the grommets with some screwdriver thing with a point on it and tapped on it with a hammer.  (Vince said it was a size 1 Philips scewdriver, if that means anything to anyone).  This gave me a guide to make my snips into the denim to insert the grommet.

Two-piece grommet with anvil

I just followed the directions on how to install the grommets.  This type uses an anvil with that cylinder you see in the above pic.  I inserted the cylinder into the hole and tapped it with a hammer until it was flat.  I did one and then Vince did the rest.  My taps on the hammer were lighter than his.  He only needed two or three taps while it was me tapping several times.

Tap on a hard surface, like concrete

Once they were all in, it pretty much was done.  I just had to figure out what to use as handles.  I looked through my craft closet and then my belts and found a yarn belt that I made with an i-cord maker.  It used novelty yarn and a string of sequins.  I used it as a dressy belt tons of times, but the sequins-on-a-string got caught on themselves one time and I almost could not untie it to use the bathroom.  Yeah, so I had rarely used it since then.

My personal touch!

At first I thought this bag was a bit juvenile, but once I put my i-cord belt on it,  I was loving it!  It is large enough to fit my laptop and it's battery power cord with plenty of room to spare.  The front and back pockets are still functional and can hold your cell phone and/or mp3 player.

Very Chic!

As I was doing this project, I had a thought of another idea.  Take the same jeans and cut the leg a lot lower and make a skirt.  You have to do it slightly different, but it is the same concept.  I have another pair of jeans that just ripped, maybe I will have to give it another life as a skirt. 

Stayed tuned.