Showing posts with label French. Show all posts

Sunday, September 9, 2012

Viveca Hunter Beret

Christmas gift making and stash-busting: I love it!  I did this beret in about a week; I was working on it just about every day.  Even if it was 2 rows, I was knitting away.

This is my second Viveca Beret.  My first one I knitted back in February with the softest yarn in the world, Flicker from Berroco (First Viveca Beret).  

I had heard on the radio that the "it" color for fall & winter was going to be forest green.  Perfect for my Viveca project.  The yarn I am using is Lion Brand Wool-Ease (80% Acrylic, 20% Wool) in a dark hunter/forest green.  I used this yarn when I knitted the Shapeshifter Shrug in November of 2011.  I had about one and a half skeins leftover from that project. 


I always keep the patterns from the projects that I do and, thanks to my Craftolution #2, they are all organized in a 3-ring binder.  I place the pattern, gauge swatch and any other items that I may find useful if I were to ever do that project again.  In this case, I tucked away my handy flashcards with the pattern repeat on them.  Each card has one Row on it.  


This pattern has a total of 5 full pattern repeats.  Here is me at 2.5 repeats.  I think that I am only going to knit 4 repeats.  It should still look fine.


I knitted this on a size 8 circular needle, but am not joining in the round.  I knitted back and forth, as if they were straight needles.  This way the needle can accommodate a large number of sts easily.

Here is the beret at the 4 repeats and the crown shaping.  I only need to cut the yarn, thread the yarn through the live loops to close the top and seam the side closed.


The thing about substituting yarn, the project will not come out the same as the original.  It may not be a bad thing, but it also may not be a good thing.  This is did not come out exactly like my first one: brim is a bit large, hat does not slouch the same.  The Wool-Ease is a bit lighter in physical weight than Flicker, so that caused the slouch/drape to be a bit different.  


But I'm not complaining: look how cute it is on! 


I have transported my living room to a French Cafe.


It does look a bit big, but it is supposed to be slouchy.  Some online reviews of this pattern say that it was too big for them.  Not sure if they realize that it is not supposed to fit like a beanie.  


I have not decided who is going to receive this as a gift yet.  I just know that it is a cute project and I figured one of my friends may also feel the same way.  This beret may also look cute with a flower pin on the brim.  I'll think about it as Christmas draws near.

What are your ideas for handmade gifts this year? Let me know!

Sunday, February 12, 2012

Viveca Beret

This is my first finished knitted project of the year!  This beret pattern came from Berroco and best of all, it was a free pattern (click here for the pattern).  The pattern name is Viveca and it was knitted with Berroco Flicker in Siegfried, which is a light heathered gray with a thread of silver running through it.

I used about a hank and a half

The stats on this yarn are 87% baby alpaca, 8% acrylic and 5% other fibers and comes in 50g hanks.  It is a dream to work with!  I love it so much that I want my whole wardrobe made out of this stuff.  It is super soft and just a pleasure to touch.  I bought it when I was visiting the family at Christmas time at a yarn shop called The Wool Patch in Middleboro, MA.  The owner was so nice that when I called to ask if they were open on Mondays, she said no but if I could tell her when we were going to come, she would open the shop for my mom, sister and I.  What a lovely lady!

The yarn is a unique weave in that instead of it being wound, it looks braided.  Here is a close-up:

Braided rather than wound - see the silver thread?

The beret is knit with a bubbly repeat pattern.  I knitted a gauge swatch to determine my needle size, like a good little knitter.

Bubbles (what else would you call them?)

It took about a month to knit, I just stalled on the seaming, but it was actually done in January.  I carpool to work with my honey, so on the way home I would break out the beret and knit away.  It was a fairly easy pattern to knit, but I certainly did have my mess-up moments.  Just be sure to count after every odd row to ensure you have the proper stitches (due to the yo's).  It is well worth the time to count the stitches.

Where I stalled out

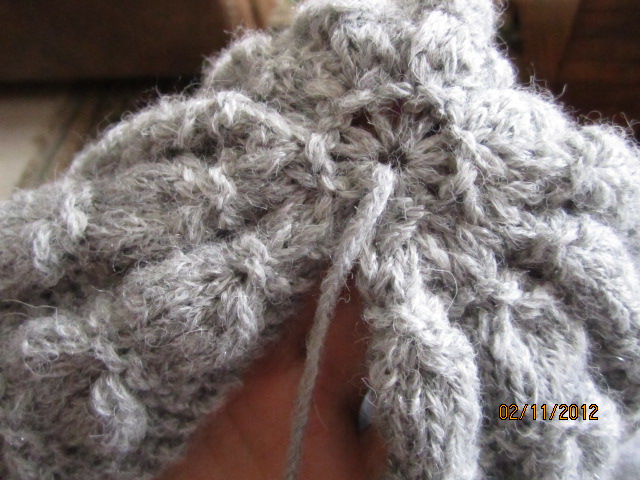
This beret was knit flat, from the bottom rib to the top.  I used a size 8 bamboo circular needle set.  Then you cut your yarn, leaving a long tail.  Thread the yarn onto a blunt-tip needle and weave it through the live stitches that are left on the needle and pull tight.

Crown of the beret

All that was left was seaming the sides together and viola!  A beret!

Roo & I trying to stay warm

From the back, so you can see the pattern:

Tres chic

I like it.  At first I was thinking that it was too big, but a beret is supposed to be flounced to one side.  The gray color gives it a vintage feel.

I'm going to make this my new FB pic

I don't normally wear hats but I will try and make an effort to wear this.  I worked hard on it, so I will show it off while the weather is still perfect for it.

Passez une bonne semaine!

Sunday, May 8, 2011

Off-the-Shoulder T-shirt

This project was inspired by my enthusiasm for UFC and a particular MMA fighter, Georges St-Pierre (GSP).  Yes, it is true and I do not hide it, I like watching cage fighting!  Atypical for a knitter and sewer to enjoy a little violence?  Maybe, but just be sure that you can never judge a book by its cover!  Ha, ha.

If you do not know much about UFC, it stands for Ultimate Fighting Championship and it is a fighting association and MMA stands for Mixed Martial Arts which is a collective term for various styles of martial arts, such as Greco-Roman wrestling, judo, boxing and jujitsu (many more, but you get the idea) combined together to make one sport.

Now, the point of this project is to honor my favorite fighter, GSP.  He is from Montreal, Canada and has been fighting in UFC since 2004.  He is currently the Welterweight champion and every fight he fights, is to defend his title.  In short, he rocks!

Ohh la la!

Anyway, enough ogling over him and back to the project.  Last Saturday night on Pay-Per-View he fought against Jake Shields and he defended his title (although, admittedly, it was a bit boring, but still a good show).  So I wanted to make something with the letters "GSP" on it.  I have been liking the off-the-shoulder style that is retro-ing back from the Flashdance days.

So, I went to a thrift store in Tampa and bought a red t-shirt for $1.50.  With this t-shirt I cut the edges off and trimmed the neckline.

Chopped!

Now, something to keep in mind when you trim the neck to be off-the-shoulder: trim little by little.  Start with trimming the neckline midway on the shoulder (halfway between the neck and the sleeve seam on the shoulder), following the curve of the neck.  Try it on then adjust the one shoulder you want to hang off gradually.  You can cut too much.  You might want to try it on a junk t-shirt first.

For my lettering, I went online and pulled up an alphabet in a font that I envisioned.  It didn't want it to be too fancy because I have to cut them out with scissors.  Once I chose my font, I increased the zoom on the screen to 400%.  I took some tissue paper (not just for gift-wrapping!) and pencil and traced the letter from my computer onto the tissue.  I did this for a G, S, P and a fleur-de-lis.  Since he is French-Canadian and he has a fleur-de-lis tattoo on his calf, I figured I'd go with it.

Trace letters to use as a cutting guide

Once all the letters and symbol were traced, I took a junk t-shirt and pinned the tissue-paper letter to the t-shirt.  I will sew these letters onto the front of the red t-shirt.

Gimme a G!  Go GSP!

I cut along the penciled letter and then repeated it for the other letters and my symbol.  Once they were all cut out I arranged them in different ways to see what would look best.  I just chose the simplest layout.

That fleur-de-lis was a pain to cut out!

I placed the G on the red t-shirt first and pinned it.  I wanted it to look like a varsity jersey with the letters curling after washing to give it a broken-in look.

I sewed just on the inside of the perimeter of the letter

I sewed each letter and the symbol as in my original lay-out and viola!  Fini!

J'aime GSP!

I was still in my pj's when I completed this, so I will model without showing my head (trust me, my hair was a mess)!

Bed shirt or can I wear it in public?

Not sure if I will wear it out anywhere, but it is comfortable and girlie.  Now, does it look like an 8th grade Home Ec project...Yes.  Do I love it anyway...Yes!  I am considering Be-Dazzling it, but not sure.  I will post-script a new pic if I ever get around to it!