Showing posts with label Katia. Show all posts

Sunday, January 16, 2011

Hooded Scarf

This project came as a request.  My boyfriend had his eldest daughter down from California for a visit over winter break from college.  She knew I knitted because I knitted her a scarf for Christmas.  Below is the Christmas scarf:

Third scarf of the season

The scarf I knitted her for Christmas was the same pattern as the Trio Scarf and the Quintet Scarf.  One thing that was different between this scarf and the other scarves is that I knitted this with hand-dyed cotton rather than hand-dyed wool.  I did continue to use the Katia silver novelty yarn.  I am definitely getting my money's worth with that yarn.  So, by using cotton, the drape is heavier than the wool, but I think it has charm. 

Ok, so back to the request: She had asked if I could make her a hooded scarf and a skirt.  I said that I would make her the hooded scarf, but to ask her grandmother to crochet the skirt for her.  (Hey, I have to divy up the workload, you know?)  I have a ton of knit magazines and there is a wealth of free patterns on the web; I was bound to find something.  I searched the web first to get an idea of what this will entail.  It appeared simple enough, although I did find a varied selection of how the hood is assembled onto the scarf.  I looked through my knit mags next, but found a scarf with a cap rather than a hood.  Eh, I didn't like it much.  Now, I just got a Knitting desk calendar (the kind that has a pattern-a-day) for Christmas.  Even though I vowed not to look ahead at the patterns and to take it one day at a time, I thought since this is for a purpose, that I should be allowed to look in the index and search for a hooded scarf.  So, guess what?  In March, there is an easy, great pattern for a hooded scarf!  Who knew this would be popular? 

So, I talked it out with the daughter, and the yarn she selected was not the one they knit the sample with, but it looked like a pattern that you could work up with just about anything and it will come out good.  I went to Joann's that evening and bought Vanna's Choice (100% Premium Acrylic) from Lion Brand in Oatmeal.  It is a natural-grayish-brown yarn with tweed flecks in it.  It is the very yarn that my sister knitted up my cabled blanket that I showed at the end of the Crazy Cables post. 

The right-side is wavy

The scarf in the pattern sample was made with a faux mohair yarn that gave a flatter look than my scarf was.  Vanna's Choice is very, very stretchy, so it tended to shrink into itself and give this wavy look to the right side.  The pattern alternated between knit and purl to make a sort of basketweave ribbing.  Here is the appearance from the wrong side (back side):

The wrong-side basketweave

I really liked the wrong side and during the process, I had asked if the daughter wanted this to be the right side, but, after thinking, she chose the right side to be facing.  So, this yarn, as I mentioned, is very stretchy.  I had to do a few gauge swatches to get it right (and it still was questionable)!  The pattern called for size 9, I ended up using a size 11.  I even could have gone up another size, but I did not want to make another gauge swatch, so I stuck with the 11's. 

This pattern is so simple that you knit the scarf really long, then fold the scarf in half to find the middle, then seam down from the fold along one edge about 12 " and, viola!  You have a hooded scarf!  Very clever.  The creator of this pattern is Designs by KN.  She is also known as DBKN and she has been published in several books and magazines.  Her website offers free patterns, too.  This is a great beginner project.  It is something more than a scarf, but not complicated.

The best thing about this scarf was that I bought the yarn on a Thursday night and knitted it throughout that weekend and finished it up on the following Monday.  Here is the hooded scarf complete:


Definitely will keep the chill out!

After the hood was seamed, I added fringe to the ends and added a tassel to the hood.  At first I was not going to add the tassel, but it really does add a cuteness factor to it:

To tassle or not to tassle...

The original pattern called for the tassel and not the fringe, but I think that it needed something else than just the tassel.  Maybe if I used the yarn recommended in the pattern, the fringe would have been unnecessary, but since I like to reinvent the wheel all the time, I added it.

I feel like all I have been knitting lately are scarves.  I am actually working on one right now.  I think once my current one is done (which it is for me, yippee!) I am moving on.  I like scarves and will most likely come back to them after a few months have gone by, but I am feeling overscarved right now.  I have some sewing projects in the queue and a few more knit ones, too.  I have a couple of dying projects too, but I am searching for a used stock pot that I can dedicate to dying on the stovetop.  The bucket method took a long time (remember Halloween 2010?), so I will be searching yard sales and the local Goodwill for the perfect one.  Wish me luck!

Sunday, November 28, 2010

Quintet Scarf

This is basically the Trio Scarf, but with, guess how many different yarns....five.  This installment of the scarves will be about attaching the fringe.  Another thing I loathe about knit or crochet patterns is that the pattern assumes that you know something about knitting or crocheting beyond your nose.  But sometimes, you just don't.  You just see something you like and want to pick up a pair of needles or a hook and start!  Practice is something that comes with time, how can you practice if you don't work on patterns?  So, in the Trio Scarf post, I simply stated "attach fringe" as a step to complete the scarf, but if you don't know how that is done, then the pattern is just dumb.  Trust me, I get it!

Let me start by explaining why this is not the Trio Scarf, but the Quintet Scarf.  The five yarns I used were out of necessity, not want, but I made the best of it (and my yarn stash).  First my MC (Main Color) was the wool that I mentioned in the Trio Scarf, with the all purple hues from South Company Rio de la Plata.  Did I mention that the Rio de la Plata is hand-dyed in Uruguay?  !Es fabuloso!  Then the second yarn was the rest of the Berroco Opulent FX.   I did not have enough of the Opulent FX to knit all the way through, so I knit it in the beginning then at the end.  My third yarn was Katia Sevilla in a silver color.  I said cream in my last post, but upon further inspection, it really is silver.  My fourth and fifth yarns were also novelty yarns.  The fourth yarn was leftover Berroco Jewel FX which is 94% Rayon and 6% Metallic.  It has a silver thread, purple thread with nubs and a blue thread with nubs all twisted together.  I used it in a felted purse project years ago.  Finally, my fifth yarn was a purple eyelash yarn.  I no longer had the wrapper label, so no clue of the brand.

If not "nubs" then what are they?

The eyelash yarn, I do remember, I bought at a yarn shop in Middleboro, MA called The Wool Patch.  It is the cutest shop built on the same property as the owners home, built like a rustic cabin.  The yarns are in wooden cubbies, baskets on the floor, hanks hanging from the wooden rafters and in an antique wooden hutch with the yarns popping out of the drawers and cabinet shelves.  In addition to the knit shop is a llama corral.  She only has a few, I believe, more as pets than shearing them for profit.  But I could be wrong.  Definitely check out The Wool Patch if you are in the area.  I don't see that they have a website, but they are on Facebook.  I included the link above. 

Like in the pattern in Trio Scarf, I alternated between these five yarns.  It gave a slightly different look than the Trio Scarf, but just as pleasing.  Ok, so now for the fringe lesson:

1. Cut fringe twice the desired length.  It will eventually be folded in half, hence twice the length.  I organized it by laying each set out because I knew I did not have enough Opulent FX to have two strands per fringe.  In the pattern, I used 11 sets of fringe for each end of the scarf.  You may add more or less, depending on how full you want it.  I put one strand of Rio (MC), one strand of Katia, and one strand of Opulent.  Then cut a few lengths of Eyelash (not too much, this can overpower the look), and a few strands of Jewel and randomly selected sets to add these to.  Not every set had an eyelash or a Jewel.

Eleven sets, organized in the order I will use them

2. Work on a flat surface and put project right side up (knit sts up).  Examine and plan out where the fringe will be attached by looking at the spaces at the end of the scarf.  This is usually the cast-on edge (alternately, bind-off edge).  I started with the very side-edge loop with the tail of the MC hanging.  The stitches may elongate as you attach, that is fine and will blend in once done.  I was able to count every other space/hole, using the knit sts space.  It doesn't matter where you put the fringe, as long as you are consistent, it will come out beautifully.  Insert the crochet hook from underneath into the hole you want the fringe to go.

Be consistent when choosing the placement

3.  While holding the crochet hook in one hand, take the first set of fringe in your other hand and find the center of the length.  The center, place in the crochet hook.  Use a big hook, it will give you the deepest notch to hold all the strands.  You may have to hold the yarn tight in the hook to prevent from losing it.  Move the crochet hook with all the strands from the front to the back until it is about half through (called, "pulling it through").  Once through, maintain the center, drop the crochet hood and place your fingers through the hole/loop that you have created (where the crochet hook was).

Make sure all the strands have made it through the space

4.  Once your fingers are in the loop you have created, take the tail of the fringe with the fingers that are in the loop and pull through.  Now with both hands, tighten and adjust the fringe so it fits snug against the scarf hole.  One fringe has been added.

Hooray!  Only 20 more to go!

5. Add the remaining fringe evenly across the edge.  You have the freedom to add as much as you want or as little as you want.  I wanted a full look, sort of chunky looking.  If you feel like it needs more bling, then in the spaces in between the existing fringe, add a few Katia strands or other shiny yarn.  I added extra teal Katia to the Trio Scarf.  I felt like the silver shows up very well and did not think more bling was needed.

I love the mixed look!

Now that you are an expert on fringe, repeat on the other end of the scarf.  You can leave the ends a little ragged, with the fringe uneven, or you can choose to snip them all the the same length.  Just be careful if you are the straight-edge type and make sure that you are cutting an even amount off.  You don't want what happened when you tried to cut your bangs when you were a tween and one side ends-up shorter than the other side, then you try to cut the longer side to match the short side and then that side is shorter and then you go back and forth before you realize you need a stylist to cut your bangs even again, now that there is only two-inches left.  But in this case, you can always "grow" new fringe, unlike your poor bangs, which will take a month to grow out.

Ragged-Edge all the way, baby!

So there it is, the Quintet Scarf.  I did not measure the full length of this scarf, but I'm sure that it is taller than I am.  What else in the world can you wear that is taller than you?  That is why I love the scarf and I hope that you love knitting them too.

Sunday, November 21, 2010

Trio Scarf

I am starting to think of Christmas.  Yes, I want to actually complete Christmas shopping / making homemade gifts before Christmas this year.  For my homemade gifts I always have the greatest intentions, but I either bite off more than I can chew or start too late to finish them.  There are countless projects that I have thought of but could not get the materials in time or projects that I have started only to determine that it was a flop.  Don't get me wrong, I do get to complete a few homemade gifts each year, just not all the ones I think up.

This year I want to accomplish homemade gifts within my skill set.  Oh c'mon, you're saying, where's the fun in that?  There is plenty of fun in that because it will be me actually finishing projects and giving them as gifts to wow the recipient.  I'm sure you have found by making a homemade gift yourself that when someone realizes that it was homemade, they have a new appreciation for it, and for you for taking the time to make something for them.  I intend on not going crazy with large or expensive, but with something simple and under $20.  Although, I do have to admit, I don't think I am making anything for the men on my Chistmas list.  It is a bit much to make something for everyone.  So, it will just be the women/girls on my list this year.

The first thing that I have completed is a trio scarf.  This scarf is knit with three different types of yarn for a mixed textured look.  I got the idea when searching through the free patterns on the Berroco website.  They have hundreds of free patterns and you can download them without having to give your email address.  The pattern is a simple 4" wide, 6' long scarf with long fringe.  I went to my local yarn store, Knit 'n Knibble, and found some really cool yarn.


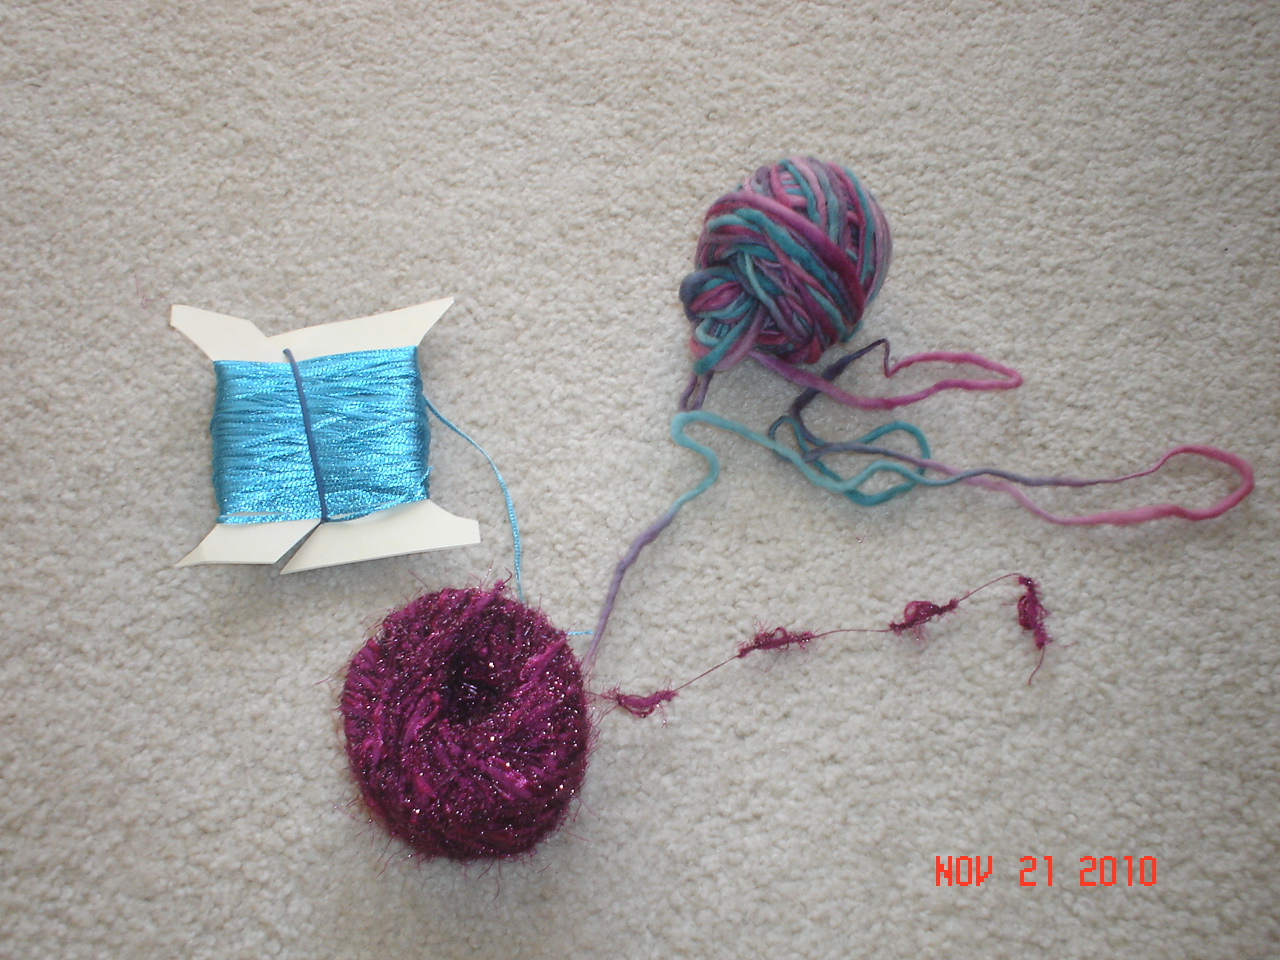
Yarn Elements


The teal colored yarn is Katia Sevilla, it is 100% nylon.  This yarn came on a cardboard cylinder like the purple one, but it was so slippery, that I had to wrap it on a makeshift spool or it would get tangled on itself.  The purple metallic yarn is Berroco Opulent FX and that is also 100% nylon.  Those yarns are considered 'novelty yarn.'  You normally mix these types in with another yarn, they are not normally worked up on their own.  They are what give plain cotton or wool yarn a pop.  The main yarn is South Company Rio de la Plata, it is a thick-thin kettle-dyed 100% wool.  This yarn I selected first and then the novelty yarn to match.

I tried the pattern as written and did not like it.  It left huge ladders on either side and it rolled alot.  I also was not achieving the recommended gauge on size 13 needles.  This is just a scarf and gauge is not a deal-breaker, but it will affect the look of the scarf.  I ended up using size 17. 

Too skinny!  Needs more fat!

This should be 4" wide and I was getting 3" on a 13, then 3.5" on a 15, then finally 4" on a 17.  Geesh.  After all that, I knitted several inches was when I saw the ladders and the rolling.  So I changed the pattern a bit to:

Cut fringe by measuring out 22, 18" length set of the main color (MC; cotton or wool) and another set of 22, 18" lenghts of the novelty yarn (B) (I did the teal as B)
Cut additional fringe by measuring out 42, 18" lengths of the other novelty yarn (C) (I did the purple one as C, since the purple yarn is not uniform, I cut double the amount)
Cast on (CO) 12 sts with the main color (MC) on a size that will give you a width of 4"
R1: k1, p1, repeat to end
R2: p1, k1, repeat to end (this is a seed st or moss st)
Repeat R1 & R2 one more time for a total of 4 rows
R5: k1, p1, k1, k6, p1, k1, p1
R6: p1, k1, p1, p6, k1, p2, k1
Repeat R5 & R6 until about 4" has been knitted
Pick-up one of the novelty yarns (B) by hold both the MC and B tog and repeat R5 & R6 until about 4" has been knitted
Drop B and pick-up the other novelty yarn (C) and hold with MC and repeat R5 & R6 until about 4" has been knitted
Switch between holding B with MC and holding C with MC until it is the desired length.
Repeat R1 and R2 for a total of 4 rows
Bind off
Applying the fringe: Take one length each of MC & B and two lengths of C
Evenly attach these four strands as one to the end of the scarf with a large crochet hook.  I put 11 sets of fringe on each end.  I also left the tail of the CO so it will mix in with the fringe.


Cut fringe before you start knitting


Yes, this still had a roll, but not as bad as the original design.  Maybe that was the charm of the original design.  I added the seed st in hopes of avoiding the roll, but it didn't work.  I did avoid the ladders, though.

Shimmering in the light

This scarf worked-up quick.  I knitted while watching tv, carpooling, and waiting to leave work.  You can literally knit this scarf for miles!  I ended it after 6 feet (not including fringe).   Here it is complete:


I love the colors!

I am pleased on how this came out.  I still have yarn left-over.  Maybe in my free time I will knit up a child scarf with the extra [insert biting-off-more-than-I-can-chew statement here].  We will see.  I plan on knitting one more scarf like this but the MC has all purple hues.  Instead of the teal, I have a cream from Katia and will use the left-over purple novelty from Berroco.  These will be given as gifts, even though I am loving this scarf.

Can someone make me one?!?

Maybe I can put this on my Christmas list and get one too!  I gave you the pattern, so get knitting!  I have lots of extra yarn from past projects, maybe I will make another mixed scarf, but when I do that, I will keep it.  Yeah, right!  No, I mean, of course!  This blog is about completing projects, so, yes, I will make one for myself.  It just might not be until next winter. 

It is worth learning how to knit or crochet.  Even if all you make are scarves or potholders, it is something to be proud of!