Showing posts with label Martha Stewart. Show all posts

Sunday, November 4, 2012

Halloween 2012

Halloween is my favorite holiday!  I was going to be lame and just wear a costume that I had in my closet, but at the last moment, I decided to actually do one.  I got the idea for this costume at Martha Stewart's website while searching for Halloween decorating ideas.  I was Medusa...for a party on Saturday night, then was a Zombie Bowler on Wednesday night, which happens to be my normal bowling league night.

I started out by only needing a few supplies:
  • Rubber Snakes
  • Hair Extensions
  • White Twin Sheet
  • White and Black Cream Make-up
  • Tons of Bobby Pins
I first took a black wig and made my own hair extensions by braiding locks of hair and cutting them off the wig.
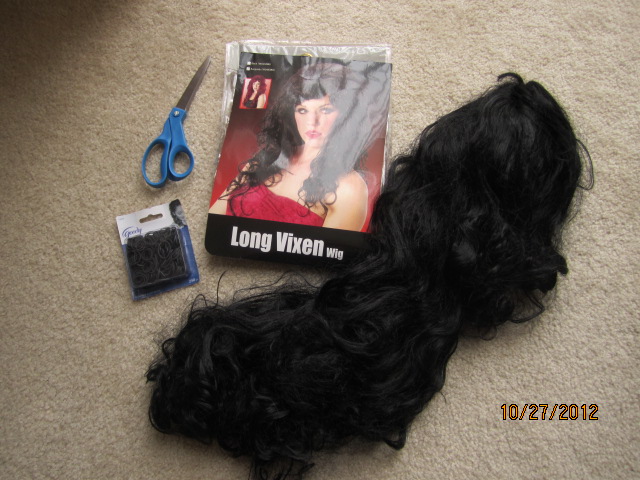


I used small rubber bands, the classic kind that knot your hair all up when you try to take them out.  I braided, banded the end, cut, then banded the cut end.  I ended up with like 20  hair extensions.  It took my over an hour to braid all that hair.


Once that was done, I had to make my toga.  I did a Google search for "make toga from sheet" and a ton of pages came up.  I chose one from WikiHow, which was so easy!


I laid the sheet out the long way and cut the length by like 16 inches.  When I practiced the wrapping, it was way long.  Once it was shortened, you take the sheet and place it around you from the back (like wrapping yourself in a towel).  Take the two corners and grab a bit below and keep one on one shoulder and wrap the other around and meet at the same shoulder and tie.  Really simple.  Check out the website for all the details.


Next was taking the hair extensions and snakes and weaving them in my hair.  The snakes were pretty good looking, considering I got them at the dollar store.


I started by putting my hair in a high pony tale.  I pulled some hair out around the edges of my hairline all around my head.  I braided these into small braids to mix with the hair extensions.  I threaded two snakes through my pony tail, between my scalp and the holder.  Then tightened the pony tail and made a bun with my own hair.  I used my own braids to anchor down the two initial snakes.  I then started using the hair extensions to wrap the snakes to my head with bobby pins.  Vince helped me wrap the snakes, 5 in all, to my head with the hair extensions.


It was heavy!  Once I had my snakes, toga and make-up on, I was ready to turn people to stone!


We went to a party on the Saturday night before Halloween.  Vince went as "Vinnie Guido."


In total, my costume cost $17.  Not too shabby!

But for work, the snake hair would be too much for me to wear all day and night.  Our bowling team decided to be Zombie Bowlers.  I bought a few more supplies:
  • Red Tights
  • Black Leggings
  • Red Long-Sleeved Thermal
I put on the red tights, then cut slits into the black leggings and put those on.  This made it look like my blood or my raw skin under the leggings.  I did not brush my hair and put a few random braids in there (my own, not the extensions) and sprayed it with white hair spray.  I did my make up so it looked bruised with the white and black cream make-up from Medusa and also rubbed some red lipstick on my face.  I wore my black bowling shirt with the red thermal underneath.


I even did my nails funky:


I got the idea from my new favorite website/blog: Honestly...WTF.  They are called Drippy Nails.  Hint: You use a toothpick.

Anyway, I had a fun Halloween, how about you??

Sunday, October 14, 2012

Sari Bracelet

I went online to search for some cute crafts to complete in a short amount of time.  I have been exclusively knitting and I needed a break from it.  First, I checked out Pinterest, then Martha Stewart's Living.  I thought I found something on Martha's website but the directions were terrible, so I just did a good old-fashioned Google search and found something great.

I followed a link to make macrame bracelets!  Macrame is back, Ladies!!

Ok, well, the fad might not have caught on again, but I am willing to give it a go.  This project was found on the blog, Honestly...WTF.  The writer is a very crafty gal and a fashionista whom goes by the name of Erica.  I cannot seem to find her Bio on the blog, but she apparently has 23,000 followers on Twitter.  Go Erica!

My project will use:

 
  • A defunct earring ring
  • String (like a stiff yarn or hemp)
  • Sari ribbon yarn
  • Scissors
  • Tape
  •  Sewing needle


It is essentially a square knotted bracelet with an adjustable knotted slide.  I will show the highlights on my blog, but full instructions are on Honestly...WTF.  She does a great job showing pics of each and every step, that it would be me reinventing the wheel if I were to step-by-step it for you.

First, you are instructed to cut 5 lengths of string.  I cut 3 of the string and 2 of the sari ribbon yarn.  You also need a ring or something to anchor your string to so that you macrame out from the ring.  This will be the centerpiece of the bracelet.  This is where my earrings come into play.


I used the middle-sized ring, but I may have to also use the small one.  My wrist is so tiny, that the middle one is even too big.  But, I started with the middle one and had to follow it through to the end with it.  No problem.

Second, you tie your 2 strings to the ring so they are on opposite sides of each other, tape down one side, and start forming square knots with the sari ribbon yarn over the strings attached to the ring.


This sari ribbon yarn is very decorative and gorgeous, that I thought this would be so pretty as a bracelet.  You are knotting until it is just shy of half distance around your wrist.  Repeat on the other side.

You thread the extra string through the knots and tie it off, but I kept them long so those ribbons will hang once tied.

Third, you are instructed to make the adjustable knot.  You are using scrap string to keep the strands in the shape of a bracelet and you are square knotting again over the strands.  Tie off as in the bracelet square knots.


Fourth, adjust the strands on either side so your hand can just fit through the bracelet.  Tie the loose strands in a knot, separately, on each side near the adjustable knot.


Lastly, try it on and tighten the strings on both sides to center the ring on your wrist.  Trim away the excess strings after the knots.


Ladies, you are all done!  Now go to Erica's blog and make yourself a dozen of these using anything and everything that would work.  This was quick and fun to do.  The creative possibilities are endless and these would make great stocking stuffers for family or your friends.

Let me know if you do make any!  I'll post your pics!

Sunday, July 1, 2012

Strawberry Bread

I love trying new recipes, especially the sweet kind!  I tried this new recipe last weekend and it was delicious plain, with butter, with cream cheese and even with ice cream!

The recipe is Strawberry Bread from the Everyday Food magazine, July/August 2004 issue.  

Pic from Martha's website

This recipe can be found at Martha Stewart's website, but I have also included here:

Strawberry Bread
Yields: 1 loaf that serves 8
Calories: 276 per slice
  • 5 tbs plus 1 tsp unsalted butter @ room temperature (plus more for greasing the pan)
  • 1 pint strawberries, rinsed, hulled & quartered
  • 1 3/4 cups all-purpose flour (can alternately use gluten free flour blend)
  • 1 tsp baking soda
  • 1/2 tsp ground cinnamon
  • 1/4 tsp salt
  • 1 cup sugar
  • 2 large eggs
  • 1/3 cup water (might not be needed, see ** note at end of recipe)
  1. Preheat oven to 350 degrees and grease an 8 x 4 inch loaf pan; set aside.
  2. Using a fork, mash the strawberries until they are soft.
  3. In a small saucepan, place the mashed strawberries and bring to a boil over med-high heat.  Cook, stirring for 1 min.  Take off heat and set aside.
  4. In a medium bowl, whisk together flour, baking soda, cinnamon, baking powder & salt; set aside.
  5. In a separate large mixing bowl with an electric mixer, cream together the butter, sugar and eggs until light and fluffy. *
  6. Add flour mixture alternately with 1/3 cup water **, beginning and ending with the flour.
  7. Fold in the cooked strawberries.
  8. Pour/scrape batter into prepared loaf pan, smoothing the top if necessary.
  9. Bake until toothpick in center comes out clean, about 45-60 min.  If it needs longer than 45 min, lightly tent aluminum foil over pan to prevent the bread from browning too much.
  10. Remove from oven and place pan on a wire rack to cool for 10 min.
  11. Run a knife around the edges to loosen, then invert on the rack.  Flip back over and cool completely.
Note *:  I had brought all ingredients to room temperature prior to starting and my creamed butter mix was not light and fluffy but a well blended slurry.

Note**: Since my butter blend was like a slurry and my strawberries contained some liquid too, I only added a scant amount of water.  Once the flour mix was added, it was still quite liquidy and not that batter-like.

Based on the Notes above, I really did not think this bread was going to work out.  I had also used a gluten free flour blend for one and normal flour for my second one and they both had the same liquidy consistency, but after 45 min, they were both done and came out great!


The white pan is the gluten-free version (bread did not rise) and the clear pan is the normal version: perfect.


When I flipped the gluten-free one over, there was a concentrated corner of strawberries, so the corner broke off.  I did not mind, that was my excuse to try it before it was cooled!  Yummy!


I ate this bread with ice cream one night in a brownie sundae fashion and it was so good.  I shared this with another gluten-free pal at work and she loved it too.

Let me know how you like it!  Bon Appetit!