I have to give kudos to my AlterKnits books. I mentioned AlterKnits in my Lace-up Fingerless Gloves post, at the beginning of January. The "pattern" for these purses seemed simple enough: Take a wool sweater, felt it in the wash, cut off the sleeves and neck and you've got yourself a bag! The book, obviously, goes into more detail, but that's the gist of it.
Now, I mentioned that I invisioned these being the coolest things ever, but I could not get my purses to look like the book. Now, just because they did not look like the book purses, didn't mean that they weren't cool in their own right. I did four purses and gave three of them as gifts. The first one I made, I kept because I'm not truely satisfied with it. I feel like I am still tweeking it.
Let's start from the beginning. After digging out the AlterKnits for the gloves, I remembered that I loved the idea of felting a sweater for a purse. In the past I had knitting a purse with a handle and felted it; it came out so good that it amazed me that it actually worked.
 |
| The Pink Lady purse |
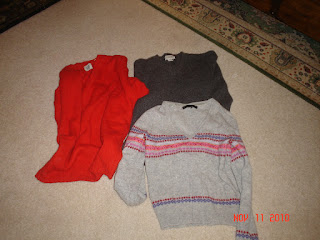
So, I then got the idea that I would make a purse for all my gal friends. It would take me less time to felt a sweater and cut it up than it would for me to knit a purse for everyone. I went to Goodwill over several weeks and bought about eight or nine wool sweaters and vests. My first felting expedition occurred at my boyfriend, Vince's mother's washing machine. She has a top-loading machine and she was willing to enable me in my crazy idea.
 |
| Remember the size of the gray striped sweater |
First in felting, you need hot water, soap, agitation and 100% wool. This can occur in a sink with rubber gloves or in a washing machine on high agitation. So, I put the temperature on high, squirted in some dish soap (like Dawn) and waited until it got nice and sudsy, then I threw a few sweaters in. I let the washing machine start the agitation cycle and checked on it every five minutes or so.
 |
| Shrink, baby, shrink! |
When I checked on it, I lifted it out of the water and tried to stretch the fabric. If it easily stretched and I could distinctly make out the knitted stitches, I threw it back in. I had to reset it back to the agitation cycle a few times. I didn't want the rinse and spin cycles until I was happy with the degree of felting. Each item will felt differently, so you really cannot compare them, they need to be judged individually. They will shrink and the texture will be very different from when they were thrown in...you will be awed in their transfomation.
Since each sweater felted at different rates, I had to take them out and hold them in buckets until they were all ready for the rinse and spin. Once I was happy with all of them, I put them back in and then switched the water temperature to cold, and forward the machine to engage the rinse and spin cycles.
 |
| Just chillin, waiting to get spun |
If you have several to do, then this could be a long process; if just one, then it goes by quick. Sometimes, you can overfelt the item and it can be smaller then you thought possible. But if you ever mistakenly washed and dried a cashmere or wool sweater and found doll's clothes when folding the load, then you know where I'm coming from. The gray sweater with the stripes is one of the items where I may have overfelted. It was supurb in it's thickness, but did not yield much for me to work with. Here is a quick look at what to expect:
 |
| Yup, it's the same sweater! |
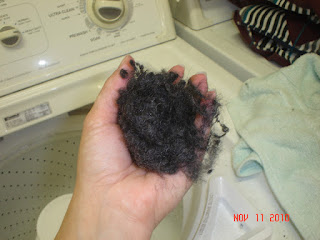
One thing I may have to mention before you get started on your first felt project: it creates ALOT of lint. So much lint that it is gross. See for yourselves...
 |
| New meaning to ring-around-the-collar |
And then this nice ball...
 |
| Try not to gag! |
The lint will be literally dripping off of the garments. But, I just picked them off. I wonder if trying to felt up the lint balls is going too far? Eh, anyway, I did end up throwing it out. So, once they were felted and spun out (they tend to still be very wet, but since they are so thick, it is hard to spin all the water out), I threw them in the dryer and dried how I nomally dry a load (using heat). They won't shrink any more.
After this, I was ready to start cutting! I consulted the book at great lengths, making sure I understood where to cut. The term: "measure twice, cut once" ain't just for carpentry, Ladies! I will show how I made the gray striped one:
 |
| Doll clothes with monkey arms, very strange! |
The idea is to cut off the arms and the neck and utilize the shoulders as the handles. Very clever!
 |
| No going back now! |
So I was very cautious about cutting. The shoulder area got cut back way farther, but I was just making sure I understood what I was doing when I made the first cut. The sleeves are no longer used in this project, but I kept them, because ya just never know. I'm glad I did because I made my Camera Cozy out of one of these very sleeves.
Next, I turned the sweater inside-out and positioned the side seams of the sweater so they will be in the front, then I sewed the bottom hem line closed (where the sweater ribs). The book does this a bit different, where they sew it rightside-out and leave the ribbed hem long, but this is just my spin on it.
Then I turned it back, rightside-out. This is where I had to fuss with it for awhile. I needed to cut the side openings so they were the same width, then cut the handles so they, too, were the same width. I trimmed and pinned, then unpinned, then trimmed some more. Once I got the handles to the width I thought was good, I folded them and pinned again and sewed.
 |
| Fold, Pin & Sew! |
Yeah, I make it sound easy and it may look like a piece of cake, but I really had a hard time with this. My sewing machine is just your average Singer, nothing "professional". I tried sewing through these two thicknesses and my foot kept getting hung up. Not sure if it was the dogfeed not gripping or what the deal was. Anyway, I swore and pricked myself a bunch of times and said, "That's it! It's [bleeping] good enough!" (Even though I knew that it wasn't, I had to stop working on it for awhile.)
 |
| Finished Sweater Purse |
I was pleased that I was able to get this far with it. I will say again, my sweater purse does not look like the pictures in the book. Nope, not at all. But, it was unique in itself. I am still not satified with the handles, and have not given it to anyone. It will be my sample, until I get that Eureka! moment and do-up those handles nice.
I did have some other sweaters that I converted to purses that each developed their own personality and so I am glad to have had the AlterKnits book so that it could inspire me to create bags/purses using old sweaters. Here are a few that I have done so far:
 |
| My other purses |
From the left is a cream colored sweater that had thin pin-striped ribs in it. The felting kept the thin indented ribs and so that gave the purse texture. The purse was very floppy on the sides so I just took the top sides in at an angle. Not perfect, but one of my favs.
The one on the right came from an argyle vest. I could not turn it so the side was the front, like with the other two because the argyle pattern was only on the front, so I had to be creative. I cut this at the armpit and took the shoulders off. I cut four strips from the shoulders and sewed two strips on top of each other to make each handle. I then used a zig-zag stitch and stitched the heck out of it attaching the handles to the body. I felt like this argyle vest did not felt up the best. It was very flimsy, not stiff like the gray striped one. But, hey, you gotta work with what you got and make the best of it.
 |
| Last sweater purse |
This had been my last purse that I squeezed out before I left to go to Mass in December. It came from a burnt orange sweater that I cut and sewed like the others but kept the neck and used it as a pocket on the front. I sewed it on with constrasting colored stitching. Like I said before, none of these look like the pictures in the book, but they all took on their own personality.
I gave the cream one to a friend in Mass, the argyle one to a friend in Florida, and the orange one to my sister. My sister has been using it as a project bag (perfect) and my Floridian friend has been using it as her everyday purse. I really did not think any of these would withstand everyday wear and tear, but the argyle one has been holding on. I think the handles need to be beefed up, but since it was a vest, there are no sleeves to make anything else out of. But, she has told me that she receives compliments on it all the time. [This is me glowing inside]
Like I mentioned in the first paragraph, I have a bag full of felted sweaters just waiting to become something else. I have other bag ideas in mind and maybe even a hat or a scarf. You will have to stayed tuned to see the next edition of the Sweater Purse.

No comments:
Post a Comment