Showing posts with label gray. Show all posts

Sunday, November 3, 2013

Fetching Fingerless Gloves

I finally started and finished a project in the same month (of the same year)!  Hooray!

I knitted a pair of fingerless gloves for a friend as a birthday gift.  She lives in Mass, so she may actually use these when it gets nippy out.

The project is called Fetching from Cheryl Niamath.  I got the pattern from Knitty.com.  Fetching are fingerless gloves that have a few row of cables around the wrist and on the knuckle.

The yarn I decided to use was Sheep(ish) from Vickie Howell for Caron.  I will have to be honest here:  I really do not like this yarn.  For this purpose, it was not the best yarn choice.  While knitting it kept splitting and there is not much of a twist or wind to it, so it was not the best for cables.  Please forgive my photography, I took most of these at night with the flash on.


The color I chose was Gun Metal(ish), which is a very dark gray.  I will admit they have such great colors to choose from, very vivid and saturated.  I knitted the gloves with a size 6.


I needed double pointed needles (dp), a cable hook (the U looking thing), a marker, darning needle and a row counter. 


While I was casting on, the yarn broke.  Ugh!


For dps, you cast on the required number of stitches, then with the other dps, transfer over several stitches, then with the 3rd dp, again.  You should have split up all the stitches so there are about the same number on each dp.  The first round is the most critical, because you must be careful that you do not have the stitches twisted.  If twisted, you will be knitting a Mobius and you don't want that.


I will then knit the gloves in the round.  Dps are good to use when you have a small number of stitches, but need it in the round.  This will have no seams (yea!) and just a few strands to weave in at the end.


In this pic, I am knitting some cables.  They will be around the wrist and arm.  To cable, you take your cable hook and slip 2 sts onto it.  Hold it in the back or the front (depending on which way it is going to twist) and knit the next sts on the main needle.  Then take the cable hook and knit from that hook.  You now have the start of a cable.  Then you knit in pattern (knit the knits and purl the purls) until the cable row again.  Really, it is easy.


Another feature I want to show you is the thumb.  I was instructed to take waste yarn (a different yarn and color than the yarn you are using) and knit with that as the main yarn for 7 sts, then transfer them back to the left needle and knit them again, but dropping the waste yarn and knit with the main yarn again.


You will have something like this, with the waste yarn showing.  I will carefully unstitch the waste yarn, revealing live stitches.  I will immediately place the live stitches onto two double points.


Slowly unstitch each one and place onto the needle.


I will now knit this little opening in the round to make the thumb.

 
I finished by cabling around the knuckle and loosely bound off with a picot bind-off.  It created little bumps along the edge.  These did not come out as fabulous as I had hoped.  I don't know if I can really blame the yarn entirely, though.  Maybe if I adjusted how much I knit after the cable on the knuckle, or if my hands are too small for these gloves.


They have been sent off to my friend.  Hopefully they will fit her better or look better on her.


I'm sure she will be able to use them on the next blustery New England day.  Enjoy!

Sunday, April 15, 2012

Black Denim Dress & Bow Earrings

I have a par-tay that I will be attending soon, so I wanted to get something new for it.  I've recently lost a few pounds, so some of my cute clothes do not fit right anymore.  This is the perfect time to get something new or new-to-me.  Which in this case, it was new-to-me.  Don't knock Goodwill, it really has some great stuff!

Anyway, I bought this blackish/steel gray denim strappy dress that is a mix between casual and dressy.  I like the top: it is fitted to the waist with adjustable straps; then it is full in the skirt.  I don't mind the fullness, it is just too long.  I will be hemming this.

Bad hair morning...look at the dress not my hair!!

I'm simply going to cut about 6 inches off the bottom.  The rest fits fine.

Major chop-off

I calculated that the hem will be 1" so I will need a 3/4" fold and then another fold that is 1".  This is so the raw edge is folded away.  Subtract those lengths from 6", I will actually cut 4 1/4" off the bottom.  I used chalk to mark my cut line.

Time to fold and press

Once pressed and pinned, I sewed around the edge with black thread.  That's it for the dress.  I told you it was easy.

Now, I wanted to make matching earrings.  I found this pic in a magazine of bow earrings that I pinned to my Pintrest board so I could do a designer knockoff on it someday.


These earrings are from Delfina Delettrez  and they retail for $1300 - way out of my price range (c'mon, $1300??) so I will have to improvise.  I gathered some jewelry supplies and I was off.

Black ribbon & pearls

I had thin black ribbon, a strand of pearls (that was me practicing my bending wire technique), a few flat-head pins and a pair of fishhooks.  My idea is to make bows with the ribbon and place them in line with pearls.

First, I had to learn how to tie a bow prettily.  Eh, just a minor obstacle.  I Googled "tying a bow" and I found a tutorial from It's in the Details blog from Lisa Pace that made it a snap.

Second, I tied four bows; I took a flat-head pin and placed a pearl on it and poked the other end through the bow from the bottom.

Nancy's way of beading

I'm sure there could've been a better way of doing this, but I don't know enough about beading to care.  After the bow was threaded on it, I trimmed the pin down and made a loop for the link.  This will be the bottom segment of the earring.  From the bottom, I linked one of the pearls, a link to thread another bow on, then another pearl.  I then finished it off with the fishhook.

Black bow earrings: Priceless!

I think they came out cute!  To make sure my bow stays tied, I dotted glue on the backs of each of the knots.  Vince then wielded his mini torch to sear the ribbon edges to prevent fraying.

Much better (dress, not the hair) lol

The dress does look much better as a short dress.  I have the earrings on too, but it's sort of hard to see in the pic.  I will post a pic or two when I'm at the party, so you can see the dress and earrings in action.

Have a great week!

UPDATE: Here is Vince and  I at the party on Friday night.  We were supposed to have our mean face on...oh well. 

Ribbons and pearls

You can see I am wearing the earrings and I added a necklace that I used the same black ribbon but I took a pearl bracelet and tied the ribbon at the ends so it hung in the middle.  Accessories made easy!


Sunday, February 12, 2012

Viveca Beret

This is my first finished knitted project of the year!  This beret pattern came from Berroco and best of all, it was a free pattern (click here for the pattern).  The pattern name is Viveca and it was knitted with Berroco Flicker in Siegfried, which is a light heathered gray with a thread of silver running through it.

I used about a hank and a half

The stats on this yarn are 87% baby alpaca, 8% acrylic and 5% other fibers and comes in 50g hanks.  It is a dream to work with!  I love it so much that I want my whole wardrobe made out of this stuff.  It is super soft and just a pleasure to touch.  I bought it when I was visiting the family at Christmas time at a yarn shop called The Wool Patch in Middleboro, MA.  The owner was so nice that when I called to ask if they were open on Mondays, she said no but if I could tell her when we were going to come, she would open the shop for my mom, sister and I.  What a lovely lady!

The yarn is a unique weave in that instead of it being wound, it looks braided.  Here is a close-up:

Braided rather than wound - see the silver thread?

The beret is knit with a bubbly repeat pattern.  I knitted a gauge swatch to determine my needle size, like a good little knitter.

Bubbles (what else would you call them?)

It took about a month to knit, I just stalled on the seaming, but it was actually done in January.  I carpool to work with my honey, so on the way home I would break out the beret and knit away.  It was a fairly easy pattern to knit, but I certainly did have my mess-up moments.  Just be sure to count after every odd row to ensure you have the proper stitches (due to the yo's).  It is well worth the time to count the stitches.

Where I stalled out

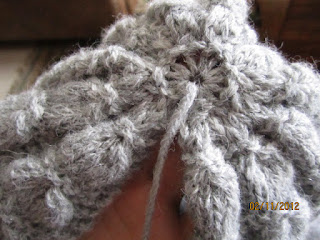
This beret was knit flat, from the bottom rib to the top.  I used a size 8 bamboo circular needle set.  Then you cut your yarn, leaving a long tail.  Thread the yarn onto a blunt-tip needle and weave it through the live stitches that are left on the needle and pull tight.

Crown of the beret

All that was left was seaming the sides together and viola!  A beret!

Roo & I trying to stay warm

From the back, so you can see the pattern:

Tres chic

I like it.  At first I was thinking that it was too big, but a beret is supposed to be flounced to one side.  The gray color gives it a vintage feel.

I'm going to make this my new FB pic

I don't normally wear hats but I will try and make an effort to wear this.  I worked hard on it, so I will show it off while the weather is still perfect for it.

Passez une bonne semaine!