Showing posts with label hat. Show all posts

Sunday, December 15, 2013

New England Patriot's Beanie

A friend asked me to make a few hats for her son.  I had made her daughters a few hats in the past years, so they must have gone over well, because she is asking me to make more.  I love knitting for someone who will use it! 
 
Her family is a real sports-loving family, Patriot's, Bruins, Red Sox...all of those and probably more, I just don't know.  I decided to knit her son a New England Patriot's inspired beanie hat.  I looked online and this is one that I found:


I got this!  I went to Joann's and bought 3 skeins of yarn:


A navy blue, gray and dark red.  All of these are Lion Brand Vanna's Choice (100% Acrylic).  Perfect yarn for washing a ton of times and still holding up.
 
I adopted a pattern from one of my magazines for basic beanies and figured out when I would need to change colors.


I started with a k2, p2 ribbing for the brim.  Then just straight stockinette st, then started the decrease for the crown right after the last red stripe.
 
I then topped it off with a navy blue pom-pom.


It's finished!

 
It practically fits my head, so I hope that I did not make it too big!  I will be visiting Mass the weekend that this is posted, so I will be giving it to her then.
 
Stay tuned for more Christmas knitting!

Sunday, November 24, 2013

Vivien's Layette

I had scheduled a few vacation days mid November to chill and get a jump start on my Christmas shopping/knitted gift knit time.  Since I was going to be off from work, I wanted to pay my friend a visit who had a preemie baby in September.  You know what that means??  I needed a homemade gift, pronto!
 
I had crocheted a few baby blankets:
But did not have the time to crochet up a baby blanket so I chose a baby layette.  The pattern was a free pattern I found on Ravelry by Linda and here is her blog: http://clickertyclick.blogspot.com/.  Very crafty gal!
 
I chose Cherub DK Multi by Cascade Yarns in Rainbow Sherbert (55% Nylon/45% Acrylic).  This yarn to so soft and was a pleasure to work with.  One skein worked up this newborn baby layette.  I used a size 4 circular needle.
 
This yarn is so sweet!
 
I followed the pattern to the T.  I could have made it a bit longer, but it all worked out in the end.
 
 
This sweater had raglan sleeves (sleeves that are worked with no seams) and I am in love with raglan sleeves!  You leave the stitches live at a certain point you simply place them back on the needle and knit in the round to complete them.  So simple!!
 
 
The sweater design had eyelets as the pattern.  Nice and simple = fast knit.  No time for fancy-smancy lace design right now!
 
 
Stitches are live, so I placed them back on the same 40" long circ needle  and I finished the sleeves using the Magic Loop technique.
 
 
The hat was way too small.  I will make another hat for her at a later date.  The sweater did fit:
 
 
So cute and little!
 
 
I posted this pic of me holding Vivien on Facebook and everyone thought that I was a natural and/or thought that this was my baby or I should be having one!  Ha!  I like other people's baby's...I'm good!
 
After I fed her a bottle, she fell right to sleep in this position.  No boppy needed after the feeding.  I'm glad that Vivien is healthy and doing well and (on the side, am happy that the sweater fit).
 
Until next time, Baby Vivien!
 

Sunday, October 7, 2012

Bean(ie) Town

This is another installment of the Knitapolooza that I happen to be in, knitting for Christmas.  The pattern this week is the Bean(ie) Town.  Bean(ie) Town is a beanie cap that can be knitted as a skull cap or a slouchy beanie.  For two little boys up in Rhode Island, I went with the skull cap version. 


This pattern came from the Knit Simple Fall 2012 issue.  The yarn I am using is from a new line of yarn from Vickie Howell for Caron International/Bernat called Sheep(ish).  It is 70% Acrylic/30% Wool.  It is pretty nice stuff, considering it is affordable and you can buy it at Michael's and Joann's. 


I am using a size 7, 16" circular needle and am joining in the round.  This beanie hat will have no seams: cool!  I am knitting it up just as the pattern states and hopefully this will fit one of the kids I am knitting it for.


The basics of this pattern is a k2, p2 ribbing and at certain points, the ribs cross.  It is done like you were doing a cable, where you move stitches to a cable needle and either hold in front or the back of your work, then knit or purl the stitches from the cable needle to create the crossing-over look.  So far, in the above pic, I have only gotten the ribbing and have not gotten to a cable yet.


I'm getting there!  I placed the hat over a small mixing bowl to pretend it is on a head, to show the cabling pattern.  I brought this project to the beach last weekend and got a lot done on it.  I did do a modification to the pattern.  The first set of cables were normal, no biggie, but then the second cable that was supposed to go in the opposite direction was kind of crazy.  It twisted into nowhere. 


In the above pic, you can see that it twists to the right, but it does not really connect with anything.  Eh, needless to say, I ripped out to 2 rows below that cable and started again.  For the cabling, I repeated the left-twisting cable, but just staggered it so it twisted with a different set of ribs. (see the pic with the bowl, above two).


When I got to the crown of the cap, I had to switch over to double points (double pointed needles) because to shape the crown I was decreasing the number of stitches on the needle and the circulars would be too long to continue knitting.  Double points allow you to knit very small circumferences.


Here it is: complete!  I had two of these to do so here is the second one:


Those are two more gifts I can cross off my list.  Once I am done, I am going to knit myself something.  I can't wait.

Sunday, September 23, 2012

Vivecita Beret

I am a knitting fool, with all these knitted gifts getting completed.  Here is another knitted gift that I made with stash yarn.  Vivecita is a small, child-size version of Viveca, from Berroco.  So far I have made a total of 3 berets:
  1. Viveca Beret (for myself back in February)
  2. Viveca Hunter Beret (as a gift earlier this month)
  3. Vivecita (as a gift, today's blog post)
The yarn I used is Bernat Softee Baby, in Soft Peach.  It is 100% acrylic.  I used this yarn (that's why I called it a stashed yarn) for the I Heart Hats that I made last Christmas.


The modifications that I did for this pattern was to only do 6 fan repeats across the row, rather than the 12 for an adult beret and on the height, knit up 3 fans, rather than the 6 for an adult then start the crown shaping.  I also knitted the ribbing at the start edge for about a half inch rather than a full inch.


The ribbing makes it stretchy.  This ribbing is a K1, P1 ribbing.  The back and forth with the yarn string to go from purling to knitting is enough to make you batty.  That is one reason for the half inch modification, mentioned earlier.


That's a close-up of the ribbing.  Since I was knitting a child-size version of my favorite beret, this knitted up in no time.   This only took one weekend to do.  I knitted while watching movies last Sunday.


I really hope that the modifications worked and that it actually will fit the recipient's head.  She is only 2-ish, but still.  I hope it fits!!

Sunday, September 9, 2012

Viveca Hunter Beret

Christmas gift making and stash-busting: I love it!  I did this beret in about a week; I was working on it just about every day.  Even if it was 2 rows, I was knitting away.

This is my second Viveca Beret.  My first one I knitted back in February with the softest yarn in the world, Flicker from Berroco (First Viveca Beret).  

I had heard on the radio that the "it" color for fall & winter was going to be forest green.  Perfect for my Viveca project.  The yarn I am using is Lion Brand Wool-Ease (80% Acrylic, 20% Wool) in a dark hunter/forest green.  I used this yarn when I knitted the Shapeshifter Shrug in November of 2011.  I had about one and a half skeins leftover from that project. 


I always keep the patterns from the projects that I do and, thanks to my Craftolution #2, they are all organized in a 3-ring binder.  I place the pattern, gauge swatch and any other items that I may find useful if I were to ever do that project again.  In this case, I tucked away my handy flashcards with the pattern repeat on them.  Each card has one Row on it.  


This pattern has a total of 5 full pattern repeats.  Here is me at 2.5 repeats.  I think that I am only going to knit 4 repeats.  It should still look fine.


I knitted this on a size 8 circular needle, but am not joining in the round.  I knitted back and forth, as if they were straight needles.  This way the needle can accommodate a large number of sts easily.

Here is the beret at the 4 repeats and the crown shaping.  I only need to cut the yarn, thread the yarn through the live loops to close the top and seam the side closed.


The thing about substituting yarn, the project will not come out the same as the original.  It may not be a bad thing, but it also may not be a good thing.  This is did not come out exactly like my first one: brim is a bit large, hat does not slouch the same.  The Wool-Ease is a bit lighter in physical weight than Flicker, so that caused the slouch/drape to be a bit different.  


But I'm not complaining: look how cute it is on! 


I have transported my living room to a French Cafe.


It does look a bit big, but it is supposed to be slouchy.  Some online reviews of this pattern say that it was too big for them.  Not sure if they realize that it is not supposed to fit like a beanie.  


I have not decided who is going to receive this as a gift yet.  I just know that it is a cute project and I figured one of my friends may also feel the same way.  This beret may also look cute with a flower pin on the brim.  I'll think about it as Christmas draws near.

What are your ideas for handmade gifts this year? Let me know!

Sunday, September 2, 2012

Fuzzy Wuzzy

I am starting my Christmas knitting early.  I am on a roll and have completed two hat and scarf sets.  I don't know how many items I will make as Christmas gifts, but I will just knit until I run out of time.  That always seems to work :-)

I start out by buying some really cute yarn at a local store; they were inexpensive so I figured I'd buy a bunch and figure out what to do with them later.  The first set of yarn is a wool-like multicolored strand with a novelty strand of mini fuzzy nubs on them wound together.  I'll call this set of yarn "Fuzzy."  The brand is Gala Yarns and I believe it is a yarn company that must buy out other company's yarns and recycles them.  So I am being green by knitting something with recycled yarn.

Fuzzy

The second set of yarn is a brown worsted weight acrylic yarn with a novelty strand of mini fuzzy nubs on them wound together, like in the other yarn.  This set is also from Gala Yarns (again, being green).  I will call this set of yarn "Wuzzy."

Wuzzy

I decided to make a hat and scarf set for my friend's two daughters.  I made them a hat last year (I Heart Hats) as well, so they can add these to their collection.

The scarves are first.  It is a pattern that I am improvising on.  Here is my pattern:
  • Any yarn, at least one ball of 50g (more if you want fringe)
  • Size 8 or 9 knitting needles (8 if thin yarn, 9 if thick yarn)
  • Work the following pattern until you run out of yarn or reach the desired length:
    • CO 16 st, loosely
    • Row 1: k1, *yo, k2 tog, repeat from * to end
    • Row 2: p
    • Repeat Rows 1 and 2 until you reach desired length
    • Bind off loosely
    • Cut fringe in 10" pieces for fringe that is about 5" long once attached
      • For Fuzzy, I used 3 strands of yarn for each fringe
      • For Wuzzy, I used 2 strands of yarn and one strand of ribbon for each fringe
    • Attach fringe at the ends of scarf at the ribs
This pattern created a ribbed look with eyelets (holes) in between each rib.  It was to have an easy pattern to mindlessly knit without a pattern, but different than stockinette.  

Here is Fuzzy, while in the works:


Here is Wuzzy in the works:


Next was fringe.  I cut 54, 10" strands for Fuzzy and 36, 10" strands for Wuzzy.  Wuzzy also had 6, 10" strands of purple ribbon cut.  


I explain how to attach fringe in a past post: Quintet Scarf.  For Wuzzy, I placed the ribbon one on each end and one in the middle, so there are 3 strands of ribbon weaved in at each end.


On to the hats.  The hat pattern is a pattern I have used in the past and love it.  It is very versatile.  That pattern is available in my I Heart Hats post.  This time, the yarns were pretty thick, so the bottom edge did not naturally roll, so I made them like beanie hats.  You gotta roll with the punches and just go with it.  


How cute, huh?

Here are them as a set:


So, I can officially cross two little people off my list.  Not too shabby.

Sunday, February 12, 2012

Viveca Beret

This is my first finished knitted project of the year!  This beret pattern came from Berroco and best of all, it was a free pattern (
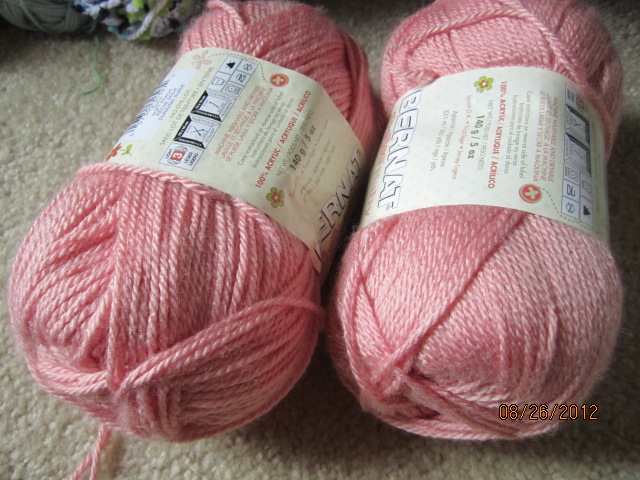
click here for the pattern).  The pattern name is Viveca and it was knitted with Berroco Flicker in Siegfried, which is a light heathered gray with a thread of silver running through it.

I used about a hank and a half

The stats on this yarn are 87% baby alpaca, 8% acrylic and 5% other fibers and comes in 50g hanks.  It is a dream to work with!  I love it so much that I want my whole wardrobe made out of this stuff.  It is super soft and just a pleasure to touch.  I bought it when I was visiting the family at Christmas time at a yarn shop called The Wool Patch in Middleboro, MA.  The owner was so nice that when I called to ask if they were open on Mondays, she said no but if I could tell her when we were going to come, she would open the shop for my mom, sister and I.  What a lovely lady!

The yarn is a unique weave in that instead of it being wound, it looks braided.  Here is a close-up:

Braided rather than wound - see the silver thread?

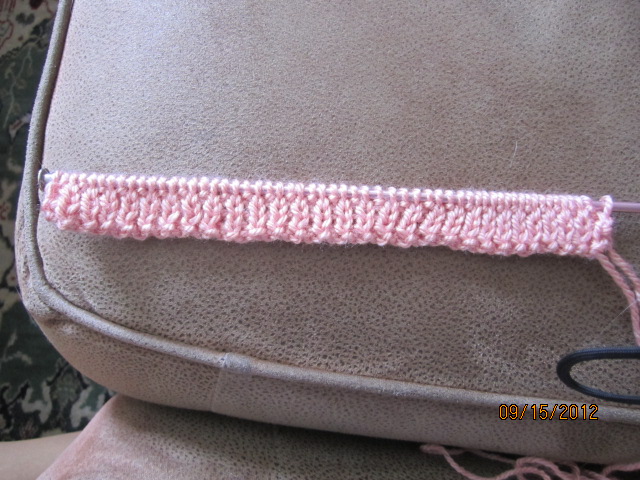
The beret is knit with a bubbly repeat pattern.  I knitted a gauge swatch to determine my needle size, like a good little knitter.

Bubbles (what else would you call them?)

It took about a month to knit, I just stalled on the seaming, but it was actually done in January.  I carpool to work with my honey, so on the way home I would break out the beret and knit away.  It was a fairly easy pattern to knit, but I certainly did have my mess-up moments.  Just be sure to count after every odd row to ensure you have the proper stitches (due to the yo's).  It is well worth the time to count the stitches.

Where I stalled out

This beret was knit flat, from the bottom rib to the top.  I used a size 8 bamboo circular needle set.  Then you cut your yarn, leaving a long tail.  Thread the yarn onto a blunt-tip needle and weave it through the live stitches that are left on the needle and pull tight.
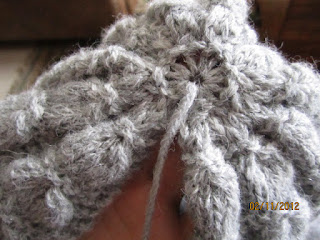
Crown of the beret

All that was left was seaming the sides together and viola!  A beret!

Roo & I trying to stay warm

From the back, so you can see the pattern:

Tres chic

I like it.  At first I was thinking that it was too big, but a beret is supposed to be flounced to one side.  The gray color gives it a vintage feel.

I'm going to make this my new FB pic

I don't normally wear hats but I will try and make an effort to wear this.  I worked hard on it, so I will show it off while the weather is still perfect for it.

Passez une bonne semaine!