Sunday, January 9, 2011

Lace-up Fingerless Gloves

Let's back-up a bit this week.  In addition to a few scarves, I also made a pair of lace-up fingerless gloves as a Christmas gift this year.  These gloves came from a knit book called AlterKnits by Leigh Radford. 

Very creative knit pattern book

This book I received as a gift one year for my birthday.  I've had the book for about four years and this is the first project I have made from it.  There are a ton of cute and cool items to knit or otherwise create with wool that it is definitely worth checking out. 

The yarn I chose for this project was Encore by Plymouth Yarn (75% Acrylic / 25% Wool) in a peach color. First, they instruct you to knit a gauge swatch.  You know how I feel about gauge swatches, so I sort of make one then just go with the needle size recommended, which was a size 7.  The cool thing about these gloves that make them different than many other gloves, are that they are longer up the arm and lace-up with a ribbon.  Wait until you see how nice they came out.

So, right away I make a mistake.  The pattern starts at the arm and you knit on straight needles for 6" or so.  In the arm part, on each side you do some yarn overs (yo) and create eyelets for the threading of the ribbon.  I missed the first eyelet on one side.  I did not discover this until I was, oh, I don't know.....

Can you read the tape measure?

Let's see, what does the tape measure read?  Yup, five inches along.  Well, I did what any insane knitter would do:  I ripped it out and started over.  I had to!!  I could not lace it up, in good faith, through a random stitch and give it as a gift.

Rip, rip, rip!

By this time, I had the eyelet pattern repeat down pat.  Once I got myself back on my feet and knitted the required inches for the arm, they instruct to transfer to double pointed needles (dp), aka double points, so you can knit in the round (join the two sides together to form a tube).  Double points are knitting needles that are short and have a point on each side and come in sets of four or five.  I have several sets and I hate using them.  You have to evenly distrubute the stitches over three or four needles and use the empty one as the second knitting needle.  I may have lost you but that is okay.  They are confusing and I can't ever hold them right.

But, alas!  There is a cure for the dp blues.  It is called Magic Loop.  You get a pair of circular needles in a length of at least 32" long and you do this thing where you have loops on both sides of your knitted tube.  This technique eliminates the "ladder" effect that alot of knitters get with the dps.  I'm not really going to try to explain, just click on the link above to see a video from YouTube.  It is only three (3) minutes long and it will convert you!!

Me, Magic Looping!!

This part is shaping the hand portion and the thumb.  The below pic shows that the join of the sides is seamless and you cannot tell (no laddering).  Laddering is when the joining stitch is slack and is not uniform with the rest of the stitches, but is consistent going up the side and looks like rungs on a ladder.  I think I am getting too technical, so forget all this!  Just let me show off my seamless stitches and be done with it! :-)

Yeah, Me!

Nothing else disasterous happened while knitting the rest of the gloves.  You work the hand up to the  knuckle, making a spot for the thumb.  Meanwhile, the thumb stitches are placed on a holder to be worked later. 

WIP (Work in Progress)

Once the thumb was knitted and yarn tails weaved in (I had to sew up a hole that formed between the thumb and the hand, so I just used the tail that was from the thumb), I had to model to show the almost complete fruits of my labor.

The rolled-edge is cute, huh?

So, when I got to this point, I just wanted to be done already!  But I wanted to block the gloves so the stitches will lay flat and to tame the eyelets so they will be straight and flat, not curling.  Here are some things you need when you block something:

Take the time to block, you will thank yourself

A flat surface (I used a wooden tv tray), a spray bottle with water, towel, and pins.  In this case, I did not need the pins.  The pins help set the item to a measured size; I did not need to size the gloves.  I wet the gloves on both sides until they were damp, but not soaking wet.  Rub the water into the stitches (this, to me, is like feeling a wet dog...yuck), then position the gloves in a single layer on the towel.  I folded the towel over the gloves, but left the rolled edges hanging out.  I did not want the rolls to be flat.  So I had essentially sandwiched the gloves between two layers of towel.

Towel sandwich

Then I placed some heavy items on top to weight it down.  Then I came back the next morning and took a look.  The gloves were dry and set.  On a side note, yes, that is a Dexter board game!  I just got it for Christmas from a very close friend and I played it on New Year's Eve.  The game is won by collecting your suspect game tokens in a mini black garbage bag and moving your piece around the board until you get to the marina to "dump" the evidence.  Yes, a bit demented, but if you are in love with the show, you would get a kick out of the game concept.

So, here are the final results of my lace-up fingerless gloves:

Now, how do you lace the ribbon?

I am pleased with how they came out.  I did have an interesting time actually lacing up the ribbon.  I wanted the ribbon to actually show but could only think of how a shoe was laced.  I figured it out, eventually. 

In my opinion, this was not a difficult project, considering that they are pretty much a half a glove (no fingers), but it still took me at least two weeks to complete them.  It actually spanned about a month, but I did not work on them each day and I visited MA for 10 days in December, so I finished them up when I got home during Christmas weekend.  I did not give these as a gift until New Year's weekend, so I had a bit of breathing room.

No matter what, it is always hard for me to part with my creations.  I may not have come up with the pattern or the idea, but I take pride in the finished piece, so I end up wishing I made the item for myself!  Selfish, I know, but I did give the gloves away, so it is not too selfish.  (I hope).

Now that you see how I got through a pattern, with a few hiccups.  What hiccups have you encountered in your latest WIP?  Let me know, take pics, send them to my email by clicking the envelope link below.  I would love to show off your pieces!

Sunday, January 2, 2011

Craftolutions 2011

Happy New Year!  With the new year here, why do we feel obligated to create goals?  My answer to that is so we can be a better person than we were the year before.  Although these are my Craftolutions, my knitting, sewing, and on the path to enlightenment declarations, if I make someone happy by making something handmade for them, then it will be worth my time and make me feel good in the process.


I want to complete my UFO's (unfinished objects).  Now, I am allowing myself the freedom to do an alterante project with the yarn.  I have a few projects that are only about a few inches long, so I can unravel it and repurpose those yarns into a project that will actually see the light of day.  I think that is more important than completing a project that had it's issues from the start!

I want to organize my patterns and craft ideas in a 3-ring binder.  I have knit and crochet patterns stuffed everywhere, swatches in random bags, yarn labels in my notions bag and magazine image clippings tucked in books.  My sister has her's organized in this manner and it was so nice to look through.  I want to organize it with a section for Completed and one for To-Do.  I will include those swatches in a sheet protector along with the pattern and yarn label.

I want to have patience (aka HP).  I can't tell you the number of times I get worked-up over a project that is not coming out right or is taking too long.  Mostly my sewing projects get me frustrated.  I imagine something being easy or should only take a few hours and when it doesn't lay flat, or takes forever to complete, I often have meltdowns.  Yes, I am admitting that I swear and often shed a few tears over my inability to accomplish the task at hand.  I believe it is due to me always wanting to challenge myself and so, of course, I don't always pick it up as quick as I would like.  I need to take a time-out and deal with my patience.  New mantra: Breathe in, HP, Breathe out...

I would like to knit, crochet, or sew something for charity.  There are several charities that knit for babies or animal shelters that can always use blankets.  I am not going to put a number on how many items I will make and donate, I can only say that I will do what I can throughout the year.  A few that I have Googled are Knitting for Charity, Knit-a-Square, and Hugs for Homeless Animals.  Reading through these websites makes me feel like I should have done this ages ago.

I would like to teach someone to knit.  This may be for selfless or selfish reasons.  I want to share my knitting skills with someone; it is a great gift to give.  But, I would also like to have a local knitting buddy to hang out with and do my projects and swap ideas.  I have taught one person to knit.  She is still knitting and is developing her skills wonderfully.  She emails me once and a while for help and I do what I can, long distance!  A few people have expressed interest in learning to sew, so maybe I can get them to make that sewing machine purchase and I can help with that skill.  Although, knowing my record with meltdowns, it might not be the best idea.  Or I could think of it as working on my patience (Craftolution #3).

This is always something that needs constant watching.  I need to be realitic with projects and I need to give myself more time to complete them.  For example, with Christmas, I started in the beginning of November, but it still was not enough time to do all my homemade gift ideas.  Another example is stating I'm going to make this one thing for everyone, then not liking the first one and having to come up with a Plan B; that happens often.  So, if I start early enough, coming up with a Plan B or even C should be no sweat!

I want to get back into jogging.  Now you're thinking, "How does this relate to the Craftolutions?"  My thoughts are that knitting, crocheting, sewing, etc are pretty sedentary "sports" if you will.  I need to keep a healthy body and a healthy mind to cut down on meltdowns and to have HP.  Along with this, I want to complete at least one 5k a quarter.  One year I did a 5k each month, because I had a goal to get my time under 30 minutes.  I did not get under 30 minutes, but at least I was out in the sun doing something.  I am not going to say under 30 minutes this time, but to get it between to 30 to 34 minutes. That is being realistic :-)

My last Craftolution is reading!  Last year I read 16 books, so this year my goal is to read 17 books.  I did finally finish reading my last book of 2010 (Knit Too).  Not sure when I will be reading, since I will be so busy with jogging and completing UFO's.  Ha ha.  I don't like to pre-choose books, I will just read whatever I'm in the mood for at the time.  I will try and break it down into quarters, so that will be about four books a quarter.  I will post my reading lists as I go so I can stay on track.

So, what are your New Year's Resolutions?  As long as you stay postive and set realistic goals, then you can achieve them.  If you are having trouble, see me and I will help you stay on track.  But, I also reserve the right to get your support with keeping me on track!  Here is to 2011 [clink your knitting needles, crochet hooks, sewing needles, and book bindings together now]!

Sunday, December 19, 2010

Christmas Village

Each year I go up to Mass to visit my family and friends at Christmas time.  Each year my sister's husband Dave assembles a Christmas Village in the basement.  The Christmas Village is made up of ceramic shops, houses and people that both his mother and our mother have given him.  The Christmas Village now encompasses not just the railing shelf in the basement but now two additional separate tables.

Ooooh!

He has assembled icicle lights along the ceiling and tree lights along the shelf.  This year he had his niece help him and I heard she really got into it and wanted to place each person just right.  Each year he adds a little bit more charm to the village.  One addition this year was the Frosty movie playing from a projector onto the wall.

Local train depot

He has features such as a train depot with a functional train, takes branches from outside and creates trees, and even made a covered bridge to connect the "town" across the doorway.

Christmas Village - Eastside

One year, there was an ice storm in the area and he recreated the ice storm in the village.  There were downed trees, fake snow covering the roadway, and even a snowplow.

Christmas Village - Westside

The westside of the Village has a town square and cars on the roadway.  Like I said earlier, he adds more charm to the Village each year.

Fire pit

This summer, my sister and husband cleared an area in the woods in the back yard and made a firepit with a picnic table and chairs.  So this year in the Village, he also created a firepit.  He was working on the picnic table last night.  He made it out of wood tongue depressors and glue.

Picnic table - isn't is great?!

Here is also a truck with branches cut-up to look like logs.

Logger truck

During my winter visit to Mass, we always make a trip to Foxwoods Casino in Conn to play a morning session of Bingo.  When we were walking to the Bingo hall area, we past a Christmas Village that was made entirely out of gingerbread, chocolate, and royal icing.  It really was amazing.

Foxwoods Village

In this Foxwoods Christmas Village was a church, houses, houses that were destroyed by a storm, royal icing trees, chocolate rice crispie rocks and bushes and, the best of all, Rapunzel's castle.

Click on pic to see more detail

If you look closely, you can see the prince climbing Rapunzel's braid of golden hair on the tower.  My picture really does not do it justice, but it was the coolest gingerbread house I've ever seen.  The Village continues to the right of the castle, but I did not get a good picture of it. 

On a side note, each year I go to Bingo and I have never won a game.  This year, one of my friends in our group was the sole winner of one of the games, so she did not have to split the pot with anyone!  It was very exciting for us, so she was even more hyped-up after the win.  So much more hyped-up that she could barely concentrate on the next game.  It was a great time.  Congrats, Crystal!!!

Now that we have all seen the Foxwoods Christmas Village, I wonder how Dave will be inspired for next year's Christmas Village.

Monday, December 13, 2010

Crazy Cables

Once you get the hang of knitting you should try and challenge yourself with something that looks hard but is quite easy (assuming you have the knit and purl stitch down pat).  If you are ready for something new, try knitting cables.  They look very impressive when they are done, but, when the pattern is followed, it can be done painlessly.

My very first cable attempt was done on scrap yarn that I knitted up a swatch piece.  Sorry to say, I no longer have that little piece of cable, but I have moved on since then.  My first project was an Irish cabled sweater.  Yes, let's go for gold, I don't want to settle for bronze.  I jumped from a swatch piece to an Irish cabled sweater.  I never admitted to being crazy, but I have high hopes!  So, in my search for the perfect pattern, I asked my Aunt Eileen.  She is the person who taught me how to knit.  She is my great aunt that is like a grandmother to me.  She lent me (let see, over 10 years ago) a Irish knit instruction booklet.  This booklet has a copyright date of 1967!

The pics inside are even more classic!

The Bernat company is still around and going strong; their website offers a blog and free patterns.  The Bernat Book of Irish Knits had the perfect pattern: a classic pullover.  The yarn I chose (sorry Bernat) was Paton's Classic Wool.  It is 100% merino wool in the classic cream color Aran.  I bought it from Smiley's Yarns which can be found on the web.  They literally have yarn for $1!  I don't think this yarn was a buck a skein but it was wicked cheap. 

This sweater was orginally knit for my boyfriend (who became my husband, then my ex).  There is folklore that if you knit your spouse or partner a sweater, then the relationship will sour.  I knew this going into this project, but I knitted it anyway!  I mean, who really believes in that old superstition anyway?  The sweater certainly did outlast the relationship, but at least I was smart enough to hold onto the sweater! 

This sweater, I thought, would take me a few months to knit.  I typed out the pattern so I could read it easily and write on the paper.  Well, to make a long story short, it took over a year to knit!  With all that time invested in it, the boyfriend/husband/ex only wore it a handful of times.  During the piecing of the sweater, he had complained that it was going to be too tight, then I knitted side panels to extend it, then he complained that it was too bulky.

See why I kept it!

I had knit the side sections in moss st, then knitted the cables, and then the middle section was done in popcorn st.  This was very time-consuming and I had to pay attention.  So, watching TV while doing a project like this is not recommended.  At this stage, I would have considered myself an Advanced Beginner.  Only a beginner because I did not know how to seam very well.  You can notice the side seams where I added the extra panels.  For my first cable project, I impressed my Aunt and myself! 

Close-up of cables

I wear it on those few chilly days a year as a cover-up/jacket because it is too large for me; I wear it anyway and I love it.

My next cable project came years later and it was a scarf.  The pattern came from Family Circle Easy Knitting (now it is published through Vogue and is called Knit Simple).  I had a ton of extra Paton's Classic Wool (apparently, I overestimated my yarn requirements) and knitting it up with that.

The scarf was cabled along the bottom edge of each side but carried only three cables through the neck/body.  I was hooked from the look of the ends so I gave it a shot.  After the sweater, this was a piece of cake!

Cute, huh?

Oh, yes, and it had a rolled edge.  The original yarn for this pattern was a soft, fluffier mohair or something.  The end cables had almost a halo appearance to them.  I was being frugal, so no halo effect, but I really liked it anyway.  The side cable always rolls in.  I never blocked it, so that may prevent that from occuring.  Blocking is when you wet the garment either with a spray bottle or a steam iron, set it out flat, shape it, and place a towel with heavy items on it to "set-in" the shape.  It is effective method with sweaters, but not sure if it works on scarves. 

Ends are my favorite part!

My latest cable project was a skirt pattern from knit.1.  This is a hipper knitting magazine for the younger knitters.  The teens and early twenties knitters don't want the stuffy patterns of some of the classic knit magazines.  This is a nice choice for them.  I was in my late twenties when I subscribed and I can see that I would not knit half the patterns, but I enjoy looking at what people can create.  The skirt was knit with Lion Brand Fisherman's Wool.  The pattern had cables running diagonal throughout the skirt with a rolled hem/edging.

I see a color theme going on here...

I finished this skirt the Christmas before last, while visiting my sister in MA.  I have to admit, when I was done, I put it on and thought, "No way am I wearing this in public!"  Let's just say it was very form-fitting and I would need some leggings under it to cover myself up!  It did come out nice, I just am not confident enough to wear it as intended.

Waist cables are a nice feature

My beau and I had a holiday housewarming party and I thought, I want to wear that knitted skirt.  Again, I put it on and could not do it.  Then I got an idea, "What if I wore it as a shirt?"  Marisa from New Dress A Day blog does it all the time!  I threaded a grosgrain ribbon through the cabled waist, put a tank top underneath to protect my skin from the itchy wool, threw on a shrug and viola!  I skirt-top!

Last pic of the evening

It was a cute way to finally wear my knitted cable skirt.  I got several compliements, so I thought that I should've done this ages ago!  Along with my top, I also showed off my early Christmas present from my sister.  She sent it to me and told me to open it up and not wait until Christmas.  She surprised me with a cabled blanket!  I have been talking about knitting one myself forever and she must've got sick of hearing me say that because she did it!

So nice!

Isn't is wonderful?!  I have it displayed on the couch, but I actually have it in my bedroom at the end of the bed.  It has been in the 40's and 50's here in FL and this blanket is the perfect weight for that added warmth.  Even though my sister did not blog about it and take pics along the way, I had to feature it in mine. 
Thank you agian, Kathy!!! 
  
Cable close-up!


Sunday, December 5, 2010

Glitter Candle

Alright everyone, let me introduce you to my first guest blogger, Crystal.  She is from Rhode Island and is one of my very good friends.  We met through my first "real job" in Boston, MA.  When we first met, we chatted and found out that we were in the same Organic Chemistry class in college, but we barely remember each other.  Strange how paths can cross multiple times and then one day it clicks.  Anyway, I am very excited to host today's guest blog post.  Here it is:
So, it's Thanksgiving Eve, and I realize I need a hostess gift.  Being a Scrooge I didn’t want to spend too much and I thought about Nancy’s sentiment of giving hand-made gifts.  Now people usually “Oooo” and ”Ahhh” over various things I make.  While I acknowledge that I have some degree of skill I never feel totally justified receiving their praise.  Why?  Because I steal ideas from the internet or just follow a pattern.  The “art” isn’t really my own creation.  This time was different, I came up with my own craft and felt that it was worthy of a guest blog.
At first I got a really cheap ($1) candle.  It was gold and really pretty.  But when I took the wrapper off most of the gold came off with it.  They went back to the store.  Next I got a red/maroon candle from Target for about $2.

Plain 'ole candle

The next thing I did was to print a “D” for my hostess last name. I used Edwardian Script in Word with a font size of 150 bolded. I then taped it to the candle.
A "D" for Delicious (actually the Hostess' last initial) 

The next step was to use a utility knife to cut out the letter.  I would have used an Exacto knife but for some reason mine hides from me whenever I go to use it.  I didn’t gouge too deep, just enough to outline the letter.  I peeled away the black just so you can see but it really isn’t necessary.

Exacto, where are you when I need you?

At this point I was at a loss as for how to make a nice groove to hold my glue.  I wanted to create a kind of well so that the glue would just sort of flow into it.  I ended up using just a regular old pen.  Note that this chosen pen will get so waxed up it will never write again.  Hey, maybe that makes this a “green” project since you can repurpose a pen that just won’t write.  You know you have them in that junk drawer!  Anyway, I just get “writing” with the pen and digging out my groove.  It made a terrible mess which required me skitteling over to the trash to brush myself off.  Finally I went outside and shook like a wet dog; that worked.
The next pic is a little dark but I wanted to show how the etching looked.  Let’s pause here to say I am not a photographer.  I can’t take a decent picture to save my soul.

Etched out area

I then took some plain Elmer’s glue and very carefully filled in the little canals I had created.  I went through all the trouble of making these canals because I was afraid if I just wrote in glue that it would just fall off because of the waxy slipperyness of a candle.  I also didn’t think I could get the fancy contours of the line for the letter without some guidance.  It worked out pretty well.

Carefully fill in letter

I took some silver glitter and sprinkled it over the glue.  I was very generous but being Scroogey as I did it over a newspaper so that I could recover any un-stuck glitter. 

Crafting's not cheap, so save that excess glitter, ladies!

Here you can see how it looks after just shaking off the excess glitter.

Almost there!

Now you have to let it dry for a good while.  Then take a stiff, thin brush like this one...
Brush to brush 

...and gently brush away the random, spare glitter.  Now you have your finished product.  I think it is beautiful if I do say so myself.  I will feel great giving this gift and comfortable for once taking the praise I hope it will receive.

Beautiful, personalized gift!

Lastly, I want to say how much extra time it took to turn this project into a blog.  I am very grateful for Nancy’s hard work each week.  I had no idea how much it took to document a simple process.  Thanks for the blog and thanks for letting me guest!
Well, that was a great project, Crystal!  Thank you and you're welcome for being my guest blogger!  I love how the last pic has one glitter piece that is giving the little "bling" wink to everyone.  Let me know how everyone makes out with this clever project.
Anyone is welcome to guest blog, just email me and I can tell you what I need from you.  :-)

Sunday, November 28, 2010

Quintet Scarf

This is basically the Trio Scarf, but with, guess how many different yarns....five.  This installment of the scarves will be about attaching the fringe.  Another thing I loathe about knit or crochet patterns is that the pattern assumes that you know something about knitting or crocheting beyond your nose.  But sometimes, you just don't.  You just see something you like and want to pick up a pair of needles or a hook and start!  Practice is something that comes with time, how can you practice if you don't work on patterns?  So, in the Trio Scarf post, I simply stated "attach fringe" as a step to complete the scarf, but if you don't know how that is done, then the pattern is just dumb.  Trust me, I get it!

Let me start by explaining why this is not the Trio Scarf, but the Quintet Scarf.  The five yarns I used were out of necessity, not want, but I made the best of it (and my yarn stash).  First my MC (Main Color) was the wool that I mentioned in the Trio Scarf, with the all purple hues from South Company Rio de la Plata.  Did I mention that the Rio de la Plata is hand-dyed in Uruguay?  !Es fabuloso!  Then the second yarn was the rest of the Berroco Opulent FX.   I did not have enough of the Opulent FX to knit all the way through, so I knit it in the beginning then at the end.  My third yarn was Katia Sevilla in a silver color.  I said cream in my last post, but upon further inspection, it really is silver.  My fourth and fifth yarns were also novelty yarns.  The fourth yarn was leftover Berroco Jewel FX which is 94% Rayon and 6% Metallic.  It has a silver thread, purple thread with nubs and a blue thread with nubs all twisted together.  I used it in a felted purse project years ago.  Finally, my fifth yarn was a purple eyelash yarn.  I no longer had the wrapper label, so no clue of the brand.

If not "nubs" then what are they?

The eyelash yarn, I do remember, I bought at a yarn shop in Middleboro, MA called The Wool Patch.  It is the cutest shop built on the same property as the owners home, built like a rustic cabin.  The yarns are in wooden cubbies, baskets on the floor, hanks hanging from the wooden rafters and in an antique wooden hutch with the yarns popping out of the drawers and cabinet shelves.  In addition to the knit shop is a llama corral.  She only has a few, I believe, more as pets than shearing them for profit.  But I could be wrong.  Definitely check out The Wool Patch if you are in the area.  I don't see that they have a website, but they are on Facebook.  I included the link above. 

Like in the pattern in Trio Scarf, I alternated between these five yarns.  It gave a slightly different look than the Trio Scarf, but just as pleasing.  Ok, so now for the fringe lesson:

1. Cut fringe twice the desired length.  It will eventually be folded in half, hence twice the length.  I organized it by laying each set out because I knew I did not have enough Opulent FX to have two strands per fringe.  In the pattern, I used 11 sets of fringe for each end of the scarf.  You may add more or less, depending on how full you want it.  I put one strand of Rio (MC), one strand of Katia, and one strand of Opulent.  Then cut a few lengths of Eyelash (not too much, this can overpower the look), and a few strands of Jewel and randomly selected sets to add these to.  Not every set had an eyelash or a Jewel.

Eleven sets, organized in the order I will use them

2. Work on a flat surface and put project right side up (knit sts up).  Examine and plan out where the fringe will be attached by looking at the spaces at the end of the scarf.  This is usually the cast-on edge (alternately, bind-off edge).  I started with the very side-edge loop with the tail of the MC hanging.  The stitches may elongate as you attach, that is fine and will blend in once done.  I was able to count every other space/hole, using the knit sts space.  It doesn't matter where you put the fringe, as long as you are consistent, it will come out beautifully.  Insert the crochet hook from underneath into the hole you want the fringe to go.

Be consistent when choosing the placement

3.  While holding the crochet hook in one hand, take the first set of fringe in your other hand and find the center of the length.  The center, place in the crochet hook.  Use a big hook, it will give you the deepest notch to hold all the strands.  You may have to hold the yarn tight in the hook to prevent from losing it.  Move the crochet hook with all the strands from the front to the back until it is about half through (called, "pulling it through").  Once through, maintain the center, drop the crochet hood and place your fingers through the hole/loop that you have created (where the crochet hook was).

Make sure all the strands have made it through the space

4.  Once your fingers are in the loop you have created, take the tail of the fringe with the fingers that are in the loop and pull through.  Now with both hands, tighten and adjust the fringe so it fits snug against the scarf hole.  One fringe has been added.

Hooray!  Only 20 more to go!

5. Add the remaining fringe evenly across the edge.  You have the freedom to add as much as you want or as little as you want.  I wanted a full look, sort of chunky looking.  If you feel like it needs more bling, then in the spaces in between the existing fringe, add a few Katia strands or other shiny yarn.  I added extra teal Katia to the Trio Scarf.  I felt like the silver shows up very well and did not think more bling was needed.

I love the mixed look!

Now that you are an expert on fringe, repeat on the other end of the scarf.  You can leave the ends a little ragged, with the fringe uneven, or you can choose to snip them all the the same length.  Just be careful if you are the straight-edge type and make sure that you are cutting an even amount off.  You don't want what happened when you tried to cut your bangs when you were a tween and one side ends-up shorter than the other side, then you try to cut the longer side to match the short side and then that side is shorter and then you go back and forth before you realize you need a stylist to cut your bangs even again, now that there is only two-inches left.  But in this case, you can always "grow" new fringe, unlike your poor bangs, which will take a month to grow out.

Ragged-Edge all the way, baby!

So there it is, the Quintet Scarf.  I did not measure the full length of this scarf, but I'm sure that it is taller than I am.  What else in the world can you wear that is taller than you?  That is why I love the scarf and I hope that you love knitting them too.

Sunday, November 21, 2010

Trio Scarf

I am starting to think of Christmas.  Yes, I want to actually complete Christmas shopping / making homemade gifts before Christmas this year.  For my homemade gifts I always have the greatest intentions, but I either bite off more than I can chew or start too late to finish them.  There are countless projects that I have thought of but could not get the materials in time or projects that I have started only to determine that it was a flop.  Don't get me wrong, I do get to complete a few homemade gifts each year, just not all the ones I think up.

This year I want to accomplish homemade gifts within my skill set.  Oh c'mon, you're saying, where's the fun in that?  There is plenty of fun in that because it will be me actually finishing projects and giving them as gifts to wow the recipient.  I'm sure you have found by making a homemade gift yourself that when someone realizes that it was homemade, they have a new appreciation for it, and for you for taking the time to make something for them.  I intend on not going crazy with large or expensive, but with something simple and under $20.  Although, I do have to admit, I don't think I am making anything for the men on my Chistmas list.  It is a bit much to make something for everyone.  So, it will just be the women/girls on my list this year.

The first thing that I have completed is a trio scarf.  This scarf is knit with three different types of yarn for a mixed textured look.  I got the idea when searching through the free patterns on the Berroco website.  They have hundreds of free patterns and you can download them without having to give your email address.  The pattern is a simple 4" wide, 6' long scarf with long fringe.  I went to my local yarn store, Knit 'n Knibble, and found some really cool yarn.


Yarn Elements


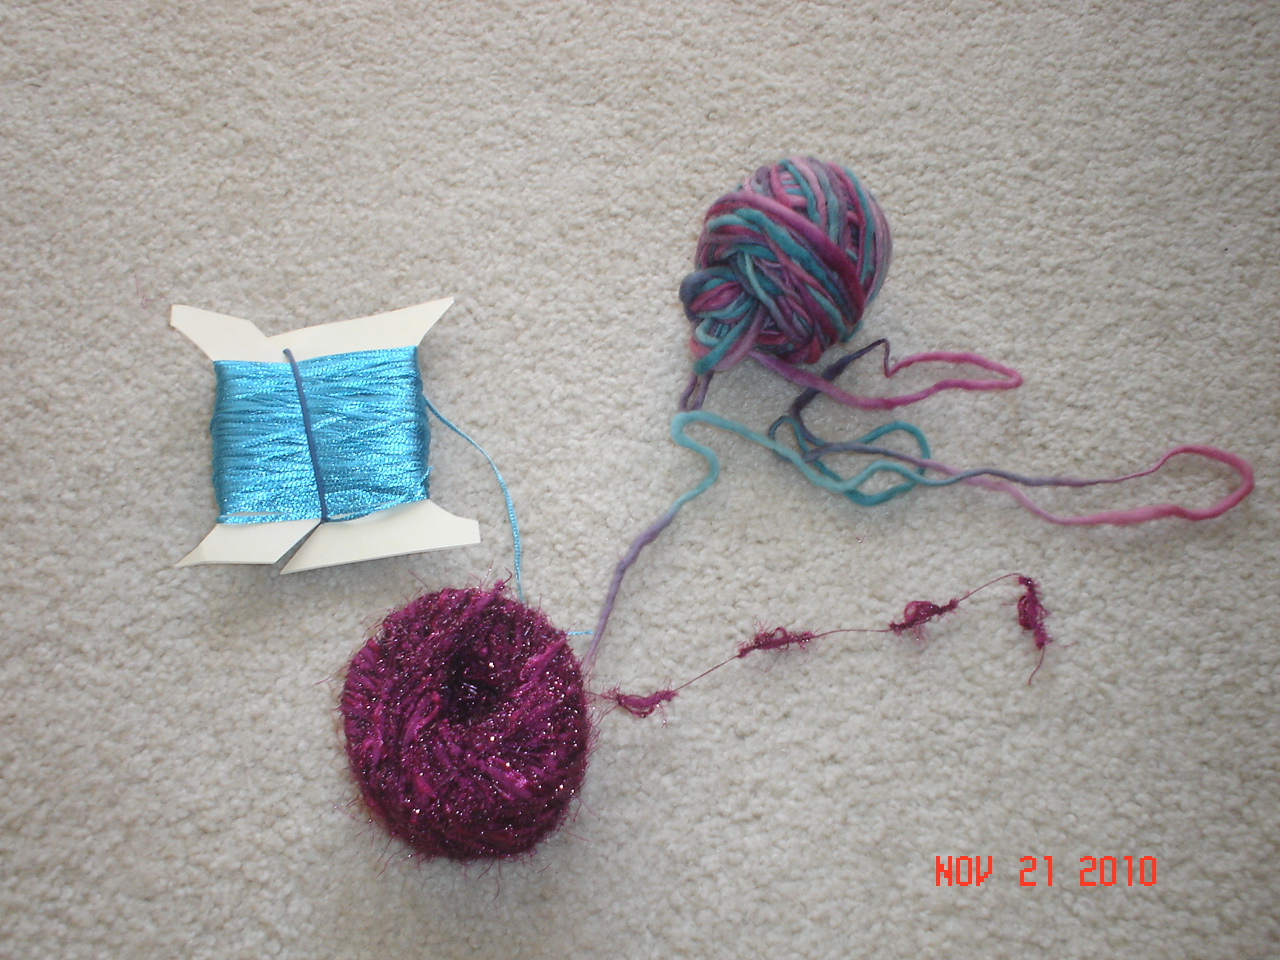
The teal colored yarn is Katia Sevilla, it is 100% nylon.  This yarn came on a cardboard cylinder like the purple one, but it was so slippery, that I had to wrap it on a makeshift spool or it would get tangled on itself.  The purple metallic yarn is Berroco Opulent FX and that is also 100% nylon.  Those yarns are considered 'novelty yarn.'  You normally mix these types in with another yarn, they are not normally worked up on their own.  They are what give plain cotton or wool yarn a pop.  The main yarn is South Company Rio de la Plata, it is a thick-thin kettle-dyed 100% wool.  This yarn I selected first and then the novelty yarn to match.

I tried the pattern as written and did not like it.  It left huge ladders on either side and it rolled alot.  I also was not achieving the recommended gauge on size 13 needles.  This is just a scarf and gauge is not a deal-breaker, but it will affect the look of the scarf.  I ended up using size 17. 

Too skinny!  Needs more fat!

This should be 4" wide and I was getting 3" on a 13, then 3.5" on a 15, then finally 4" on a 17.  Geesh.  After all that, I knitted several inches was when I saw the ladders and the rolling.  So I changed the pattern a bit to:

Cut fringe by measuring out 22, 18" length set of the main color (MC; cotton or wool) and another set of 22, 18" lenghts of the novelty yarn (B) (I did the teal as B)
Cut additional fringe by measuring out 42, 18" lengths of the other novelty yarn (C) (I did the purple one as C, since the purple yarn is not uniform, I cut double the amount)
Cast on (CO) 12 sts with the main color (MC) on a size that will give you a width of 4"
R1: k1, p1, repeat to end
R2: p1, k1, repeat to end (this is a seed st or moss st)
Repeat R1 & R2 one more time for a total of 4 rows
R5: k1, p1, k1, k6, p1, k1, p1
R6: p1, k1, p1, p6, k1, p2, k1
Repeat R5 & R6 until about 4" has been knitted
Pick-up one of the novelty yarns (B) by hold both the MC and B tog and repeat R5 & R6 until about 4" has been knitted
Drop B and pick-up the other novelty yarn (C) and hold with MC and repeat R5 & R6 until about 4" has been knitted
Switch between holding B with MC and holding C with MC until it is the desired length.
Repeat R1 and R2 for a total of 4 rows
Bind off
Applying the fringe: Take one length each of MC & B and two lengths of C
Evenly attach these four strands as one to the end of the scarf with a large crochet hook.  I put 11 sets of fringe on each end.  I also left the tail of the CO so it will mix in with the fringe.


Cut fringe before you start knitting


Yes, this still had a roll, but not as bad as the original design.  Maybe that was the charm of the original design.  I added the seed st in hopes of avoiding the roll, but it didn't work.  I did avoid the ladders, though.

Shimmering in the light

This scarf worked-up quick.  I knitted while watching tv, carpooling, and waiting to leave work.  You can literally knit this scarf for miles!  I ended it after 6 feet (not including fringe).   Here it is complete:


I love the colors!

I am pleased on how this came out.  I still have yarn left-over.  Maybe in my free time I will knit up a child scarf with the extra [insert biting-off-more-than-I-can-chew statement here].  We will see.  I plan on knitting one more scarf like this but the MC has all purple hues.  Instead of the teal, I have a cream from Katia and will use the left-over purple novelty from Berroco.  These will be given as gifts, even though I am loving this scarf.

Can someone make me one?!?

Maybe I can put this on my Christmas list and get one too!  I gave you the pattern, so get knitting!  I have lots of extra yarn from past projects, maybe I will make another mixed scarf, but when I do that, I will keep it.  Yeah, right!  No, I mean, of course!  This blog is about completing projects, so, yes, I will make one for myself.  It just might not be until next winter. 

It is worth learning how to knit or crochet.  Even if all you make are scarves or potholders, it is something to be proud of!