Monday, May 30, 2011

Fix It - Skirt & Tank

Happy Memorial Day!  I had big crafting plans for this long weekend and I ended up doing none of them!  Hey, everyone needs a do-nothing weekend once and awhile, right?

Alterations are never very high on the sewer's to-do list.  I have a huge pile of to-do's that I never can find the time to fix.  So, since I was lazy this weekend I figure I would look in my cache of pics to see what I have done recently and I found a white denim skirt and a blue tank top.

First the skirt.  I bought this at Goodwill for less than $4.  It is a J.Crew white denim skirt that has a normal waist.  By normal, I mean not the hip-hugging, low-rise style that gives anyone who is a few pounds above their "desired" weight muffin top.  I have my fair share of low-risers, but I was glad that this one is one that I do not have to suck in my tummy to wear comfortably.

White denim, so 90's!

There is actually nothing wrong with this skirt, but since I only paid a few bucks for it, I had no buyer's remorse wanting to make it a bit more chic for the summer.  The bottom hem has a roll to it and I know that I will have to break out the iron every time I wear this.  Not very grab 'n go if you have to take the ironing board out in the morning.  I have frayed the ends of skirts and jeans before, so I was leaning towards that direction, but I did not want a mini either.  The length of this skirt was good as it was, so I decided to unstitch the bottom hem and unfold it.

Carefree, here we come!

The unstitching was a bit tedious, but not too bad.  I took a standard seam ripper and went all the way around the bottom hem of the skirt.  Then I unfolded it, like you see above.  You can also see the the raw ends are already fraying: Perfect.

When you unstitch something, be patient.  You will have to break the thread several times and pull out the tiny lengths with you fingers or tweezers, but you will be rewarded in the end with no rips or holes.

Orts of threads

Once it was unstitched and unfolded, I took it over to the ironing board and ironed it with steam and starch.  I knew the folds were not going to iron out, that is why I went this route rather than lopping off the bottom hem.  This way, it gave the skirt a meant-to-do-that deconstructed look.  Done!

Ta-da, Starch!

Next came the blue tank top.  This is a sale rack, Forever 21 purchase.  The straps were very long, so I had to shorten them.

Soon to be stunted straps

I prefer to alter the backs of items, rather than the fronts, so that you do not see stitching or other imperfections, in case the thread does not exactly match or an otherwise "oops" happens.  I took the same seam ripper and unstitched the back straps. 

Mark where they came from with a pen

I marked where they originally went so I could affix them in the same location.  I pinned it in place and tried it on.  I did this until the straps fit well.  These straps were originally placed at an angle so I wanted to ensure that the same angle was pinned.

Look how long the straps were!

Since the band gong around my chest was elastic, I installed a ballpoint needle on my machine.  I did not bother with a zig-zag because I was not sewing around the circumference, just an inch or so.  The elastic will still be stretchy around the rest of the top.  This is not fabric that will fray much, so I did not finish the edge, after I cut the extra length off.  No one will see it.

Perfect criss-cross angle!

This ensemble was less than $10 and it is very comfy!  Just a little bit of stitching skills and you can decontruct and alter someone else's cast-offs to be unique to you.

Plenty of daylight left to enjoy!

I have worn both of these pieces since I fixed them at the end of March and am truly satisfied with how they came out and how they wear.  This skirt will fray more as I wash it.  I will trim away the excess long threads, but you can keep them there and that will give it an even more casual look.

Try looking in your donation pile of clothes and see if there is something that you can tweak about them that may make them wearable to you again.  It doesn't even have to fit, you can totally cut it up and make a headscarf or a fabric belt.  Or if it has a stain, consider dying it a darker color or try tie-dye. 

Let me know if you try a Fix-It project of your own!  Happy Deconstructing!

Sunday, May 22, 2011

Glace Shrug - Part 1

My knitting has taken a backseat in the last month or two and now I am ready to pick-up my needles again.  Here is a UFO (Unfinished Object) that I had pulled out of my organization session back in Craftolution Update - Organize post in March.  Originally, it was to be a spaghetti strap tank top knitted out of Glace from Berroco.  It is a 100% rayon ribbon.  It is also discontinued, so I cannot purchase this yarn any longer.

Rescued UFO

I was knitting the green colored tank in the booklet you see in the picture above.  The pattern is called Daniela.  I loved it.  Now, the history behind this tank top, and why this post is called Shrug and not Tank, is that I attempted this pattern two times over the course of the years.  It is not that it is a difficult pattern, but just a myriad of mistakes I encountered along the way. 

My first attempt, I was fairly new to knitting and wanted to knit a "real" project that I would wear.  It started fine, I did my gauge swatch, and was almost done with the front half and I fumbled when I was shaping the arm and top.  I was supposed to be shaping the arms and dealing with the neck at the same time.  I read the pattern as if you do them at separate times.  So, I put it down until I could figure out how to undo what I did and get back on track.  Meanwhile, I really needed the size needles that where on this project for something else.  I ended up taking all the stitches off and just leaving them thinking that I will rip out and fix the top.  That never happened.  I just ripped it all out and started new.

My second attempt I started and knitted about 4" and put it down.  I was bored with it.  I then recently picked it up and thought about finishing it.  I took stock of the yarn I had and thought that I needed about 7 or 8 balls for this tank and I only had about 5 or 6.  Something was missing.  I did not want to continue with this pattern if I didn't have enough yarn.  That would be the ultimate worst feeling of getting towards the end and realizing that you don't have enough yarn, while the yarn has been discontinued.  So, I went searching for another project.

I chose a pattern from knit.1 magazine (which I think has been discontinued too, what's going on around here?) from Summer of 2007 called "Moss Stitch Bolero."

New project

I like how it ties in the front, rather than just having sleeves and open front.  The only thing is, is that I may not have enough yarn to do the sleeves.  So my hopes of a shrug may be a sleeveless shrug.  Can I still call it a shrug if it has no sleeves?  Well, I'm going to anyway!  The shrug/bolero has a crocheted edging, a nice touch.

For me to do this project, I have to unravel the tank top again.  As you may see in the first photo, the yarn balls look a bit tangled.  Well, they are very much tangled!!  I had just thrown them together in the bag.  Yikes, what a mess.

Takes 5 to Tangle

Only one ball is attached to the tank top, but yet 5 balls of yarn are tangled.  Here is a close-up of the rat's nest that I must untangle before I can start my shrug.

Maybe just a Mole Nest, not too bad

Once they were separate balls of yarn again, I now had to unravel the knitted part.  When it is unraveling, it stays kinky for some time.  There is no one way to get out the kinks.  Some natural fibers stay kinked until you wet it and wrap it in a ball until dry.  Since this is a rayon yarn, I did not know what to expect.

Kinky Kinky!

I did not wet it but tightly wound it back into a ball.  Since the others had been wound since my last attempt, I was going to let this ball sit and I will use the others to start with. 

The main stitch in this pattern is the moss stitch or seed stitch.  It is k1p1 across the row, then on the next row it is p1k1.  You repeat knitting the purl sts an purling the knit sts to make the pattern.  It is easy, but it is time consuming because you are pausing in between each st to reposition the yarn either to the front or to the back.  It creates this pebble look, where it is not all knit nor all purl.  It is a nice texture to look at.  Below is a close-up of the seed st.

Seeding along

My plan with this is to knit the back, then the two side front panels.  Then I will see how much I have left to do the sleeves.  I may just make this sleeveless and crochet the edging on the arm holes and have a sort of shrug-vest that ties in the front.  I could also make cap sleeves, so there is something there, but that would mean that I would have to make-up something as the sleeve.  I'm not good at that in the knitting world.  This would be going out of my comfort zone, but maybe that is what I need.

Current status

This is what I have worked up so far.  This is the back and I have started the arm hole shaping (the part at the top that tapers inward).  It is looking good and I'm proud that I'm actually rescuing a project from the dooms of the deep dark basket in the closet.  So far I have used only 2 balls of yarn, by my calculation, I may not have enough to do even cap sleeves.  I will crochet the edging along the neck and bottom and see what is left over.

Stay tuned for Part 2, which hopefully will be before I go on vacation in late June.  I would like to bring this with me. 

Does anyone out there recently completed a UFO??  If not, save yourself a few bucks and finish it.  It will keep your money in your pocket a little while longer than if you went out and bought materials for a new project.

Good luck (and wish me some too)!

Sunday, May 15, 2011

Lucky Star Key Chain

This project was done in a couple of hours, for that is all the time I had allotted.  Since I have been doing all of the Sweater Purses, they have created a lot of scraps that I have been collecting in a bag.  So this project is a scrap project.

Here are the items I will use to make my key chain:

Scrap-a-plooza!

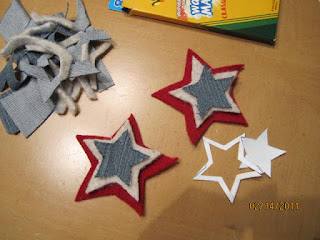
I had printed out a star shape on paper and cut it out, then had denim, pink and gray sweater scraps.  I used washable marker to trace the star on each scrap.

I'm not above tracing, no freehand for me! 

I can't draw to save my life, so I had to trace if I wanted my shape to even resemble a star.  Plus, a star is an easy shape to cut, no rounded edges or fine detail.  Once traced, I then cut them all out.  There are two of each because I will be making this double-sided.

Fourth of July scraps

I cut them all out the same size and then determined what order I would stack these in.  I really liked how the denim looked on top when I did Sweater Purse 3.0, so I decided, Pink, Cream, Denim.  I took my paper star and drew lines about a quarter inch in with a ruler (yeah, I can't even draw a straight line without help) and trimmed it.  Then I retraced the cream stars and trimmed and repeated again another quarter inch in and trimmed the denim stars.


Second round of tracing
 
I totally have Lucky Star from Madonna in my head right now.  I heard she refuses to play her old stuff at concerts, is this true?  I've never been to one of her concerts, but I had heard a rumor that she would charge the venue extra for her to play songs like Material Girl and Lucky Star.  I love those songs!
Anyway, back to the trimming.  I trimmed out all the stars so there are a total of six (6) stars.  I then stacked them to ensure that was what I wanted.

Star stacked action

I thought it made sense to sew from top to bottom, so I sewed the denim to the cream then the cream to the pink.  I did the sets separate.  While I was sewing and thinking that there must be a better way to do this (they were not staying straight for me and so the stars came out a bit skewed), I snacked on one of my favorite snacks: Toffifay.

Yummmmm

Toffifay is described as a caramel cup with a whole hazelnut dropped into, then a chocolate hazelnut filling covers the hazelnut and then it is topped with a drop of chocolate.  I love these!  Vince's mother eats these and I had never heard of them until she got me addicted to them.  I can find them at Walgreen's and Joann's (strangely enough).  Joann's sells them in a package of four, while Walgreen's sells them in a package of 15 (often at a buy one, get one free).  Try them!!!

Again, I digress!  The stars are finally sewn together.  Like I mentioned above, they are not aligned as I had imagined and are a bit off.

How do you read unaligned stars??

I did not like that so much pink was showing; it also made these really large.  I trimmed the pink to the cream star.

Much better!

Now that the stars are stacked and trimmed I then put them back-to-back and took needle and thread and hand stitched them together with a whip stitch.

The Stars Unite!

Once the stitching was done, it was time to make this a key chain.  In my kit of rivets, it contained some colored ones, rather than just silver or gold.  Luckily, there was a red one.  Vince did the honors of punching the hole and affixing the red rivet into the star.

Riveting Star

Once the rivet was attached, then I took a key chain and attached it to it.

A star is born!

This was a quick project, but I think that if I were to do it again, I would do it differently.  I think by cutting out all of the pieces ahead of time, that left me with little to hold onto while I was sewing them together.  I would try cutting out the smaller one first, then sewing that onto the next one, for me it was the cream.  Then cutting the cream out based on the lines of the denim.  Do the same for the cream on the pink. 

When I gave this as a gift, she said, "How did you know I love stars?"  Funny, they were an easy shape. :-)

If anyone tries something like this, let me know what worked for you.  Thanks!

Sunday, May 8, 2011

Off-the-Shoulder T-shirt

This project was inspired by my enthusiasm for UFC and a particular MMA fighter, Georges St-Pierre (GSP).  Yes, it is true and I do not hide it, I like watching cage fighting!  Atypical for a knitter and sewer to enjoy a little violence?  Maybe, but just be sure that you can never judge a book by its cover!  Ha, ha.

If you do not know much about UFC, it stands for Ultimate Fighting Championship and it is a fighting association and MMA stands for Mixed Martial Arts which is a collective term for various styles of martial arts, such as Greco-Roman wrestling, judo, boxing and jujitsu (many more, but you get the idea) combined together to make one sport.

Now, the point of this project is to honor my favorite fighter, GSP.  He is from Montreal, Canada and has been fighting in UFC since 2004.  He is currently the Welterweight champion and every fight he fights, is to defend his title.  In short, he rocks!

Ohh la la!

Anyway, enough ogling over him and back to the project.  Last Saturday night on Pay-Per-View he fought against Jake Shields and he defended his title (although, admittedly, it was a bit boring, but still a good show).  So I wanted to make something with the letters "GSP" on it.  I have been liking the off-the-shoulder style that is retro-ing back from the Flashdance days.

So, I went to a thrift store in Tampa and bought a red t-shirt for $1.50.  With this t-shirt I cut the edges off and trimmed the neckline.

Chopped!

Now, something to keep in mind when you trim the neck to be off-the-shoulder: trim little by little.  Start with trimming the neckline midway on the shoulder (halfway between the neck and the sleeve seam on the shoulder), following the curve of the neck.  Try it on then adjust the one shoulder you want to hang off gradually.  You can cut too much.  You might want to try it on a junk t-shirt first.

For my lettering, I went online and pulled up an alphabet in a font that I envisioned.  It didn't want it to be too fancy because I have to cut them out with scissors.  Once I chose my font, I increased the zoom on the screen to 400%.  I took some tissue paper (not just for gift-wrapping!) and pencil and traced the letter from my computer onto the tissue.  I did this for a G, S, P and a fleur-de-lis.  Since he is French-Canadian and he has a fleur-de-lis tattoo on his calf, I figured I'd go with it.

Trace letters to use as a cutting guide

Once all the letters and symbol were traced, I took a junk t-shirt and pinned the tissue-paper letter to the t-shirt.  I will sew these letters onto the front of the red t-shirt.

Gimme a G!  Go GSP!

I cut along the penciled letter and then repeated it for the other letters and my symbol.  Once they were all cut out I arranged them in different ways to see what would look best.  I just chose the simplest layout.

That fleur-de-lis was a pain to cut out!

I placed the G on the red t-shirt first and pinned it.  I wanted it to look like a varsity jersey with the letters curling after washing to give it a broken-in look.

I sewed just on the inside of the perimeter of the letter

I sewed each letter and the symbol as in my original lay-out and viola!  Fini!

J'aime GSP!

I was still in my pj's when I completed this, so I will model without showing my head (trust me, my hair was a mess)!

Bed shirt or can I wear it in public?

Not sure if I will wear it out anywhere, but it is comfortable and girlie.  Now, does it look like an 8th grade Home Ec project...Yes.  Do I love it anyway...Yes!  I am considering Be-Dazzling it, but not sure.  I will post-script a new pic if I ever get around to it!