I love Halloween. It is one of my favorite holidays because you get to dress up in something ridiculous or be bolder than you would be on a normal day. I think of it as a challenge each year because I am putting my creativity out there for people to see. This year is my year to become a cartoon character. For my character, I need a brown or black bob wig, black-rimmed glasses, orange sweater, red skirt, orange knee-high socks and loafer shoes.....can you figure out who I will be? Well, I'm not telling you yet, you will have to wait and see. This costume took a few weeks to prepare, so here was my journey:
 |
| Part I - The Skirt |
I started with the skirt. I knew I was not going to find a skirt that was plain enough and had the pleats I desired. So, about a month ago I started looking in the Joann's flyers (sale circulars, for those of you that are not from Mass) for when McCalls, Butterick, or Simplicity patterns go on sale for $2 or less. By doing this you save SO much money because the patterns retail for $15 or more. The pattern I chose was $0.99 (sweet!!) and I used a coupon for the fabric. I did buy the thread and elastic for the waist, but the total for the skirt was still under $8.
 |
| Sewing the hem on the skirt |
I just followed the pattern, so I will not bore you with the steps. It is an elastic waisted full pleated skirt made out of lightweight corduroy fabric.
 |
| I'm loving elastic! |
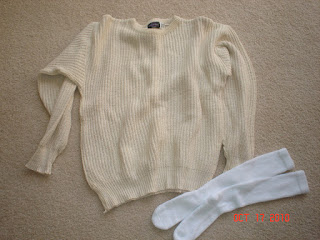
Next on the checklist was an orange sweater and knee-high socks. Now, it is Halloween and one could possibly find the orange knee-high socks, but an orange sweater??? Doubtful. I was keeping an open mind when I went yard saleing these past weeks. I was looking for anything that I could somehow make into this orange sweater. I found this:
 |
| Part II - The Orange Sweater and Socks |
This is a cream-colored cotton men's crew neck sweater with Dr. Scholl's therapeutic knee-highs. I bought the sweater at a yard sale for $0.50 and the socks new for about $4 (twin pack). If you have never tried on circulatory socks before, I encourage it. They are SO comfortable and soft; I just had to "break them in" before moving on to the next step. I may have looked funny lounging around the house with socks up to my knees, but they were cozy! Let me know if anyone wants a pair for Christmas...I'm definitely bringing these to Mass when I go up for a visit in December.
Since the sweater is cream-colored, I thought this is the perfect opportunity to try out
RIT dye! I had never dyed anything before in my life and I always like a challenge, so I went for it. I have a front-loading washing machine and I am renting, so I decided that dying the items in the machine was not an option. The package gave a few options: 1. Washing Machine, 2. Stovetop Method, and 3. Bucket Method. I chose the bucket method because this sweater was not fitting in my stockpot!
 |
| Cat Litter Bucket-O-Fun |
The directions were to add hot water to a bucket, add the powder packet to about 2 cup of hot water in a separate container, then add the dye to the bucket. Then soak the garment(s) in water then add to the bucket with the dye and agitate for 10 to 30 minutes. After about 5 minutes, I felt like I had been standing there forever. My beau was helping me with this part of the project because he knows I have no patience. God love him! The sweater was done in about 15 minutes, but the socks took a second packet of dye and another 20 minutes. This is because RIT recommends natural materials like cotton; the socks are polyester. After this step, then you rinse the garment in cool water until the rinse water is clear. After about 12 buckets of rinse water, the water was still a light peach color, but considerably lighter then the first few rinses. Then the sweater and socks were put in the washing machine with detergent and dried normally.
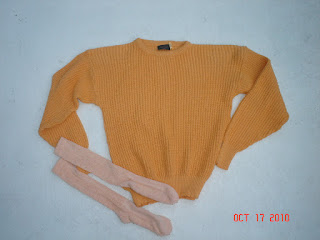 |
| How awesome is this sweater??!! |
I was very pleased with the sweater, but a bit dimayed with the socks. I got over it quickly. This is only for Halloween and nobody will even notice once everything is on. Now that the sweater is orange, I am not stopping there. This is not the style of my cartoon charater's sweater; she wears a turtleneck. I want to stay in character, but this is Florida and I don't want to wear a long-sleeved t-neck in 80+ degree weather. I decided to have a little fun with the scissors.
 |
| Cut and Butterflied |
I left about 3 inches to the sleeve on the sweater and then cut up the length of the arm to open it. I will use one of the sleeves to make my mock cowl-neck. As for the existing sleeves, I took some leftover elastic and made the sleeves gathered and puffy.
 |
| Puffy-sleeve action |
I used a ball-point needle and a zig-zag stitch since this is knit and wanted to maintain a bit of the stretch that the knit ribbing gives. Once the sleeves were done I had to be creative in how to finish the neck. A t-neck would be too hot, but I did not want to necessarily do anything to the back of the neck area either. I decided to attempt a cowl-neck. I pinned and re-pinned several times and did not like it. I then decided to try an 80's neck style. Since I already had the puffy sleeves, might as well go for gold.
 |
| Had to bring in the big guns - Quilting pins! |
I cut off the cuff of the sleeve (did you see how long and tight they were? I could not figure out how to work with those). I unstitched the neck and shoulder seam on one side and pinned in the cuffless end, folded. I resewed the shoulder and neck seam. So, the sleeve was hanging out of the shoulder, in a way. I then pinned the length of the arm to the front neck area, as seen above. I had to break out my flat-head pins I use for quilting; these pins are long. I gathered it at the neck so the end of the sleeve would meet up with the other shoulder seam.
 |
| Orange you jealous of this classic nugget?! |
Anyway, the look I was going for was cowl-neck with the side buttons. I did not have three buttons, or even two, for that matter, that matched to pull that off. I was going to leave it like this, with the raw edge, but when I modeled it for my beau, he asked me if it was finished. Ack! So, I had to do something with it. I had a large skirt pin that I gathered the raw end with. What do guys know about 80's fashion anyway? This was coming from a guy who admits to wearing MC Hammer pants in the late 80's...
I purchased the bob wig for $6 and black-rimmed glasses for $5, new at the store. For the shoes, I had a pair of weathered chunky heel loafers that I had in mind for this costume. Here it is all laid out:
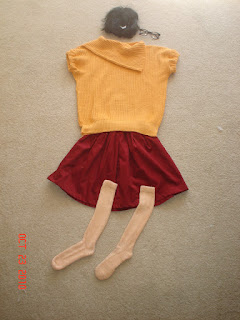 |
| Jinkies! Any guesses? |
We are allowed to dress up in costume at work for Halloween. So, this past Friday, I donned my costume and grabbed my prop and went to work. Everyone had a good laugh...
 |
| I'm Velma Dinkley, Gang! |
I won for Best Costume...Yeah me! I would like to thank the lady at the yard sale for parting with her husband's old sweater, the little girl who sold me her Scooby Doo stuffed animal at another yard sale, also Dr Scholl's for making a comfortable sock, and .....
The total cost for this costume was under $25! So, what do you think? Also, let me know what you are going to be or were for Halloween. Send me pics!!


