Sunday, March 27, 2011

Lace Dress Repair

I bought this dress to attend an outdoor wedding.  I loved how it had the lace and the satin band, empire-style.  When I saw it on the rack at Forever 21 and tried it on, I noticed that there was a section of lace by the top edge that was frayed and had come unstitched.  I bought it and got 10% off because of the frayed lace.  No problem, I can fix that.

Lace Dress - Before
I tried it on again at home and was thinking that it was a bit short for a wedding, in my opinion.  I could have left it, but instead I wanted to sew ruffled satin on the liner hem.  I wanted to give it the look where the liner or lace peeks out from under the main dress.  First, I needed to attack the frayed lace.

This fray saved me $3!

I tucked the fray strands inside the lace and arranged it so it lined-up with the rest of the lace seam.  I took a needle and thread and sewed along the lace seam where it was once attached.

Good, old-fashioned darning!

I knotted the thread so it was under the lace, to keep it hidden.

Seamless - Can't even tell!

Then I bought a length of satin at Jo-Ann's to add my ruffle edge.  I measured the circumference of the liner edge and then multiplied it by 3.  Creating ruffles takes alot of fabric, so the equation could be anywhere from 2.5 times to 3 times the length of the garment the ruffle will go on.  Based on that I had to cut quite a few strips of satin.

Satin ready for cutting

I wanted to have the ruffle folded at the bottom edge, rather than hemming the edge.  This meant that my cut strips had to be about 6 inches wide, so I could fold it in half.  I bought enough fabric, so I could cut plenty in case I made a mistake.

Cut strips (these are folded here to make cutting easier)

Once I had my strips cut, I went over to the sewing machine and sewed each strip, end to end.  This is a technique I learned in strip quilting.  This created a very long strip.  Then I ironed the seams open and folded wrong-sides together in half, matching up edges.

Use low setting on iron and keep going over the fold.

I then lifted the lace part and started pinning the satin to the hem of the liner.  I used my mini measuring tool to create my ruffle evenly all the way around the dress.

I left the fray, but I would have serged it if I owned one.

The liner was pretty lightweight, so I pinned the ruffle so it lined-up with the liner hem.  The weight of the satin flipped the ruffle so if was turned down.  It worked out, that is all that mattered to me.  I'm sure there could have been a more proper way to do this, but I couldn't think of it at the time.

Once I made it all the way around, I worked it so the end of the ruffle was tucked into the beginning.  I then sewed that hole closed.  I then sewed the pinned ruffle.  I had my fingers crossed that it would work out to how I envisioned it....

Viola!  Me at the wedding!

It was perfect weather for the wedding.  The ruffle was just as I had hoped it would turn out.  It added about 1.5 inches to the length.  Still a bit short but I loved it anyway!  I also bought my cameo and pearl necklace from Forever 21.  It is a great place for accessories.

The newlyweds had a table of various succulent plants as the wedding favors.  The table was so beautifully arranged.

I loved the bell jars!

The wedding was outside and the reception was in a converted stable.  Very well done along with the sangria flowing like water!  Let's just say, the sangria was very tasty!  Did I ever mention that I love sangria?  Bottoms-up!

Sunday, March 20, 2011

More Shirt Skirts

Another thing I like to make that are so easy is the Shirt Skirt.  I made one last year and it is my bi-weekly rotation of either pjs or hanging around clothes.  I followed the basic steps that I did in an earlier post (Shirt Skirt) but changed it slightly.  Instead of an elastic waist, I used a shoe string and instead of sewing all the way to the bottom of the front, I stopped just under the second to last button to give it a slit in the front.  Keep reading and I will show you....

I made four skirts but I will demonstrate on one shirt to show how I made the others.  My first shirt came from an estate sale for $1.  I think it was bought in Hawaii because not only did the brand tag say Tailor Hawaii, it was essentially a Hawaiian shirt.

Aloha Mr. Shirt

This shirt also had some cool buttons:

I wonder what those symbols mean?

The first thing I did was iron the shirt, but I didn't worry about the sleeves.  Then I unstitched the pocket on the front and set it aside.  Then I laid the shirt out on my cutting mat and lined up the bottom hems.  I took a rotary cutting ruler (a yard stick or long ruler would work)  and used a rotary cutter and cut it from armpit to armpit - straight across.

A shirt, shoestring and thread is all we will need

At this point, I no longer need the top part of the shirt for the skirt.  I will put it in my scrap bag, because you never know when this will come in handy (I love buttons, so I take off all of the buttons and keep them in a jar).  Now, I am only working with the bottom portion of the shirt.  I am now calling this the skirt.  The top button on the skirt was removed and I also removed the buttons that are often found on the inside towards the bottom.

I pinned the bottom skirt front closed and sewed down the front along the button panel.  At the last button, I went about an inch further and stopped and stitched across to meet the stitching on the opposite side of the button panel.

I went back to the iron and ironed my drawstring casing by folding in about 1/4" and then about an inch.  I pinned it so when I sew, it will sew the 1/4" hem, making a casing.  Before I went and sewed, I unpinned the front area and figured out where the drawstrings were going to come out.  I made marks so I could make button holes.

I used chalk to mark my guidelines

I should mention that on this skirt only, I had to flip it around so the bottom was the top of the skirt.  There was something strange about this shirt bottom that made me do it; I can't remember why though!

Anyway, before you sew the casing, you need to make the buttonholes.  My sewing machine has a buttonhole guide thing so it was a snap to do.  I made two on this skirt, but the other skirts I only made one.  One is really all you need.

Cut the buttonhole open with a seam ripper

Now that the buttonholes are made and cut, I sewed the casing as I had it pinned before.  Once the casing was made I went and sewed the pocket on the front of the skirt.

I'm right-handed, so I like my pocket on the right-side

Now, I have this gadget that threads string and such very easily.  I got this at a very small store in my hometown called Goldstein's (which is like a 5 & 10 store) and I have no clue what it is called.  But, I'm sure Joann's has something similar.  I attach my shoestring (really it was a boot string and I got it in a really long length) to this gadget and threaded it through until I reached the second hole and pulled it all the way out, holding onto the first end of the shoestring so it does not get pulled all the way in.

Shoestring was a-go!

Once the shoestring is in place then I had to hem the bottom (of this skirt only).  The button that I took off earlier I attached it to the bottom button panel where it logically would be on the shirt.  It went in the slit area.  I then made another buttonhole for that new button.  But it is for looks only, I do not intend on buttoning it.

All done! Now it is Aloha Ms. Skirt!

That evening we went to a birthday dinner at the Melting Pot, which is a fondue restaurant.  I got compliments on my outfit, which I said, "Thank you very much, I made the skirt today from a man's button shirt!"  I love the reactions when you say you handmade something.

The Fondue Runway!

I also made a few more shirt skirts that I will model:

Very comfy!

That one will be a gift and so will these others:

Yeah, I'm not modeling these but you get the idea!

On the striped one, I took it in about and inch on each side then made the casing for the drawstring.  I would have done the same on the pink one about, but it had these cool side pleats, that I would have lost if I took it in.

Side Pleat - Cool!

Again, I got these at a thrift store and/or Goodwill.  They each cost under $5, and the shoestring was about $2 for two pairs.  I pick the shirts for their pattern and fabric quality.  For example, if you pick a white button shirt, your undies will be seen through it, unless that is the look you are going for.  I hold my hand under the shirt when shopping.  If I see my hand, then it is a no-go.

Have fun and good luck.  Let me know how you make out.

Sunday, March 13, 2011

Sweater Purse 4.0

This is my fourth installment of the Sweater Purse.  For those of you that have not read a Sweater Purse post yet, I took regular wool sweaters and washed them in hot, soapy water until they shrank.  This created an impermeable fabric that can be cut without fraying.  The technique is called felting.  It seems like I have made a hundred of them, but I think I have made only about eight (8) of them so far.  Each one takes on a character all their own.  See Sweater Purse 1.0 to see how I did the actual felting.

This purse will be made from a sleeve from a gray J. Crew sweater.  I know, it seems like a sin to cut up a J. Crew sweater, but you make whatever sacrifices are needed to get the job done!  I think I got this sweater at a thrift store in Tampa for about $1, so I don't feel so bad cutting it up.

Cut off sleeve - one purse coming up!

So, for this purse, I will use a sleeve, my chic lining, a ring I took off an old purse and a purple zipper.  I did not use the entire sleeve, just a portion of it.  My chic lining is lining that I got at a yard sale for cheap and I'm using it on everything.  The ring I got from a purse that I tore apart for the hardware, see Chunky Cuff Bangles post, and finally a purple zipper that I had in my craft stash.

Rotary cut the sweater

I will use the left portion of the sleeve that you see in the above pic.  I also will use one of the little strips for something that is coming up.  The rest went back into the sweater scraps bag.

I squared-up the sleeve part but left it sewn as it was.  I turned it inside-out and sewed the bottom closed.

Sweater and lining

Then I measured the sweater part and sewed a matching lining section.  I turned the sweater back so the right side was out and then turned the lining inside-out and fitted it into the sweater.  I then used a zig-zag stitch to attach the lining to the sweater.  I then hand stitched a stitch in each corner from the inside of the purse to anchor the lining inside the purse; to keep it in place.

The lining is in!

I figured I would adorn this purse with a zipper rosette.  Using zippers for fashion and not for zipping has been in trend lately so I wanted to try something with it.  I went searching online and came across a tutorial on the zipper rosette.  There are several blogs out there dedicated to crafting, so I chose to make mine look like the one from Scraps to Beauty by Zandra.  My zipper was not that long so I took it apart and sewed the two parts to form one long zipper half.  (Technically one whole zipper could make two zipper rosettes).

This is where my little sweater strip comes into play.  By following Zandra's tutorial, it actually started looking like a rosette!

Stitch each step

I had a brain freeze a few times trying to ensure that the zipper teeth were facing the right way.  But, I ended up finishing it up so it looked nice.

How cute!!  Thanks Zandra!

Now, the large ring is going to be the handle on my purse.  I folded over the front edge to cover a portion of the ring and pinned it down.  I hand sewn the flap down.  This sounded easier than it was, trust me!

Ring, ring...who's there?

Once I attached the flap over the ring, I needed to figure out how to close this purse.  As it currently was, it was flapping wide open.  I ended up using a large eye-hook.  At first I put it on backwards, so I unstitched it then did it right.  I then trimmed the gray sweater strip that held my rosette and hand stitched the rosette onto the front of the purse.

Completed sweater purse

The closure on this purse may need to be reconsidered.  I was sober and was having a hard time latching it, so if I was inebriated in anyway, there is no way this was closing.  I will work on that with my friend to see what she wants to do.  She sews too, so she may have already fixed it.

Modeling the purse

Here is a pic of the sweater purse being modeled at the birthday/housewarming party.  This is also the party where I wore my diamond studded Chunky Cuff Bracelet that got some attention (I'm the one in green).  I cheated on my no-booze diet and had a few appletinis to celebrate.  We had a blast!!

Wednesday, March 9, 2011

Craftolution Update - Organize

So, it is March and it appears as though I am not working on any of my Craftolutions.  Untrue!  I just have not been blogging about them.  Let's first start with Craftolution # 1 & 2.  I wanted to organize my patterns and projects and start on some WIPs (Work In Progess); so this post is going to be a picture blog this time (you are probably thinking: "Yeah, she talks too much, anyway").  I first went to my craft closet and took stock of what was in there, yarnwise (I have other crafts such as sewing and misc crafts that I am not talking about here):
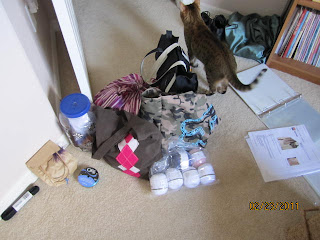
Stuff that is not organized

Above are the items that are in the closet that are not in a bin or a basket.  Then I have the items that are in a bin or a basket that appear to be organized, but it has been ages since I looked in them.  Which is what we have below:

All seems neat, but I have no clue what's even in them!

So, let's pull the bin apart and see what we got here.....

UFO#1:Toddler's Sweater

First, I can't get this picture to rotate, so it is sideways.  It is a toddler's sweater that I had thought would be fun with the bright colors.  This sweater was originally going to be for my friend Nicole's daughter.  Nic, this was going to be Allison's!  For those of you that don't know, Allison is 6.   Yeah, no longer a toddler.  This was only the back of the sweater, I never made it to the two front sides or the sleeves.  Hmmm......Next:
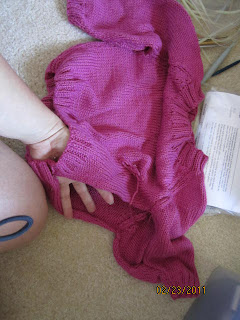
UFO#2:Baby Sweater

Again, this pic won't rotate correctly.  Now, this one I really have no excuse.  This is a baby sweater that all I have to do is seam the side and weave in the ends.  It's about 98% done.  Laziness, that is all I have to say about this one.  It has been in this state for about, oh, 5 or more years.  I know, I'm ashamed, but I stuffed it back in the bag it came in to deal with another day, just the same.

UFO#3:Ugly Purple Vest

This pic should speak for itself.  This is the ugliest item of clothing that I have ever made with my two bare hands.  But, this was my first crochet project; still not a good excuse!  This was an actual pattern I got from a magazine and it looked so cute in print.  It should have a crocheted flower near one of the shoulders.  I wanted to use an eyelash yarn to fringe the edges, but that went horribly wrong and I tore it out.  This yarn is very scratchy, too.  Just downright ugly.  This will never leave the yarn bin or the UFO list.  Next:

UFO#4:Irish Knit Sweater

This one I'm not sure if I can even call it a UFO (Unfinished Object).  I would think that it had to be put to needles to be considered a project, but alas, I have about 4 large skeins of this fisherman's wool from Lion Brand.  This was going to be my sister's Irish knitted sweater.  Kathy, I know I promised this to you about a decade ago...sorry!  Next...
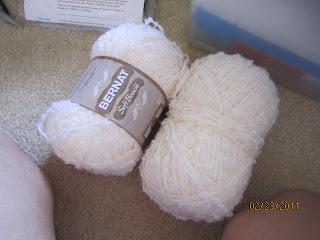
UFO#5:T-neck Sweater

These are two skeins that I have that were left over from a baby blanket I made for a friend and now I was using it for a T-neck sleeveless sweater.  It actually will have a cowl neck, but for some reason the pattern called it T-neck.  Whatever.  This UFO is in another bag that appeared in the first pic of loose items.  The UFO project is in the black bag and this reserve yarn was found in the bin.  Below is the rest:

UFO#5 Continued

This UFO is almost complete, too.  It will consist of a front and back and an added cowl neck.  No sleeves.  The front is complete and I am on the back.  I would say it is about 85% done.  I made a mistake and do not want to rip it out, so I placed it back in the bag until I can convince myself that nobody will notice that I did a purl row on a knit row.  I know it is there and I refuse to rip it out so I guess I refuse to work on it right now.  Stubborn, that is how I will describe my thinking on this one.

UFO#5:Beaded Sachet

This next one was from a beading class where you knit with beads.  I took the class at Knit 'n Knibble in Tampa back when I lived in St Pete, which was in 2006.  The goal was to knit a square with your initial in it as the front and then just knit another matching size square as the back and sew them together to become a sachet.  So the pink beads would have been the N and the blue beads would have been the background.  You have to string them on in a certain order before you begin knitting.  I strung them on incorrectly and so a pink or blue was not going to line up correctly.  Ha, so I ripped it out and placed it neatly back in a zip baggie.  I found out by reading an article just recently that you don't have to rip out everything, you just have to rip back to the beginning of the row and cut the yarn and fix the beads in the correct order and restart.  Duh, it sounds so logical now, but not at the time I messed-up.  Oh well.

Seaming Scraps

This one is not a UFO but scraps from another class from Knit 'n Knibble.  This was a seaming class.  Seaming is assembling separate pieces together so they look like they were meant to go together, like sides of a sweater and sleeves in the body.  This was a valuable class that I kept the scraps and refer back to them from time to time.  The red yarn is to simulate that when done correctly, you should not see the red once the tan pieces are seamed together.  Really cool.

Circular Needles

I keep all of my circs in this bin.  I used to store them in zip bags that I wrote the size on the bag, but I had to coil them up to fit them.  I read once that you should not keep them coiled but flattened or uncurled in some manner.  If they are curly, then you have to uncurl them by using very hot, almost boiling water and dip them in until they relax.  That may be ok for the metal ones to do that to over and over, but most of my "vintage" circs are plastic and I am afraid that they will melt one day.  (Who am I kidding, I have not used these circs in years.  I most likely could have left them in the zip baggies for years before I really needed them....).  Let's see what else is in this bin:

Bag-o-Patterns

This bag contained many patterns that I have made over the years.  It also contained all my double pointed needles.  I have said in past posts that I like Magic Loop so much better than using double pointed needles, that this was not such a great find.  But they are there in case I ever need them.  The patterns are what I need to organize in my pattern binder.  I have swatches, patterns, and yarn labels in this bag.  So I threw all of them in a pile and put them in another project bag with the 3-ring binder and plastic page protectors.

Craftolution #2 - Organize Patterns

For me, every project needs its own project bag.  This can be anything from a plastic shopping bag to canvas totes to reusable silky travel bags.  I am not too picky when it comes to project bags because I may not see them for awhile, so I can't be too attached to them.  But what bag I do place them in will determine the order in which I work on them.  Strange, but true.  My favorite bags will get worked on first, then the ones that end up in a plastic shopping bag may never get seen in this decade.  Sad, but true.
 
Extra Project Bags

Here are two extra project bags that I found in the bin.  My People's Saving tote that I got while working at a bank while attending college and a Mobic tote bag that I got in a 5K race promoting a drug for arthritis.  These are great totes for projects.  I will hold them aside for when new projects come in.

I packed up all these UFOs and placed them back in the bin.  I have decided not to work on any of these projects yet.  I am going to organize my binder and then get to the other pile of loose items.  I have my picnic basket of yarn and my loose items to still go through. 

I know you wanted to see me complete something in this post, but I actually did.  I got to see how I have progressed into projects and got to see what my thought process was when I chose these UFOs.  Remember, Craftolution #1 says that I can reuse yarn in a UFO for another project that I will actually complete.  That is a post yet to be written, but it is coming up.

I have to still organize the patterns, swatches and yarn labels, but I have at least gotten to the point where they are in a bag and considered a UFO.  That is more than what they were last month!