Sunday, November 25, 2012

Whitin Five Road Race

Happy Thanksgiving!

I am still up in Mass visiting my sister for Thanksgiving.  I leave on Monday.  In the meantime, we ran a road race on Thanksgiving.  My sister, Vince and I ran the 24th Annual Whitin Five Mile Road Race in Whitinsville, MA.


It was freezing, literally.  It was between 35-40 degrees out.  I had did a practice 3 mile run the Sunday before Thanksgiving and I got a serious side cramp that was painful.  I walked about a quarter mile home, then when it subsided, I jogged the rest of the way.  In sum: it was a horrible training experience.

Then my sister, Kathy and I ran a 5 mile loop in her neighborhood on Tuesday, which went very well.  I think it was because I did my stretching and deep breathing outside, in the cold, to acclimate my body and lungs.  It must've worked.

So, Thanksgiving day came and we got all suited up in some cold-weather exercise clothing and went out to the race.


My goal was to run the 5 mile race in 45 minutes or less.  Vince did it in just over 41 minutes and Kathy did it in just over 43 minutes.  I did it in just over 46 minutes.  I'm not upset about that, because it was cold and I did get a slight cramp at mile 3, but I'm not making up excuses!  I'm proud of my time.  It is just under a 9 and a half minute mile - That's better than many of my practice jogs at home!


Here is the preliminary time sheet posted after the race.  I came in at 504th place out of over 800 runners.

Once the race was run, we got some water and some coffee and was off to finish the Turkey Day lunch back at home.  It was fun, even though I complained about the cold, it was a great time!

Thank you, Kathy!!!  Love you for making me do these things!!

Sunday, November 18, 2012

Kathy's New Cardigan

During the summer, my sister Kathy came to visit and brought about 5 pullover sweaters that she wanted me to convert to cardigans.  She said she liked what I did for the Unbiased Cardi back in March.  I assume she wanted these for the upcoming fall and winter months (she lives in MA).  I also thought: It's still summer, I have plenty of time to get to them.

Well, here we are, November, and I have not worked on any of them!  Ugh, I always do this.  So, I am currently in MA now visiting the family for Thanksgiving, and I really had to get a move on with at least one of them.  Here is what I did for a v-neck green cabled pullover from Old Navy:


As you can see, she used to roll the sleeves.  I know this because there were dents at the arms, and I also tried it on and we are similar sizes, and it was too long for me.  So, you know I had to take my new skill and shorten the sleeves, like I did in Pink Cashmere


Basically, I snipped one stitch about where I wanted to add onto, and unraveled and detached the cuff of the sleeve.  I then unraveled it and with that very yarn, reknit a cuff.


Last time, I used straight needles to do this and then seamed up the arm again, this time I tried using double points so that I can knit in the round and not have to worry about seaming.  It worked great.


This is how much I shortened the sleeve.  That's a lot, huh?  I did the same to the other sleeve and then seamed up the small hole that remained from opening up the sleeve to unravel.


Alright, here comes the "cardigan" part.  Since there was a centrally placed cable, I simple cut up the middle of the cable.


Before I cut, with a sewing machine I stitched stitches on either side of where I was going to cut, just to hold the stitches in place so that they do not unravel as I'm trying to work with it later.  Then I cut.


So, it was cut all the way up.


I pinned the edges in.  I intended on sewing right down the middle of this cable half.


Next, I went out and bought toggle buttons.  This is a perfect sweater for toggle buttons! 


With the yarn that was left over from unraveling, I made loops.


I cut three strands and braided them.  I made a total of 4 loops.


I stitched the toggle buttons to one side and lined up the cables and figured out where the loops would go.  I poked through the ends of the braided loop and knotted them together on the back side.


I then trimmed the long strands.


Ladies and Gentlemen:  I am done!  Above and below is my sister modeling the new cardigan.


It fit her so well!  The length of the sleeves were just right.  She also just got her hair cut, so it was so sassy to have her new 'do with the new cardi.


I love it and she did, too!  She told me later that she wanted to ask me about all the sweaters that she left with me.  I'm sure glad that I was able to deliver at least one to her.  Although, not sure how long this one can keep her at bay from wanting the other ones.

Last thing, since I am on vacation in MA, freezing my butt off in 32-40 degree weather (FL is still in the 70's), I'm not sure if next week's blog will get written.  Just saying....

Sunday, November 11, 2012

Origami Sweater - Part 1

In my fog of knitting a few [hundred] Christmas gifts, I decided to start a project for myself.  Nothing like putting pressure on myself.  Meaning, I'm not done with my Christmas knitting yet, but I am throwing a sweater in the queue for myself...that I started already!

My local yarn shop (LYS), Brandon Yarn Boutique, was having a sale, so it was a perfect time to shop.  My intention was for myself, I won't fool anyone.  I picked a few projects that I had on my mind and went down there.  Luckily, only one panned out.

I am knitting the Buzios pullover from Berroco.  It was a free pattern from their website and it is knit with Origami (48% Acrylic, 19% Nylon, 17% Linen, 16% Cotton) in a green and blue blend called Turtle Bay.

Pic from Berroco website

As usual, I went down a needle size than what was recommended so that I could achieve the correct gauge.  So, I am using a size 7 circulars.  This sweater is knit in the round from the bottom up.


Here is the yarn.  It is actually not really yarn, but has beautiful colors.  It is several different types of string held together then wrapped with a black thread to bind it.  It's like working with a thin cord.  I don't see this sweater being all that warm, but since it is lacy and open, that was never it's intention!

I casted on and I was off!


The stitches in this sweater are a lace stitch and seed stitch.  There will be stripes of seed stitch alternating with the lace stitch.  I was joking with a fellow knitter and we were saying how seed stitch takes a lot of time.  I told her that this is half seed stitch and I said that this was a project doomed to be a UFO (unfinished object) before it even starts.  I was only joking because this yarn was pricey and it was not going to sit in the closet, unknit!

I'm actually chugging right along on it.  The seed stitch stripes are great for knitting while watching TV or chatting.  The lace stitch stripes, I need to pay attention and count the stitches after each row.  Lace stitching is made up of a lot of yarn overs (yo) and decreases, so you can miss one and not realize it until a row or two later.  Fixing lace is not fun.


I snugged a long pillow through the sweater so that you could see my progress.  From the bottom up, I knitted the seed stitch for 1", then there is the lace stripe, 2" seed stitch stripe, and another lace stripe, then a seed stitch stripe.


The lace stripe: A close-up.  To date, I have knitted a bunch more, I just have not taken any more pictures, but it is pretty much the same: alternating the seed and lace.  Since I am knitting in the round, there will be no seaming.  Once it's done, it's done.

But, since I'm still finishing up some Christmas knitting, this sweater I will work on in the background.  I have only a few more items to knit for gifts, but I'm dragging my feet on them.  One involves stranding, which is like using the yarn wrapping technique that you use for fair isle knitting (multi colors).  I do not have much practice with multiple colors.  We shall see.

Stay tuned for more fun stuff in the pipeline.

Related Links:

Sunday, November 4, 2012

Halloween 2012

Halloween is my favorite holiday!  I was going to be lame and just wear a costume that I had in my closet, but at the last moment, I decided to actually do one.  I got the idea for this costume at Martha Stewart's website while searching for Halloween decorating ideas.  I was Medusa...for a party on Saturday night, then was a Zombie Bowler on Wednesday night, which happens to be my normal bowling league night.

I started out by only needing a few supplies:
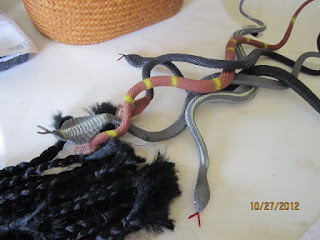
  • Rubber Snakes
  • Hair Extensions
  • White Twin Sheet
  • White and Black Cream Make-up
  • Tons of Bobby Pins
I first took a black wig and made my own hair extensions by braiding locks of hair and cutting them off the wig.


I used small rubber bands, the classic kind that knot your hair all up when you try to take them out.  I braided, banded the end, cut, then banded the cut end.  I ended up with like 20  hair extensions.  It took my over an hour to braid all that hair.


Once that was done, I had to make my toga.  I did a Google search for "make toga from sheet" and a ton of pages came up.  I chose one from WikiHow, which was so easy!


I laid the sheet out the long way and cut the length by like 16 inches.  When I practiced the wrapping, it was way long.  Once it was shortened, you take the sheet and place it around you from the back (like wrapping yourself in a towel).  Take the two corners and grab a bit below and keep one on one shoulder and wrap the other around and meet at the same shoulder and tie.  Really simple.  Check out the website for all the details.


Next was taking the hair extensions and snakes and weaving them in my hair.  The snakes were pretty good looking, considering I got them at the dollar store.


I started by putting my hair in a high pony tale.  I pulled some hair out around the edges of my hairline all around my head.  I braided these into small braids to mix with the hair extensions.  I threaded two snakes through my pony tail, between my scalp and the holder.  Then tightened the pony tail and made a bun with my own hair.  I used my own braids to anchor down the two initial snakes.  I then started using the hair extensions to wrap the snakes to my head with bobby pins.  Vince helped me wrap the snakes, 5 in all, to my head with the hair extensions.


It was heavy!  Once I had my snakes, toga and make-up on, I was ready to turn people to stone!


We went to a party on the Saturday night before Halloween.  Vince went as "Vinnie Guido."


In total, my costume cost $17.  Not too shabby!

But for work, the snake hair would be too much for me to wear all day and night.  Our bowling team decided to be Zombie Bowlers.  I bought a few more supplies:
  • Red Tights
  • Black Leggings
  • Red Long-Sleeved Thermal
I put on the red tights, then cut slits into the black leggings and put those on.  This made it look like my blood or my raw skin under the leggings.  I did not brush my hair and put a few random braids in there (my own, not the extensions) and sprayed it with white hair spray.  I did my make up so it looked bruised with the white and black cream make-up from Medusa and also rubbed some red lipstick on my face.  I wore my black bowling shirt with the red thermal underneath.


I even did my nails funky:


I got the idea from my new favorite website/blog: Honestly...WTF.  They are called Drippy Nails.  Hint: You use a toothpick.

Anyway, I had a fun Halloween, how about you??