Sunday, June 24, 2012

Pima Pullover - Part 2

I'm still working on the Pima Pullover from last week.  I could not have gotten this far without my sister Kathy's help.  She has explained every stitch to me and showed me how to connect the front and arms and, most importantly, where I'm inserting hook at the end of each row.  I find that the most confusing part, not the stitches or the pattern repeats, but how to finish and start the rows/rounds.

Last Morning with Kathy

We got as far as the shoulders, connecting to make the v-neck, finish one sleeve and start the second.  Kathy finished one sleeve for me so I would: A. know what to do on the rib part and B. cover some ground so I would not have so much to do.

I was hoping that this sweater would be completed by the time she left and I was really sweating doing it on my own.  I finally had a chance to re-start the sweater only today.  I was able to make some good headway:  I finished the second sleeve.

Half a Sweater

I tried it on to to make sure that it was still on-track for fitting well.

Yeah, it's fitting!

Awesome!  It is fitting and my second sleeve looks like the first sleeve that Kathy crocheted.  Seriously, I was worried that my sleeve would be looser or tighter and it would be ridiculous.  I'm giddy with excitement!

No time for celebration just yet, I need to keep crocheting my little heart out!  See you next week!

Related Links:

Sunday, June 17, 2012

Pima Pullover - Part 1

My sister is down from Mass visiting me for about a week.  I love it!  I took that time off from work and we have been busy everyday.  The first day she got here, we went to the local yarn shop, Brandon Yarn Boutique.  I had a crochet pattern I wanted to make while she was here.  (Between you and I: I'm not a crocheter and barely know what I'm doing).

Alex, myself, Kathy (my sister)

The project I want to crochet is an open-weave / mesh v-neck pullover from Lion Brand called the Persimmon Pullover.  It is an experienced crochet pattern...gulp.  I've already nicknamed it Pain In the A$$ pullover (PIMA, cute, huh?).

Lion Brand: Persimmon Pullover

I bought the softest cotton yarn: Ultra Pima from Cascade Yarns, which is 100% pima cotton.  Merriam-Webster dictionary defines pima cotton as a cotton that produces fiber of exceptional strength and firmness and that was developed in the southwestern United States by selection and breeding of Egyptian cottons.  It's first known uses was in 1925.


The color is called Cranberry.  It looks a bit lighter in the picture than it really is.  It comes in twisted hanks and you need to wind it in order to actually use it or it will become a complete rat's nest.  Fortunately, for Christmas, Vince bought me an umbrella yarn holder and ball winder.  Sweet, huh?


That is my sister winding one of the balls for me on the winder couple.  Once wound, it looks like this:


So, I have to be good and do a gauge swatch.  I used a size H hook to crochet the swatch, with my sister's help.


This yarn is so nice to work with.  I'm glad I went with pima cotton.  I felt comfortable enough to start a foundation chain, which is some fancy chain that is like a increase chain of some sort.  So, here comes my sister's help right out of the gate.  I get stuck on the first 2 rows, which is discouraging, but I have to keep on trucking because she is down only for a short period of time.

Once those were completed and I'm working the pattern stitch for the bulk of it, I'm feeling a bit more at ease.  She also suggested that I take out Purl to help me.  Remember Purl, my string doll?


Since I took her out of my accessories bag, I've been doing much better.  Phew!

Ok, so this pullover is crocheted from the top-down, which I find interesting.  I have not made anything like that before.  I love trying new techniques (aka biting off more than I can chew).  Hehehe.


The above pic is showing what has been done up to this point.  It is the shoulders and back.  Once it is on, then the open weave will be more visible.  

Well, if I'm going to even come close to finishing this while she is here, I need to stop typing and start hooking!  See you next week.

Related Links:

Sunday, June 10, 2012

Sleeveless T-Neck - Part 1

Most crafters (knitters, crocheters, cross stitchers, beaders, seamstresses, etc) have projects that are not complete.  This could come in many categories such as: supplies bought but never started, half done, and almost done but something is preventing you from finishing.  This sweater project fits in the "almost done" category.   It has been in this stage, probably, oh, since 2007.  So, what, 5 years?  Yes, it has been sitting in the dark for 5 years! 

Natural roll at the bottom edge

I'm sure I'm not alone, but not sure who will be admitting this over the internet?  I don't care, no problem, let me start!  I am just happy that I am finally getting to it.

Here are my reasons for delaying it:
  •  Seemed like a nice project, but something better came along, so I put it aside to work on that.
  • I picked it back up in those 5 years, but, again, something better came along, so I put it aside.
  • I picked it up last year and realized, about 6" of knitting ago, I made a very noticeable mistake.
    • That was when I put it back until I had the courage to do what every knitter hates:
Ripping Out! 
 
Nobody likes ripping out hours of work.  But, I'm in a stash-busting mood, so I'm going to figure this problem out.

Let me introduce you to the project first, though.  It is supposed to be a sleeveless t-neck (cute way of saying turtleneck, I guess).  I got this pattern from the Vogue Knitting International,  Holiday 2004 issue.  I think I may make this a cowl neck instead.  That is more in vogue than a turtleneck (and I'm in Florida, so who the heck wears turtlenecks down here, anyway??)

Boucle yarn

It is being knitted with Bernat Soft Boucle (98% Acrylic/2% Polyester).  It was leftover yarn from a baby blanket I knitted a friend.  The word "boucle" comes from the French for curly.  This yarn is spun so it forms loops at various intervals.  I never knew how to pronounce this word so I looked it up:  boo-clay.   Oui cheri,  Now we can speak French!

The "mistake"

Above is what I have done so far.  I'm working on the second side and that is where the mistake lies.  I have circled it in red.  It a about 15 sts or so of purl on a knit side.  One may not be able to notice it, but I knew it was there and would never had worn it if I finished it like that.  I claim that I was knit-sleeping.

I thought of quick fixes: double stitch a thin ribbon around the body at that row so it would hide it or threading a ribbon through it so it would tie into a cute bow on the side.  Eh, in the end, I figured it would just be best to fix the darn thing.  But I am not ripping it out.  I am going to dropstitch to each wrong stitch and pick them back up.


First: Transfer the good stitches to a stitch holder and placed a stopper at the end of the needle.

 
Second: Undo the stopper and pop one stitch off the needle.  Undo that stitch.  I have the crochet hook there so you can see that it is a live stitch.  I am using the hook to help undo each stitch in each row.


Third: Undo that stitch all the way down to the mistake and one stitch further (for good measure).  The hook is where the bad row of stitches are.  Yea, it's pretty far down.  I call the yarn strands that are left behind a "rung", like rungs on a ladder.


Fourth: To make a good knit stitch, you put the hook through the live loop (the one that you just undid down the length of the sweater) from front to back.  Take the next "rung" that is in the row above it and hook it.  Pull it through the live loop from back to front.  You just made/picked-up one good knit stitch.

Fifth:  Re insert the crochet hook in that new live loop and repeat the fourth step all the way back up the ladder.

Sixth: Once all stitches have been fixed, then transfer all the stitches on the holder back onto the needle.


Finally ready to tackle this sweater!  All the mistake stitches have been fixed.  Not sure if this saved any time, but I feel better that I did not undo all my hours of work.  It took hours to fix the stitches this way, but I can say it is now fixed.

Sunday, June 3, 2012

Cotton Wrap

I'm doing what we knitters call "stash-busting" with this weeks project.  Stash-busting is taking yarn that you already own and making something with it.  It could be yarn that was bought but never used or it may be leftover yarn from a completed project.


In this case, it was leftover yarn.  I made a sweater with it back in 2007 and had a lot leftover.  I always buy too much.  The sweater had it's issues, but it came out nice enough that I do wear it.


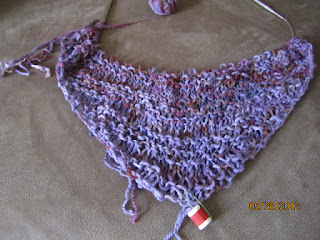
This yarn is a hand-dyed cotton that I bought when I visited Mass one winter season.  It is a cotton yarn that when it was spun, it was done in a way that makes the strand thick in some places and thin in others; very cool.

I chose to knit a small shawl that I am calling a wrap.  It came from the Holiday 2011 issue of Knit Simple.  This is not the suggested yarn, so I had to wing it a bit.  The original pattern called for a silk yarn that had beads and sequins attached to it. That sounds very pretty, but not within my budget for this week.


The wrap is knitted by casting on 3 sts and increasing at the beginning of each row to create a triangle.  I used a size 13 circular needle to accommodate the large number of sts it will have when finished.


The yarn is a purple/brown/pink variegated yarn, which you can see a bit better in the above pic.  This worked up pretty quick because it was just knit and purl back and forth.


Since the original pattern with the beaded and sequined yarn was a fancy idea, I knew I had to put a bit of pizazz into this one.  She's a bit of a plain Jane.  What I decided to do was to make fringe.


I cut strands about 12" long, held two together and placed it at every end-of-row hole.  It came out very chic, in my opinion.  My new summer cotton wrap:


Stash-busting was fun.  You can stash-bust too, by seeing what supplies you have on-hand (which could be fabric, beads, ribbon or anything that is leftover) and make something nice for yourself.  Go ahead - Stash-bust!