Sunday, November 11, 2012

Origami Sweater - Part 1

In my fog of knitting a few [hundred] Christmas gifts, I decided to start a project for myself.  Nothing like putting pressure on myself.  Meaning, I'm not done with my Christmas knitting yet, but I am throwing a sweater in the queue for myself...that I started already!

My local yarn shop (LYS), Brandon Yarn Boutique, was having a sale, so it was a perfect time to shop.  My intention was for myself, I won't fool anyone.  I picked a few projects that I had on my mind and went down there.  Luckily, only one panned out.

I am knitting the Buzios pullover from Berroco.  It was a free pattern from their website and it is knit with Origami (48% Acrylic, 19% Nylon, 17% Linen, 16% Cotton) in a green and blue blend called Turtle Bay.

Pic from Berroco website

As usual, I went down a needle size than what was recommended so that I could achieve the correct gauge.  So, I am using a size 7 circulars.  This sweater is knit in the round from the bottom up.


Here is the yarn.  It is actually not really yarn, but has beautiful colors.  It is several different types of string held together then wrapped with a black thread to bind it.  It's like working with a thin cord.  I don't see this sweater being all that warm, but since it is lacy and open, that was never it's intention!

I casted on and I was off!


The stitches in this sweater are a lace stitch and seed stitch.  There will be stripes of seed stitch alternating with the lace stitch.  I was joking with a fellow knitter and we were saying how seed stitch takes a lot of time.  I told her that this is half seed stitch and I said that this was a project doomed to be a UFO (unfinished object) before it even starts.  I was only joking because this yarn was pricey and it was not going to sit in the closet, unknit!

I'm actually chugging right along on it.  The seed stitch stripes are great for knitting while watching TV or chatting.  The lace stitch stripes, I need to pay attention and count the stitches after each row.  Lace stitching is made up of a lot of yarn overs (yo) and decreases, so you can miss one and not realize it until a row or two later.  Fixing lace is not fun.


I snugged a long pillow through the sweater so that you could see my progress.  From the bottom up, I knitted the seed stitch for 1", then there is the lace stripe, 2" seed stitch stripe, and another lace stripe, then a seed stitch stripe.


The lace stripe: A close-up.  To date, I have knitted a bunch more, I just have not taken any more pictures, but it is pretty much the same: alternating the seed and lace.  Since I am knitting in the round, there will be no seaming.  Once it's done, it's done.

But, since I'm still finishing up some Christmas knitting, this sweater I will work on in the background.  I have only a few more items to knit for gifts, but I'm dragging my feet on them.  One involves stranding, which is like using the yarn wrapping technique that you use for fair isle knitting (multi colors).  I do not have much practice with multiple colors.  We shall see.

Stay tuned for more fun stuff in the pipeline.

Related Links:

Sunday, November 4, 2012

Halloween 2012

Halloween is my favorite holiday!  I was going to be lame and just wear a costume that I had in my closet, but at the last moment, I decided to actually do one.  I got the idea for this costume at Martha Stewart's website while searching for Halloween decorating ideas.  I was Medusa...for a party on Saturday night, then was a Zombie Bowler on Wednesday night, which happens to be my normal bowling league night.

I started out by only needing a few supplies:
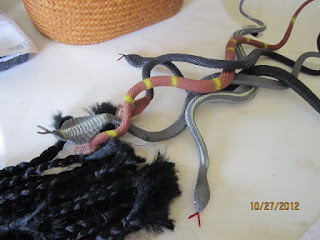
  • Rubber Snakes
  • Hair Extensions
  • White Twin Sheet
  • White and Black Cream Make-up
  • Tons of Bobby Pins
I first took a black wig and made my own hair extensions by braiding locks of hair and cutting them off the wig.


I used small rubber bands, the classic kind that knot your hair all up when you try to take them out.  I braided, banded the end, cut, then banded the cut end.  I ended up with like 20  hair extensions.  It took my over an hour to braid all that hair.


Once that was done, I had to make my toga.  I did a Google search for "make toga from sheet" and a ton of pages came up.  I chose one from WikiHow, which was so easy!


I laid the sheet out the long way and cut the length by like 16 inches.  When I practiced the wrapping, it was way long.  Once it was shortened, you take the sheet and place it around you from the back (like wrapping yourself in a towel).  Take the two corners and grab a bit below and keep one on one shoulder and wrap the other around and meet at the same shoulder and tie.  Really simple.  Check out the website for all the details.


Next was taking the hair extensions and snakes and weaving them in my hair.  The snakes were pretty good looking, considering I got them at the dollar store.


I started by putting my hair in a high pony tale.  I pulled some hair out around the edges of my hairline all around my head.  I braided these into small braids to mix with the hair extensions.  I threaded two snakes through my pony tail, between my scalp and the holder.  Then tightened the pony tail and made a bun with my own hair.  I used my own braids to anchor down the two initial snakes.  I then started using the hair extensions to wrap the snakes to my head with bobby pins.  Vince helped me wrap the snakes, 5 in all, to my head with the hair extensions.


It was heavy!  Once I had my snakes, toga and make-up on, I was ready to turn people to stone!


We went to a party on the Saturday night before Halloween.  Vince went as "Vinnie Guido."


In total, my costume cost $17.  Not too shabby!

But for work, the snake hair would be too much for me to wear all day and night.  Our bowling team decided to be Zombie Bowlers.  I bought a few more supplies:
  • Red Tights
  • Black Leggings
  • Red Long-Sleeved Thermal
I put on the red tights, then cut slits into the black leggings and put those on.  This made it look like my blood or my raw skin under the leggings.  I did not brush my hair and put a few random braids in there (my own, not the extensions) and sprayed it with white hair spray.  I did my make up so it looked bruised with the white and black cream make-up from Medusa and also rubbed some red lipstick on my face.  I wore my black bowling shirt with the red thermal underneath.


I even did my nails funky:


I got the idea from my new favorite website/blog: Honestly...WTF.  They are called Drippy Nails.  Hint: You use a toothpick.

Anyway, I had a fun Halloween, how about you??

Sunday, October 28, 2012

Pink Cashmere

Earlier this month, we had a yard sale.  The whole Fishhawk Ranch community had one.  So you can put your stuff out, sell some of it, and then go around and buy other people's stuff.  Ha.

Anyway, Vince always goes around and I don't.  This time, my friend Cathy came over and we worked the yard sale for several hours, then put Vince in charge for a bit.

We went to one where I bought a pretty pink Anne Klein 100% cashmere sweater for $2.  I later saw that the back of the lower arm had a tiny food stain on it.  No big deal, the sleeves were too long (as usual) so I wanted to try shortening them.  This is going to be called my:

"$2 Experiment"

I read that this is possible, but have not officially tried it myself.  I am going to attempt to unravel the sweater sleeve and pick-up the live stitches on my straight knitting needles and knitting with the unraveled yarn, a new edging.  I tried it on to see how long the sleeves really were.


It was / still is a pretty sweater:


I first measured the sleeve length and figured I would want it about 7" shorter.


I then opened the sleeve at the seam.  I then made a cut a little lower than where I wanted the new edging to be.  I cut one strand along the edging.  I held my breath; I really didn't know what I was doing.  And then to be doing it on a nice cashmere sweater.  I must be nuts!


The one cut allowed be to unhook this end of the strand from each loop by pulling gently at each stitch until I made it across the row.  The bottom of the sleeve has been separated from the rest of the sweater.


In the above pic, I have already started to unwind the lower portion of the sleeve and ball it up.  Yes, that ball of yarn is the bottom portion of the sleeve.  Cool, huh?

That pic also shows the rest of the sleeve, if you look closely, you can see the loops of the live stitches.  These are the loops that I will pick-up on my straight needles.  I chose a size 2 needle, because this was a fine knit sweater, so I estimated the needle size.


The live loops have been picked-up.  This was not as bad as I thought it would be; the stitches stayed open so I could easily insert the tip of the needle through them.  I made sure that the strand that I took out was near the last stitch I picked-up.  I need that to make sure I'm on the correct side. 

I then took that ball of yarn that I wound from the bottom portion of the sweater and did 1 purl row and then 3 rows of k1, p1 ribbing edge.  I then bound off.


I seamed the sleeve back up and it was done!  

It worked!

I was so stoked that I did not ruin the sweater.  I was getting nervous while I was unraveling that first row to separate the sleeve from the sweater.  I repeated this for the other sleeve.


I now have two small balls of cashmere yarn to do with as I please.  How nice!


Here is me modeling how lovely this sweater fits now.


I have another sweater to do this with.  I bought that a while back and now feel the confidence to go ahead an try this technique on it.  Another set of close-ups of the sleeve edging.


I love it!  I'm going to do this to everything now.  A long sleeve will not prevent me from buying a garment now.  Awesome!

Sunday, October 21, 2012

NY City Cowls

One of my friends is going to NY City to visit her sister and her husband.  I was invited to go, but other financial commitments (ahem, a sick cat) has prevented me from going; this has made me very sad because it was going to be a Sex in the City sort of weekend (minus the sex, hehe).  In other words, a girls weekend in New York City.

When you live in Florida, you tend to get rid of your warm weather clothing a little bit each season.  It comes to a point where you barely own a jacket.  As a "Sorry-I-Can't-Go-But-Thanks-For-Asking-Me" gift, I thought I would knit up a snuggly cowl for her to wear while she is up in NY.

The pattern comes from the Knit Simple Holiday 2011 issue designed by Vickie Howell.  I then chose chunky baby yarn.  Never underestimate the greatness of baby yarn!  I chose Patons Beehive Baby Chunky in a light green called Quicker Clover (70% Acrylic/30% Nylon).


I used size 10 straight knitting needles and about 1.25 balls of yarn.  I knitted several rows of a k2, p2 ribbing to start.


Then I started to cable.  I had never done a cable quite like this and I thought something was wrong at first, but once you do a few, it starts to look very nice.


Here is a close-up of the cabling:


The pattern instructs you to either sew adornments on the folded cowl or make buttonholes and sew buttons on.  I chose the button route.


I chose some nice bling buttons for the NY girl in her.  I situated the cowl and figured out the placement of the buttons and sewed them on.


I buttoned it up and it is complete!


I had to try it on and test drive it for a bit while watching TV.  In the words of TV Guide: I Cheer it!


This should keep her warm as she sees the sights with her sister...Have fun, Cathy!

I thought this came out so nice that knitted up a second one to give to another friend for her birthday.  I chose black bling buttons for her.  Happy Birthday, Kj!


Send me pics of you guys wearing them...I'll post the pics!

Sunday, October 14, 2012

Sari Bracelet

I went online to search for some cute crafts to complete in a short amount of time.  I have been exclusively knitting and I needed a break from it.  First, I checked out Pinterest, then Martha Stewart's Living.  I thought I found something on Martha's website but the directions were terrible, so I just did a good old-fashioned Google search and found something great.

I followed a link to make macrame bracelets!  Macrame is back, Ladies!!

Ok, well, the fad might not have caught on again, but I am willing to give it a go.  This project was found on the blog, Honestly...WTF.  The writer is a very crafty gal and a fashionista whom goes by the name of Erica.  I cannot seem to find her Bio on the blog, but she apparently has 23,000 followers on Twitter.  Go Erica!

My project will use:

 
  • A defunct earring ring
  • String (like a stiff yarn or hemp)
  • Sari ribbon yarn
  • Scissors
  • Tape
  •  Sewing needle


It is essentially a square knotted bracelet with an adjustable knotted slide.  I will show the highlights on my blog, but full instructions are on Honestly...WTF.  She does a great job showing pics of each and every step, that it would be me reinventing the wheel if I were to step-by-step it for you.

First, you are instructed to cut 5 lengths of string.  I cut 3 of the string and 2 of the sari ribbon yarn.  You also need a ring or something to anchor your string to so that you macrame out from the ring.  This will be the centerpiece of the bracelet.  This is where my earrings come into play.


I used the middle-sized ring, but I may have to also use the small one.  My wrist is so tiny, that the middle one is even too big.  But, I started with the middle one and had to follow it through to the end with it.  No problem.

Second, you tie your 2 strings to the ring so they are on opposite sides of each other, tape down one side, and start forming square knots with the sari ribbon yarn over the strings attached to the ring.


This sari ribbon yarn is very decorative and gorgeous, that I thought this would be so pretty as a bracelet.  You are knotting until it is just shy of half distance around your wrist.  Repeat on the other side.

You thread the extra string through the knots and tie it off, but I kept them long so those ribbons will hang once tied.

Third, you are instructed to make the adjustable knot.  You are using scrap string to keep the strands in the shape of a bracelet and you are square knotting again over the strands.  Tie off as in the bracelet square knots.


Fourth, adjust the strands on either side so your hand can just fit through the bracelet.  Tie the loose strands in a knot, separately, on each side near the adjustable knot.


Lastly, try it on and tighten the strings on both sides to center the ring on your wrist.  Trim away the excess strings after the knots.


Ladies, you are all done!  Now go to Erica's blog and make yourself a dozen of these using anything and everything that would work.  This was quick and fun to do.  The creative possibilities are endless and these would make great stocking stuffers for family or your friends.

Let me know if you do make any!  I'll post your pics!

Sunday, October 7, 2012

Bean(ie) Town

This is another installment of the Knitapolooza that I happen to be in, knitting for Christmas.  The pattern this week is the Bean(ie) Town.  Bean(ie) Town is a beanie cap that can be knitted as a skull cap or a slouchy beanie.  For two little boys up in Rhode Island, I went with the skull cap version. 


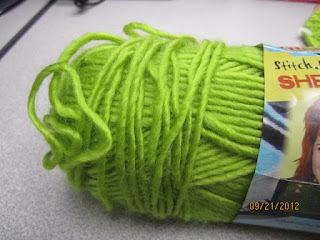
This pattern came from the Knit Simple Fall 2012 issue.  The yarn I am using is from a new line of yarn from Vickie Howell for Caron International/Bernat called Sheep(ish).  It is 70% Acrylic/30% Wool.  It is pretty nice stuff, considering it is affordable and you can buy it at Michael's and Joann's. 


I am using a size 7, 16" circular needle and am joining in the round.  This beanie hat will have no seams: cool!  I am knitting it up just as the pattern states and hopefully this will fit one of the kids I am knitting it for.


The basics of this pattern is a k2, p2 ribbing and at certain points, the ribs cross.  It is done like you were doing a cable, where you move stitches to a cable needle and either hold in front or the back of your work, then knit or purl the stitches from the cable needle to create the crossing-over look.  So far, in the above pic, I have only gotten the ribbing and have not gotten to a cable yet.


I'm getting there!  I placed the hat over a small mixing bowl to pretend it is on a head, to show the cabling pattern.  I brought this project to the beach last weekend and got a lot done on it.  I did do a modification to the pattern.  The first set of cables were normal, no biggie, but then the second cable that was supposed to go in the opposite direction was kind of crazy.  It twisted into nowhere. 


In the above pic, you can see that it twists to the right, but it does not really connect with anything.  Eh, needless to say, I ripped out to 2 rows below that cable and started again.  For the cabling, I repeated the left-twisting cable, but just staggered it so it twisted with a different set of ribs. (see the pic with the bowl, above two).


When I got to the crown of the cap, I had to switch over to double points (double pointed needles) because to shape the crown I was decreasing the number of stitches on the needle and the circulars would be too long to continue knitting.  Double points allow you to knit very small circumferences.


Here it is: complete!  I had two of these to do so here is the second one:


Those are two more gifts I can cross off my list.  Once I am done, I am going to knit myself something.  I can't wait.